Sunday, October 31, 2010

My 100th. Post!

When I first began this blog I didn't know how far it would go and how long I'd last doing it but here it is, post number 100.  Never know how many readers I actually have but since there has been a fair amount of feedback, questions, and comments it's been worthwhile to me.  Hopefully the goal of sharing my woodworking trials and tribulations have encouraged others to try the craft.  Learned a long time ago that you can't get anywhere if you're just sitting on the couch!  Yesterday Diane and I went to the Civil War reenactment at Spring Mountain ranch. I had my sample pistol case and flyers to see if I could generate some potential commissions and she had her camera to see if she could capture some good images to use as reference material for future paintings.  Other than the occasional wind gusts the weather was pretty nice and we made some contacts.
Earlier I'd mentioned that I have a couple of projects in the works.  One of them are the two frames I'm currently gilding and one of those is just about complete.  The other I'll try to improve what I did on this first one -- it's a definite work in progress this business of gilding.  The other is the box to hold my cabinet scrapers, files, burnishers, etc.  Here's how it looks at this time:


Scraper Box in Progress
This a practical project and it's allowed me to experiment with some techniques as well.  First off is the carving.  The profile of Ali is pretty self explanatory but now I've added her paws.  They're a little over sized but  were added so that I could get a grip on the sliding top to open the box -- Ali agreed to pose for them.  To finish this box I plan to use a new process I read about that (hopefully) should be  a durable one for a dining table top.  The hand rubbed finish I've been using for years on my furniture is not as durable as I'd like for that and  requires some maintenance.  Supposedly, this finish will appear as a hand rubbed one but uses gel polyurethane rather than my concoction of linseed oil, turpentine, and varathane as a final coat.  I'll keep you posted.

Wednesday, October 27, 2010

What's New in the Shop

Now that I've had the chance to see my new grandson life is back to normal -- sorta!  I don't know if I'll ever become a proficient gilder, it's a difficult art but I keep plugging away.  I've just used up 11 of the 20 books of gold and do have quite a number of frames to show for it.  While in Seattle, I visited Charles Douglas at his Gilding Studio.  We had a nice visit and I would like to take one of his 3 day workshops to get more one on one instruction on laying the gold.  Practice, Practice, and more Practice is what it will take.  A pack of 22 kt. gold is about $400.00 and has those 20 books.  Although it's expensive, the gold is really a minor part of the operation.  The preparation of the frame with 6-8 coats of gesso followed by the same number of coats of bole (clay), not to mention any carving I might try to throw in is where the cost comes in.  Thankfully my labor is pretty reasonable, truth be told I couldn't afford myself!  Here is a picture of two small sample pieces I'm doing at the same time, they'll be used to experiment with the toning process once I complete the two 16 x 20 frames  that are in the works.
It's hard to tell but the cut off piece on the left has some combed gesso, a process I've always wanted to try.  Just as the name implies, I made the gesso fairly thick and then used a comb to create the texture, it should make for an interesting frame.  The longer piece has composition ornamentation on it and is what the frame I'm almost done gilding has.  The molding is modified from our stock and then I steamed on the "fish scale" pieces all the way around.  It's destined for a painting Diane did based on a photo she took at Pike's Market when we visited there last year.  Anyway, once it's done I'll post it on the blog.

Monday, October 25, 2010

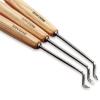
My Review of PFEIL "Swiss Made" Undercutting Tool Left


Just Right!

By Woodworks by John from Las Vegas, NV on 10/25/2010


5out of 5

Pros: Work in restricted space, Works Effectively

Best Uses: Small detailed carvings

Describe Yourself: Professional

Primary use: Personal

I found these very useful for the small areas that are carved into my picture frames. The "dog leg" design keeps the handle out of the way and allows you to cut to your design or stop cut. They make a strange sound as you cut because of flex in the shaft where it makes the "dog leg". My designs are low relief but these chisels could reach down into a pretty deep space. A little tricky to sharpen but I'm pleased with the set.

(legalese)

Saturday, October 16, 2010

One of Two Projects in Progress

Carved Lid for Tool Box
Since returning from the OPA show in Wyoming I have two projects in progress, this is one of them.  Carving is an aspect of woodworking that I want to hone my skills on and create something other than picture frames.  Picture frames demand fairly small carving just because of their size.  Any project is more interesting if there is an end purpose and that's what you see here.  I need a place to keep my cabinet scrapers and related items like files and burnishers.  As it is, they are kept in a couple of different places in the shop which is pretty inefficient! This box will be my solution to that.
It's made of materials I had left over in the shop and it's the finger jointed, Oak box that you see in the background.  The lid slides in and is made of Cherry that has been resawn and turned into a book matched panel.  The image is of Ali, my buddy -- she's an Oriental Shorthair and this is how she spends much of her day, splayed out on top of the couch watching over the house.  She's a really cool cat but like my father in law says: "jeez, don't get him started on that d#%&* cat!".  Suffice to say she's truly captured my heart and made me her chosen one.
The other thing I want to experiment on with this box is a finish I've read about that is better suited for dining tables.  Less maintenance than the finish I've always used.  Basically it's several coats of polyurethane brushed on, then lightly sanded and followed by hand wiping gel polyurethane onto the surface.  Although I stay away from surface coatings and prefer to hand rub in oil and my own top coat concoction this should stand up better to a surface like a dining table that is subject to spills.  Time will tell and I'll share the results.