Saturday, September 17, 2011

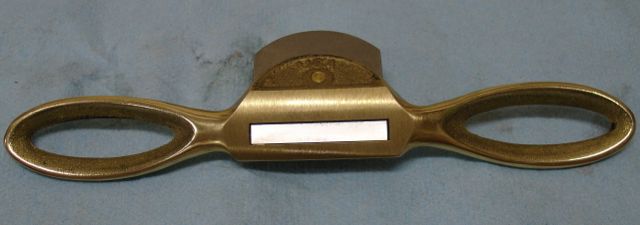
Lie-Nielsen: Small Bronze Spokeshave

Beautiful Tool !!
     In the hand tool class I'm teaching, we're using a variety of tools and my goal is to expose the students to methods of work that are an alternative to using power tools. Not that there's anything wrong with power tools, it's just a whole other experience doing the work quietly, listening to the sound the cutters make as you apply them to the wood.  So much to learn by listening, the wood does talk to you and let you know whether or not your technique is correct, your tool is sharp, and the cut is just so.
     One of my favorite tools is the spokeshave.  Just as the name implies, it's original use was to form the wooden spokes on wheels for wagons and later cars.  I showed the class my old Stanley version and also the one I made myself so they could experience how these tools work.  Our project has a gently curved, bandsawed edge and the spokeshave is ideal for smoothing it out to a fair curve.  Only problem is where there is a slight inward cove -- for that you need a spokeshave with a radiused edge.  I've had my eye on this spokeshave for quite some time so in the interest of educating my students decided to buy it, sounded like a perfect excuse to open my wallet!
    Lie-Nielsen is a custom tool maker located in Maine.  Their tools are beyond compare in quality, and they have customer service where you actually talk to a person!  They will answer questions or give you advice on how to best sharpen, select, or use one of their tools.  Here is a  link to their website so you can see them for yourself.  Their tools are ready to use, right out of the box.  It is recommended that you hone them for optimum performance.  Most other manufacturers tools require more preparation than theirs do.  For cutting tools to really work well, the backs need to be perfectly flat, the sides should be parallel, and the casting that holds the blade should be flat as well.  Preparing this blade took very little time plus there is a video on YouTube, made by Lie-Nielsen that showed the best method to prepare the blade.
     In the class, we've discussed how a sharp tool will improve the quality of the work.  It's also much safer to use a tool that is sharp compared to forcing a tool to do the work that isn't sharp.  What you look for as you sharpen is the scratch pattern made by the stone.  I use Norton waterstones and started out with a 4000 grit and ended with a final honing on an 8000.  Below is a photo essay showing the progression of the sharpening process, you can see by the scratch pattern that there is a small area near the center of this blade that needed attention:
After 3-4 Passes
More ......
..... keep going
Almost there


See the Reflection?
     That's what you're looking for whenever you sharpen a tool.  Doesn't matter if it's a spokeshave, plane iron, or chisel.  The scratch pattern is so fine it'll have a mirror finish.  You remove the burr created by sharpening from the back, install the blade, and you should be good to go.
Setting up and Practicing

Blade Installed

Wednesday, September 14, 2011

Ready For Delivery

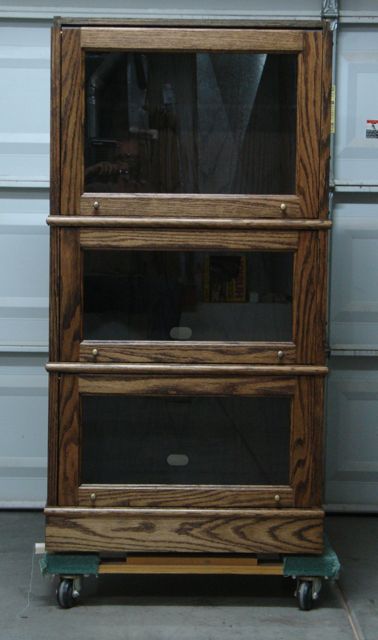
     I'm happy to say that the Faux Barrister Bookcase is ready for delivery however; the weather is just not going to cooperate!  After bemoaning how hot is was last month and the delays in gluing up, now it's raining and I really don't think it's wise to give it the water test.  I spoke with my clients last night and they're excited to get their piece but patient too.  Here's a couple of pictures that I took in the shop last night, unfortunately I couldn't assemble the piece by myself so for now we'll just have to use our imagination as to how it'll look as one piece.  I'll definitely take my camera and try to get some photos in their house.
     There's quite a difference in the overall appearance of the unit with the doors, knobs, and glass installed.  The oval shape you see is the access for electronic cables, there is access inside of each unit to allow flexibility. It's pretty obvious now but once the unit is placed into the media niche and things are put into it it won't be seen.
Upper Unit

     I'm sure thankful for the furniture dollies that Harbor Freight sells so cheaply, they make a world of difference in being able to move pieces around the shop to where I want them.

Straight on View

3/4 View


One of the main items destined for this unit is a turntable.  It'll be housed in the largest area. The placement of it pretty much determined the spacing and sizes of the remaining shelves.  We wanted it to be at a comfortable level for easy access to the turntable.


From this 3/4 view you can see how the molding creates the illusion that these are separate units, just like traditional Barrister Bookcases would be.  You can imagine how this look will continue once the upper unit is placed on top.  The custom molding that wraps around it like a skirt will conceal the material of the top of the base unit and give the appearance of one, continuous bookcase.


     We were talking about doing custom furniture work in my class yesterday and we all agreed that the final steps of a project seem to take the longest.  It sounds quick and simple to say; "all that's left is putting on the doors, back, and hardware" when in reality these things are quite time consuming and have a fair share of head scratching!  For example, let's look at the brass pins used for the doors to pivot and move on:

Cutting Pins
The process was to first use wooden dowels to check for side play of the door.  Since I used jigs and stops to drill the pin holes theoretically everything should have been the same.  They were pretty darn close, that's where being careful through out the building process pays off.  What was involved was to first create a bevel on the both ends of the pin (1/4" brass rod), cut it to the required size using the jig shown in the picture, and then using some super glue and a hammer to gently coax the pin into the sides of the door.


Roller Set-Up

The door needs a means of support at the front of the case as the pin travels in the groove.  Traditionally all that is required is a dowel but I decided to add a small roller thinking that it would make the action a bit easier, especially on the larger doors.  Placement was critical and needed to be consistent on all doors.  With this jig that was accomplished, seems like I contorted myself into some weird positions to get this done.  It wasn't bad on the larger doors but the smaller they got the less room I had for my hands, drill, and head!


Set-Up for Catches
The final step to the door process was to locate the catches in the exact, same location so the reveal on all the doors would be consistent.  Rather than trying to measure this for each door I devised a method to hold the doors at the same location while locating them.  Again, fairly easy on the bigger doors but the small ones were tougher to get in to.  I like using these brass, double-ball catches that can be adjusted for tension and allow for some slight movement due to weather conditions.


     All in all, I'm happy with how this project turned out.  Building custom furniture is always a process of learning and doing research to accomplish what your client wants and the vision you come up with to meet that.  I'd be bored to death if someone wanted me to build ten of these for them, might as well go into production then!  Anxious to get this piece delivered and go on to the next project.  It's going to be a bit different as I set up an Etsy store to sell and market the custom eyeglass cases I've made.  Seems like just the thing for a unique, one of a kind, Christmas present for somebody!

Work Goes On Intently

     Had a wonderful day of work in the class, sure was nice to have the coolness of our first rainstorm in a long time here in the desert.  It's just proof that this dry climate becomes something we're accustomed to here with our woodwork.  The sample cabinet I made for the class regained its "cup" on the shelf and now the drawer will barely open!  You may recall that this particular piece of material cupped badly after I had surfaced it the night before a storm in July.  Unfortunately, by that time work had already begun on the joinery so re-surfacing it was not an option.
     Here's the class in action, our goal is to glue the main portion of the cabinet together tomorrow and then begin work on the drawer  --- hope all of our wood is stabilized!

Precise Dovetail Work, notice the sample Cabinet in foreground

Intently Paying Attention to the Task at Hand

Sunday, September 11, 2011

Coming to the HomeStretch and Using MinWax Wipe On Poly

     Work continues on the bookcases, almost done with the finishing process.  I'm trying a new product from MinWax (new to me) which is a wipe on, polyurethane.  For my solid wood furniture I typically use a natural oil finish that is top coated with a multiple, hand applied finish.  For solid wood, the sheen and feel of the wood is beyond compare.  When using cabinet grade sheet goods, even the best quality ones that you can find, the veneer simply isn't thick enough to achieve the same sheen.
     The concern for woodworkers everywhere, when it comes to the finish, is how to apply it and not have it become contaminated with dust during the drying process.  Dust is a big enough issue here in the desert but now add the typical woodshop environment and you compound the issue considerably.  The wipe on poly eliminates that concern completely.  It's simply wiped on with a clean, cotton rag and dries so quickly the dust doesn't have any time to settle.  A plus I discovered with it is that it will remove any stain that has dried on the surface or oozed out of the pores.  If you've ever stained Oak, that tends to be a problem.  Oak is so porous that it'll allow the stain to settle below the surface and then ooze out and harden sometime over night when you're not there to wipe it off!  In the past, you would have to remove this with some solvent before applying your top finish.  In any case, the Wipe On Poly works well.  A very light sanding between coats is all that's required.
     At this point, everything has three coats except for the base unit which only has two.  The glass wasn't ready for pickup on Friday (think they went home early) but it'll take some time to install the doors and get them adjusted.

Base Unit


Upper Unit
Being able to move the unit around on furniture dollies is a big plus.  Since the backs won't be attached until the doors are in and adjusted it was easier to get to the entire unit and see what's going on in there.


This has three coats of the Wipe On Poly, I like the way the crown molding and the skirt came out.  Even though these are new units I think they have an aged appearance and will look like my client has had them for years, maybe passed on from generations past!

The door frames are ready to have the guide pins, knobs, and glass installed.  The pieces laying in front of them are the door stops that will limit the travel of each door as it slides back into the case.


Door Frames

Friday, September 9, 2011

Second Day of Class


     The second day of class was another successful one.  During the first day everyone began cutting the materials needed for the cabinet after making a practice dovetail or two.  We started off today getting the material prepped for the cabinet sides.  These need to be surfaced to 5/8" thickness so we had a slight bottle neck at the planer but we worked through all of that.  The class is small (5 students) and everyone gets along well with one and other unlike the team on last nights Project Runway -- bet you're surprised I watch and like that show!
Power Tools to Size Material
     One of the goals for this class session was to discuss ways to create what's called a "fair curve".  I brought a couple of spokeshaves for this that they all had the chance to use.  Since the emphasis of the class is hand tools the spokeshave works just as well (better in my opinion) than an oscillating spindle sander and leaves a much cleaner finish on the wood.
Initial Curve Cut on Bandsaw


There are several ways to lay out a curve but we used a thin, flexible piece of wood and clamped that to the starting point of the arc.  It was then flexed until the curve suited their design and a line was penciled in.  After taping both side pieces together, the bandsaw was used to cut it out.


Working Intently
Scribing Line for Dovetail on Tail Board
Laying out the Tails on the Tail Board

Use of a Spokeshave to Achieve a "Fair Curve"


One of the things that's always satisfying as a teacher is to watch your students work at what you've taught.  Look at how intent everyone is to accomplish the task at hand -- love it!


Jamie, the owner/operator/principal/and everything else related to WoodItIs was impressed with how well everyone is working and having success at this complex bit of wood joinery.  She couldn't help but appreciate the quietness in the room as everyone worked on their projects compared to the noise of the machine room.  Love those hand tools -- hope to pass some of that along to them as well.

Wednesday, September 7, 2011

First Class Success!!

     Yesterday was the first session of the hand tool woodworking class I'm teaching at WoodItIs.  Not sure who was happier to see all five class members complete a couple of dovetails successfully --- me or them!  Here are four of them with their completed practice joints:


     Even if you're not familiar with woodworking joints, you've probably seen a dovetail joint on the side of a drawer.  It's a joint that's been traced back to ancient Egypt and found in furniture and burial vaults from that time and they're still holding tight!  Here's a sketch of what they look like:

     The next class session will be tomorrow, Sept. 8 from 11am to 2pm.  This class meets every Tuesday and Thursday for the next three weeks.  It's going to be fun to see how they apply this practice dovetail to the project. This joint is completely done by hand with chisels, mallets, and a dovetail saw.  It's a great exercise in learning how your body mechanics control what the tool in your hand does.  Frustrating at times but rewarding just the same!

Monday, September 5, 2011

Cases are Almost Complete!

Cases Together
     Things are coming together and here is the proof of that.  This is the entire unit with the doors loosely set into place so that I could see how the grain pattern would look on the completed piece.  The only thing missing now is the cap that goes onto the front edge, as it is you can still see the plywood edge.  In the background are the panels for the back of each case, they're stained and ready for the finish coat of satin polyurethane. What's been completed so far represents about forty hours of work.  It's kind of like running a long race, at first you just feel like you're slogging along but then you realize you've covered 30-40 miles.  The final stretch always takes a bit longer than you think it should but victory is close and sweet!
     Designing this project had some interesting challenges.  The first was how to design a cabinet that had the appearance of separate Barrister Bookcases but it needed to have different sized shelving areas to accommodate the turntable.  That'll be housed in the center area.  At 80+ inches tall, it would have been too difficult to build and move as a one piece unit so I came up with a way to hide where the two pieces come together.  It separates right above the turntable area.

Using Wax Paper to Prevent the Glue from Joining

Close up of Case Joint Molding
The molding at the case junction is similar in profile to the crown molding.  It is attached to the upper unit which simply slides into position.  To attach it, I put wax paper between the two cases so the glue wouldn't ooze out and attach them -- that could have been a major problem!  These were glued and clamped, and reinforced with a few biscuits for strength.


     In this close up view you can see that there is a slight relief cut on the bottom of molding to help it clear the lower unit.  This is looking at the back of the cases.  The groove visible on the bottom case is what the door pin will slide in.


Guide Block Attached to Door Front

     The challenge of making custom pieces is that no two of them are alike.  To be sure, there are certain operations in woodworking that are the same no matter what the final project will be but usually, each project has it's own set of challenges that need to be solved.  One of those challenges for this project was how to accurately lay out and drill the holes required in the doors.  It was critical that each one was in the proper location or else the doors wouldn't function the way they should.
     To solve that problem I made a guide block that was clamped in line with the top of the door.  Since it's always difficult to measure to the center from both faces the best way to align this block was to the front face of the door on each side.

Drill bit with Stop Collar

     This meant there had to be two holes so that when you flip it to the opposite edge it would line up.  Maybe sounds a bit confusing but not so bad, you just have to keep it in mind as you drill the holes.  By making the guide block on the drill press I was guaranteed a straight hole.  In practice the guide block is first clamped to the door, then the drill bit is inserted into the hole and it's drilled until the stop collar contacts the guide block.


     Now comes the finishing operations.  It's critical that the brass pins used to support and guide each door are a certain size.  My plan is to use wooden dowels first to check the operation and then cut the brass pin the exact, same size.  Because of the nature of wood, there is bound to be some variation in these things but hopefully not too bad.  The brass pins will be attached with either epoxy or crazy glue, I need to do a mock up first.  I'm thinking that the crazy glue would be better because it's thinner than the epoxy so there shouldn't be a problem with it oozing out and showing up on the finish.  Theoretically, they shouldn't go anywhere once they're inserted into their holes.
     Now comes the finishing procedures, this will require quite a bit of sanding since it's made of cabinet grade plywood rather than solid wood.  For solid wood I generally smooth the surface with hand planes -- can't plane plywood!  I'll order the glass tomorrow but I also start teaching the hand tool class at WoodItIs school here in Las Vegas -- really looking forward to that.  I'm hoping that work and weather will cooperate and I'll be able to deliver the completed project in a week.  My clients schedule has him off on Mondays so that's the best day to shoot for completion.  I'll keep you posted.