Don't get me wrong, I'm not complaining here it's just that I've realized how much engineering and design work this chess case requires. It's been a fantastic learning experience and if we challenge ourselves, everything we do should be. Glad I didn't take this commission on when I was first contacted about it back on the fourth of December! At that time I thought there was a chance I'd be able to finish and deliver it in time for Christmas ---- boy, would I have been wrong.
When you work with wood, all of the time you've invested can be ruined with one slip up or mis-measurement. For some reason, separating the two halves of the chess box was turning into a mental stumbling block. Just the box alone, without the intricate egg crate dividers for the interior has taken over 6 hours. One slip up and all of that time and material would have been lost. Here's how the completed and oiled box looks sitting on the saw:
 |
| Ready for Surgery |
 |
| Tape to Accent Where to Cut |
The case needs to be neatly sawed right through the center of it, I placed tape on the cut line so it would show up better. As you can see, the case is pretty good size so I had to be very steady as I passed it over the blade. The first to be cut were the short sides, these weren't cut completely through.
Once both were cut, the blade was raised up to cut completely through and each long side was cut. This is done to prevent the sides from closing together which is apt to happen if you try cutting all four sides completely through.
I had a comment from one of my readers the last time I shared this technique commonly used in box making. It was suggested that using a utility knife was easier than a flush cut saw like I've done in the past --- he was right!
 |
| Using a Utility Knife to Complete Separation |
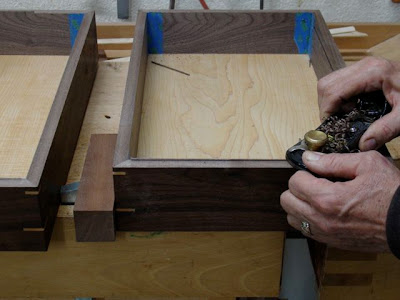
Next up was trimming the edge smooth with a block plane.
 |
| Trimming Flush |
Recesses were cut for the hinges, I generally rough them out with a trim router and shop made template. Even though I line the template up carefully it's about 1/16" smaller than the hinge to allow me to make final adjustments with a chisel as needed.
 |
| Hinge Template |
 |
| One Half with Cover Sheet |
The way all of these pieces fit together will only require 4 screws to hold the entire assembly in place. They all interlock but there's a bit of wiggle room to accommodate seasonal changes. The cover sheet now has a slot between the two finger holes. There is a Maple toggle that goes on the piece of Walnut you see in the bottom of the case that will keep everything in its place. This project is so close to being complete I can almost taste it. A coat of shellac on the interior, setting the hinges and the clasps and we'll be in the mail next week. I have time to let the finish cure for a few days so that's the plan.
In the meantime I'm also working on a series of boxes to put on the Etsy store as Valentine's Day presents. Etsy keeps sending messages to gear up for Valentine's and I'm trying to heed them -- must feed my wood addiction!


No comments:
Post a Comment