Showing posts with label Diane's Studio. Show all posts

Thursday, June 7, 2012

IKEA's Got Nothing on Me -- 'cept $$$

     Adding furniture to Diane's studio has really gotten me to thinking about furniture pricing and quality as a whole.  Adam recently purchased a very nice dining table plus 6 chairs for under $400.00.  Sure he had to spend a small amount of time to assemble it but you know what?; it doesn't look half bad and after having dinner at his house last night, the set is functional and comfortable too.  To replicate it I couldn't even buy the materials!  I know that what I build is quality so maybe I have that over IKEA too.
     For Diane's studio she wanted white laminate so I used a Nevermar product on it.  I really liked working with the ultralight MDF as well.  This always strikes me as odd, when the forklift driver brought it over to the truck for loading I noticed that is was marked "Made in New Zealand".  I mean light or not, that's still a long way to ship material.  The driver said the other big supplier for that is in Chile!  Only thing that I can figure out is that American labor has priced itself out of the market or/and the EPA has put so many restrictions on manufacturing that it's no longer feasible or profitable to manufacture this in the USA.
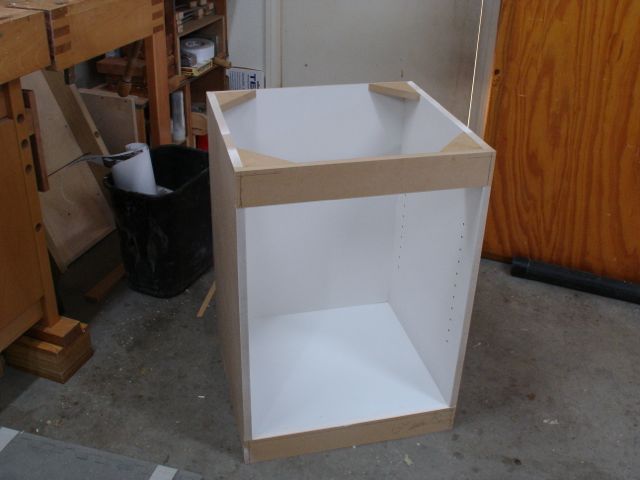
     Okay, off the soapbox.  Here's a shot of the shelving cube in process:
IKEA Quality Plus

     The bottom is dado'd, glued, and nailed in as are the corner blocks and back.  To fit the back I used my somewhat antique Stanley #78 -- not sure that's what it was originally intended for but it sure made some long, continuous shavings!

Stanley # 78

     Since the entire studio has been repainted the doors looked pretty awful.  Decided that they too should get a fresh coat of paint.  I'm really liking the Earlex sprayer.  Can you imagine trying to brush all of the panels in the doors, not for me!

Spraying Again 

     What looks like half of a table is actually the legs for the shelving cube.  I figured that if these were bolted to the cube it would be plenty strong.  The overall length of the unit is 55", making the leg section a separate bolt on unit will alleviate any concern about the strength.  It seems to have been successful:


Shelving Cube and Work Station Installed

     As you can see all of the studio furniture has the same appearance, not matchy matchy like I hear the HGTV designers bad mouth.  This one has the power strip mounted to the side and each of the new units has a hole and grommet in the top to manage the cords.
     Diane has told me she really loves her new space and it's amazing how much more room it seems she has.  Putting all of the furniture against the walls really opened up her studio.  She's blogged it on her website as well, you can link to that here.

Monday, June 4, 2012

Combination of Hand & Power Tools

     Well, here in the desert it's really been heating up and I've spent the last 4-5 days out in the shop until well past 95 degrees!  Usually like to get out of there about 5 degrees earlier but I'm somewhat driven when I get into new projects.  Now that Diane has been working in her studio creating her rag dolls for several months she's decided there were some needed changes.  The soothing green on the walls worked well for her when her entire focus was to create her beautiful oil paintings.  It's unfortunate that the economy has cut into her gallery sales so drastically that she knew she needed to change her focus.  Speaking of focus, the green that worked so well for painting proved to be less than desirable for sewing so the first thing we did was to paint everything white.  Some of the walls needed 3 coats to cover but between her doing all the trim work (Thank you, thank you, thank you!) and me doing the roller work that phase is now complete.
     The next thing to be addressed was to create more horizontal space for laying out fabric and housing sewing machines and a serger.  I had made a table that held two machines but the way it stuck out into the room interrupted the work flow.  That table has become the main cutting table and two new, narrower tables are almost complete that will fit against the walls.  The hardest thing we had to overcome in the design was an angled, 45 degree wall.  Angles may add interest to a room but they're a royal pain when it comes to creating a floor plan -- always end up with some wasted space.
     In any case, last Friday we went to Peterman Lumber to buy ultralight MDF and Poplar to start the build out.  Also picked up a couple of 4' x 8' sheets of white laminate.  Doing laminate work isn't one of my favorites but you can't beat it when you need a smooth and durable work surface.  The first thing I needed to do was to build the tables.  The legs came from 8/4 stock and have a taper at the bottom to lighten them up.  Nothing says quality furniture to me like mortise and tenon joinery, here's my set up for that:

Ready for M & T's

     You can see the taper at the bottom of the leg.  The mortises are cut and need to be cleaned out with chisels.  On the left is a bench hook and saw ready to cut tenons and at the right is another bench hook and a rabbet block plane to trim the cheeks.

Haunched Mortise
     One of the mortises is haunched for the longest span, the short span is not.  A technique I use to lay out the haunch is to use a 1/4" spacer to lay it out on the tenon:

Laying out the Haunch

     Once the sawing is done my go to tool for trimming the tenons is a rabbet block plane:
Trimming Tenon Cheeks

      Once all of the joints fit the way they should the final step before assembly is to plane all of the surfaces. The bronze smoother plane left a beautiful finish on the Poplar.  I use the block plane to put a slight chamfer on every edge.

Final Surfacing

     This is a rather long (5') and narrow (22") table so assembly was done in two stages.  First the ends were glued and clamped, then the long apron pieces were assembled.  Good thing Diane is good about helping on these projects as it's pretty hard to span 5' and bring the joints together!

Glued up and Ready for Paint
     There is another unit for the room. It features a 30" wide area that will accommodate a chair and has a set of open shelves at the opposite end.  This will need a filler piece to go into the angle on the wall.  Given up trying to visualize and figure out how to deal with that.  After wasting many brain cells on it decided to just put everything else in place and deal with that odd piece later.

Thursday, November 17, 2011

It's Finished !!

   Happy to say the finishing touches were put on Diane's studio today and it's just how she wanted and designed it to be.  We picked up the doors from the Glass Art Studio here in Las Vegas, decided to let them install the glass as I was sure they can run a much finer bead of silicon than I can.  Besides, they charged just slightly more than a tube of it would have cost us.  We also got a different bulb temperature of lighting but will probably need to add some more light to the entire studio space.  Diane has some task lighting but for the work she's doing the studio needs to be completely well lit.
     Here's a few pictures of the finished project, first off, this is the left side of the space:

Left Side
     The lighting doesn't show off the glass and the crystal knobs.  See the wooden horse on the top shelf?  I brought that with me from Holland when we came to the states in 1956!  It's been glued a multitude of times and the tails long gone but it's one of two childhood toys I have.  The other is a teddy bear I recall getting for Sinter Klaus in 1955.  Okay, back to the project.  You can now see the two drawers in the case that are in line with the table top.  Di will keep one of her machines on this side of the table and store any needed items in the drawer below.

Right Side
     Here is the right side of the studio.  Everything is pretty much the same and you can see the patterned glass and the crystal knobs illuminated from the light coming in through the window.  Diane's inspiration for the table was found in a magazine or web search as was the cabinetry.  She then worked the design to suit her requirements and the space we had and she's very happy with it.  I'm happy too that the table is plenty sturdy for the machines, especially the serger.  When that thing gets going it moves!!  It used to be on an L-shaped desk upstairs and when it was in use we needed to put an extra support under the corner of it.

Monday, November 14, 2011

Drawer Progress - Trying to Simplify

     Diane keeps telling me I don't need to build a masterpiece for her sewing center but hey, if you're going to do it -- do it right!  In any case though I am using some different, more streamlined techniques for the drawers.  For starters, rather than being dovetailed I thought I'd cut a rabbet on the drawer front and then use dowels for reinforcement.  Thanks to the drill press that Vince gave me, this is a fairly simple process.  Without being able to use the drill press the process would have been different.

Drawer on drill press for dowel placement.
      I would have had to use a hand held drill and be very steady and square to drill the holes.  This particular drill press has a table which can be adjusted for height quite easily.

     You can see the other drawers in the back that have been drilled already.

     Once all of the pieces were dry fit with an MDF bottom they were glued and assembled.


Nice Shavings!

     It seems that no matter how careful you are with sizing the drawer members there's usually a small amount of trimming that needs to be done with a block plane.  Here's where having a nicely sharpened tool comes in handy.


     For this application I chose to put a 3/4" wide groove in the drawer sides and make runners to guide the drawers.  As a general rule, a piece of hardwood would be used for this purpose but I broke that general rule and used pieces of 1/4" MDF!  Since the drawer space is just a bit over 5" tall I knew it would be a hassle working in there with a drill and screwdriver.  To make my life simpler I used a 1/2" piece of plywood to fill the space between the inside of the cabinet and the face frame.  My thought was that I could attach the runners to the plywood first and then attach the plywood to the cabinet -- it worked!!

Notice the pennies used to set 1/16" gap
     The first step was to locate the runner for the bottom drawer and attach it to the plywood filler piece.  Then by clamping the plywood pieces to the drawer I was able to locate the runner for the upper drawer with a small try square.  If you look close you can see my hi-tech spacers; a penny at each corner.  This gives about a 1/16" gap between the drawers which is just about right.


Plywood and Runners Installed

     Last of all was to screw the plywood into the cabinet.  A coat of wax and it works as it should!

     At this time the units are in Diane's studio.  Tomorrow we'll take the doors to a stained glass studio in town so they can cut the glass to size.  I'll take some final photo's of the entire unit after they're installed.

     Does she like it --- you bet she does.  Took us to Smashburger for dinner, that's all the payment I need.  Tried their black bean patty and it's good, highly recommended.


Monday, November 7, 2011

Aww, paintings not so bad!

Alfie likes the new Table
     This week decided to turn drastically cold so there was no way I'd let Diane honor her commitment to paint her new studio furniture out in the unheated shop.  In spite of my grumbling, painting isn't all that bad especially when Alfie is so happy to have a new table!!
     Yep, that's Alfie -- a second generation of Diane's creations.  If you haven't seen her shop and blog here is a LINK to her Etsy store.  Alfie has evolved somewhat.  First off you'll notice her segmented legs and knee joint (wish Di would make me a new knee joint) which allows her to sit.  Some added weight to her feet help her do that as well.  More shape to the head will make the hair more realistic and easier to style.  Diane likened the first generation heads as trying to put hair on a bagel!  Alfie is a real cutie, she got her name Alpha, meaning the first, and also in honor of Diane's Mom who had an Alfa Romeo which was affectionately named Alfie.

     As for the remaining studio furniture here is a shot of the table:

Table with Machines and Alfie
     This table will eventually be flanked by these two bookcases, they will replace the wooden toned MDF one you see in the corner:

Bookcases Approx. 23" x 72" each
     These cases will have a back installed.  Each narrow space near the center will house two, fairly shallow (2+") drawers.  These  will be divided for thread, bobbins, ribbons, etc.  The space directly below the drawers will have a pair of doors with a clear yet textured glass.  We went to a stained glass studio in town last week and Di's picked out some really neat stuff.  The top of the table will be level with the top of the drawer section to present a continuos plane.  Each drawer and door will have a crystal knob installed, you can see it on the table drawer.

     All in all, this studio make Diane designed is going to give her a great place to work and create the Rag Dolls Rising.  You've got to see them, they are cute and would be great for any child.

Thursday, November 3, 2011

Quality and Made in America RANT

Look at that --- 1/128" !!
     Where is the quality these days?  Madison Avenue and the marketing guru's of the world have convinced the population that everything these days is disposable.  Everything, from diapers to furniture!  For the studio make-over Diane chose to paint the cabinets and the table so we're using shop grade Birch plywood which should have been of sufficient quality, or so I'd hoped.  Veneers are getting thinner and thinner as you can see from the picture. The joinery is a dado and tongue for the shelves.  I have a quality dado set that pre-scores the material before the full cut is made.  On cross cuts with this ply it chipped pretty badly and the veneer came loose!  I measure the thickness of the piece that I ripped off and it's just slightly more than 1/128" in thickness.  Forget using a plane to flush up the banding or any abrasive rougher than maybe 220 grit or so.
     I know it'll be acceptable for this project and no one will probably notice but I must admit that it really bothers me.  Back in the early 70's when I was working at Silvera Lumber in Antioch, CA the local newspaper did a story about how plywood was being made off-shore rather than in the states.  The article showed me holding a sheet of plywood and if I remember correctly off-shore meant that the Japanese had factory ships out in the Pacific producing the material!  Seems crazy but they would buy logs from the Northwest, take them out to the factory ship, produce the ply and sell it back to us for less than companies like Cascade and Roseburg could.  Anybody reading this know if that was really the case?

Saturday, October 29, 2011

Woodworks by John: First Look and an Offset Tenon

First Look!
     You know how when you go to the movies they play previews and trivia before you get to the feature? Well, in keeping with that theme here is the first look of the table.  It's just a dry-fit and already I've sat on it to check it's stability.  You can see how the drawer is off center, there's one on the opposite side as well.  The table will nestle between two cabinets (yet to be built) so that's why the drawer is off center.  Obviously, the top needs sizing and planing.
     A big concern for this table was to design it with stability to support sewing machines and handle their vibrations and also to allow full access underneath it.  That meant a center stretcher couldn't be used in its' design.  The apron is 4 1/4" wide which allowed using offset tenons.  Here's a picture of how they were designed:

Offset Tenons
The first thing to notice is the full, 1/2" deep mortise to prevent the apron from twisting.  To get the maximum depth on the tenon I chose to offset them rather than have them meet inside of the leg with a miter.  Wanted to have the maximum "meat" left in the leg and this solves that.  The leg is 1 3/4" square and the tenon is 1 1/4" long so I think we're good


Cleaning Mortise
After chopping out the mortise I wanted it to be a consistent depth in the entire haunched section.  Using a Stanley #271 router plane accomplished that.


Tenon Detail
     The tenon was pretty straight forward as well.  The first step was to draw a line 1/2" up from the shoulder.  I used a piece of plywood to set that.  After transferring the full tenon location it was simply cut out.  The only problem encountered here is that my dovetail saw's depth was limited by the back so I needed to finish the long cut with a flush cut saw.
     As of now, the two ends of the table are assembled so today will find me doing the drawer runners, drawers, and starting work on the top.  Happy to say that Diane will paint it, I have an aversion to painting wood!

Thursday, October 27, 2011

Table Progress

     Techniques used to build furniture can vary depending on the shop that's making it.  I used to tell my students that "there's more than one way to skin a cat", an expression that needed explanation to the younger set!  For this table, there will be a shallow drawer on either side for sewing supplies.  The design calls for space on both sides of the table, one side is for the sewing machine and the other side is for the serger.  Since the table will be against the wall the drawers will need to be in line with one and other.
     The customary way to do this is to take your apron piece, rip off the top and bottom pieces, then glue them back together after cutting out the drawer area.  This picture will help illustrate that:
Drawer Apron
     I mentioned that the 6/4 Poplar was pretty picked over and one of these pieces has quite a wind in it which I'll need to plane out before surfacing the entire assembly to 7/8".  Even though this table will be painted, when you construct a drawer apron this way you are able to keep the wood grain continuous, even the grain on the drawer front will match, giving the appearance of one solid piece of wood.  Once these are surfaced they will be cut to the required size and tenons will be cut on the ends.
   
Taper Jig

 While this was drying work started on the legs.  The plans Diane gave show a short taper on one side to lighten the over-all appearance of them.  Using my shop made taper jig simplifies this process, all that's needed now is a bit of hand planing to make them all uniform.


      I prefer to use a good, solid, mortise and tenon joint to build table aprons.  This is a time proven joint and although dowels, biscuits, pocket screws, and other methods are quicker they won't compare to the strength of the mortise and tenon.  If you've ever seen a serger in action, strength and stability are a must!

Cutting Mortises, note depth block


I use a hollow chisel mortiser to cut my mortises.  I started out years ago doing them all by hand the same way my junior high school students were taught.  Then I graduated to getting a drill press, then a bench top mortiser, and now finally a dedicated hollow chisel mortiser.  It's nice to know I have the ability to cut them by hand but this sure makes it easier.  They still require some clean up work with chisels but all in all, this is the best method for me.
     The apron will be 4 1/4" wide.  For maximum strength I chose to stagger a 1 1/2" wide tenon in a full haunch that will be 1/2" deep.  Lots of technical stuff here but the purpose of the full haunch is to prevent the aprons from twisting.  I decided to stagger the tenons rather than having them meet inside the leg to increase the strength.  The technique I use is illustrated by this picture; at the rear of the mortiser there is a black rod which is the depth stop.  See the little block of reddish colored wood? It's 3/4" thick so when you cut the haunch, that is put onto the stop which limits the depth to 1/2".  For cutting the full depth mortise, you remove the block and cut the full 1 1/4".  Simple little trick but works quite well.
     Well, the sun's coming up so that means I can make noise out in the shop.  Glad to say our weather has cooled down considerably so working conditions are much improved!
   

Wednesday, October 26, 2011

Woodworks by John: Diane's Studio Make-Over

     During my trip and drive back from the east coast I was able to talk to Diane using FaceTime on our Apple MacBooks.  Wow, this was pretty cool just using the internet through the Wi-Fi at the hotels and being able to see each other while we were talking.  One of the things we talked about is a make over of her studio so I told her to draw out some plans and we'll call it a project!  Well, in one of our FaceTime conversations I could see that she was at my drafting table and when I came home the plans were ready.
     She's really good at designing to get the maximum use of the limited space we have available.  The over-all look will be one of shabby chic with a contemporary twist.  It's centered around a table (28 x 48) that will extend out from the wall.  This will be flanked by a pair of tall cabinets which will have shelves at the top, a bank of two drawers, and then a pair of glass fronted doors at the bottom.  Since everything will be painted by her, Poplar and shop grade Birch plywood will be used.  We went to Peterman lumber Monday to buy material and ordered hardware on line.
     The first project will be the table.  Since this will have a sewing machine on either side, her design calls for a drawer on each side as well.  I was able to find a decent piece of 6/4 Poplar that was 10+ inches wide.  After surfacing all three pieces it was time to joint the edges prior to glue up.

Checking Edges

Once the edge has been cut on the table saw my method is to use a #7 Jointer plane to true it up.  After laying out the pieces according to the grain direction you can check them by laying the matching pieces on edge as shown in this picture.


Using straight edge to check for square
I also like to take a straight edge to them.  Theoretically, if there isn't any light when you sight down the joint both edges are square and the panel should glue up just fine.  That's always a concern but as of now, I've had very few panel failures so my methods must be working okay


     The final step is to glue up the panel.  I've found that Gorilla Glue is great for this mostly because of how easily it cleans up.  The way it foams as it cures doesn't seem to penetrate into the wood which can become a problem during the finishing process.  In the picture you can see some clamps that I found at a cabinet shop that was going out of business.  You don't see these around too much but I really like them because they help keep the panel flat while bringing the edges together.  When I bought them I was told they were a pain in the neck because, being wood, glue sticks to them and they may get stuck to your panel --- not good!  I solved this by ripping down pieces of UHMW polyethylene and screwing that to the wood, nothing sticks to them.  They're at wooden pieces at the ends and center of this picture:

Glued up Table top
       I'll find out soon how much work it'll take to make this smooth and flat.  As you know, I tend to shun power tools for things like this preferring the quiet process of hand planing this to get there.  I was talking to a friend of mine who has a shop with a wide belt sander and many time people come to her and ask what it'll cost to sand a wide panel.  Let you know how sore my arms may be after I get this flat!