Showing posts with label Elliptical Walnut Shelf. Show all posts

Thursday, June 7, 2012

Walnut Shelf Photo

Finished & Installed

    For those of you that were asking about the elliptical shelf I was commissioned to make here's a photo of it.  Looks pretty sharp if I do say so myself!  Started out as a couple of rough, 8/4 pieces of Walnut and this is what we ended up with.  Don't know who the designer was but personally I really like how the long, glass tile mimics the long sweep of the shelf.
    Here's yet another photo that shows how tall this glass tile, curved wall is.  When you figure an outlet is usually placed 12"-16" from the floor it makes it a pretty tall wall!  I believe it's the back of a staircase but not 100% sure.


Wednesday, May 9, 2012

Walnut Shelf Installed


Walnut Shelf Installed

     I was hoping that my client would come through with getting me a picture of the shelf installed in the custom home they're working on and here it is!  Not sure how they will finish it, my option would be oil and at least 3 coats of my hand rubbed top coats but with a philosophy of time = money that probably won't happen.  I just hope he was pulling my leg when he said they may stain it black :-/.  A couple of coats of lacquer would be a possible option.  Not sure what will be done to finish off the edges by the wall but if possible I'll see if I can get a picture of the completed project as well.

Sunday, May 6, 2012

Spokeshave + Cabinet Scraper = Ready for Pick Up

Ready for Pick Up

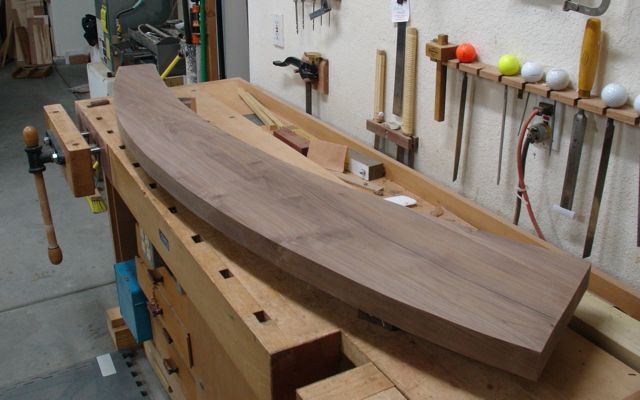
     Here is the finished shelf waiting for the client to pick it up.  From what I understand this will be installed on a curved wall that will be covered with those long, thin glass tiles.  The ones that remind me of ledge stone you might find on a fireplace or exterior wall but on a much smaller and glitzier scale.  I was told they would take a picture of the installation so I can have it for my portfolio.
     As I talked about in my last blog, the edges needed to be cleaned up and finished since the router bit wasn't long enough to cover the entire thickness.  Here's what it looked like:

Edge and Spokeshaves

     The thing that makes a cut edge appear so much better than one that has been abraded by sandpaper is the clarity.  I guess in political speak that would be "transparency!"  The upper portion of the edge is where the router bit didn't reach.  Notice how much clearer the left side is compared to the right; that's been cut with the spokeshave.  Primarily I used the black, Stanley #151 except on the concave sections of the back that required the bronze, Lie-Nielsen with the radiused sole.  This picture shows the quality of the cut better:


Outer Edge
When it comes to hand tools like spokeshaves and scrapers there's a difference of opinion on whether they should be pushed or pulled.  For me, it really depends on the project and grain direction of the wood.  In this case, pushing the spokeshave seemed the best.  It's easy to spot the difference in the grain color that indicates where it's been cut and which area is still low.  With a large, free-form curve like this you have to let your eye and fingers tell you when it's a fair curve.  Luckily the grain direction was easy to read and there were only two small knots that gave me some difficulty.


     Once the edges were done it was time to work on the faces.  The client wanted to keep a sharp edge on the piece but personally, I hope he cuts it ever so slightly.  Even though I've scraped the board I'm guessing they'll hit it with some sandpaper before the finish the piece.  I started out with a cabinet scraper:

Cabinet Scraper

     This is a tool I always push.  You can see the shavings that are curling out that indicates a well defined burr.  On this tool I use a blade that's been ground at 45 degrees and then add a burr for cutting.  That allows a pretty aggressive cut which was needed to remove the glue and level the surface when the two pieces were laminated together.  Before beginning this step, the board looked like this:

Chatter Marks from the Planer
 
     I tried to capture this but not sure how well it shows.  The chalked in arrow which was my triangular marks for laminating the piece, almost point to an area of those visible chatter marks.  They're caused by the planer as the board is surfaced.  I didn't run this board through my planer but even it, with a helix head, leaves a bit of chatter marks.  I wanted to give them as good of a surface as possible so once the board was done with the cabinet scraper I went to the card scraper for the finish:

Card Scraper


    These will put a blister on your fingers real quick!  I always pull these, to me pushing feels awkward.  Although I've purchased a holder for this from Veritas (upper left on bench) I haven't been able to master that yet -- guess I'm destined to have burned finger tips when it comes to using a card scraper.  I do need to work on my technique with that because I'm giving a demonstration to the Sin City Woodworkers group in June on sharpening and using card and cabinet scrapers.
     Well, now that this is done I can get back to work on the bulletin board for Diane.  Pretty straight forward project with mortise and tenoned construction and a rack to hold ribbons she needs for her Rag Dolls Rising work so I'll blog that as it goes.

No More Noise !!

     Those of you that know my method of working will understand the title of this post.  My philosophy towards the craft is to let the power equipment do the "grunt work" and then, when that phase of work is  complete, switch over to the quieter process of letting my hands and tools do the finish work.  This project is no different.
     Once the glue had cured over-night the pattern was traced onto the Walnut.  I used the bandsaw to get that roughed out.  That was interesting, although I have a pretty large table on the bandsaw maneuvering a 6' long piece of 8/4 Walnut around and sawing to the line was challenging.  This is where the stackable torsion boxes came into play.  By stacking them together they match the hight of the bandsaw table.  Then, with Diane supporting the cut off piece the shape was cut out.
     Routing, ah yes, let's see now; eye protection -- check; ear protection -- check; dust protection -- check.  Okay, I'm ready to do this now:

Ready for Pattern Routing

     The plan is to shape the inside edge first, somewhat of a trial to see how the OSB (oriented strand board) would work as a pattern for the router.  Once the inside pattern matched the template I would re-attach it, line it up exactly to the routed curve, and then proceed to cut the outside curve on the bandsaw.

Two Passes on the Template

     Here you can see how pattern routing works.  There is a bit in the router that has a bearing mounted above the cutter.  This bearing follows the template to trim the piece below it and make it a copy.  Only problem here is that the Walnut is about 1 3/4" thick and then add the 1/2" thickness of the OSB template you'll need a really long bit to cut the entire part.  Don't have one of those and figure why make that investment, a spokeshave will cut cleaner and give a much better finish.
     Along the way I learned why not to use OSB for a template.  It is full of voids which I didn't realize on the back of the shelf but became evident on the front.  Because of the voids the bearing would go into the template a bit which gave me some discrepancies as I routed.  Soon as I saw that I knew it was time to stop and repair the edge.

Template Repair

     I used some putty to build up and reinforce the voided areas.  Once it was dry the areas were sanded smooth to give the bearing a better surface to ride on.  The material I prefer to make patterns from is MDF (medium density fiberboard)  which cuts, files, and sands easily.  Another advantage is that it's very smooth so the router can glide over it easily, OSB has a rough surface that the router base would catch on.  Basically, MDF is a higher grade of particle board that has no grain direction and, most important of all, no voids.  When you do this operation, and your bit isn't long enough to cut the entire thickness, it's done in small passes.  Because the spinning bit can tear the wood out as the grain direction changes it's best to take very light cuts.  Once you're down a quarter of an or so it's best to remove the template and use the area previously cut as your guide.
     Now that all of the noisy machine work is complete it's time to refine the edge with spokeshaves and a block plane.  That's on tap for tomorrow.

Friday, May 4, 2012

New Commission

     Today, as I was starting on a project for Diane I got a commission for an elliptical shaped, hanging shelf.  This should be an interesting project and since it's a paying one I'm sure Diane won't mind if I put her bulletin board on the back burner, so to speak.  This is a job for a custom house and what makes it nice is I didn't have to go and select the material which is 8/4 Walnut.  Here's the material that was delivered to me along with a template made of OSB material:

25 1/2 Board Feet of Walnut


     What you're looking at is about 25.5 board feet of Walnut.  At the price of it these days I better not make a wrong cut or this job will cost me!  I'm hoping that they will let me keep the "scrap" which would make some nice boxes or even a lid panel for a pistol case.  From what I understand, this will be suspended on a curved wall which will be covered with glass tile.  I should be able to get a picture of it once the piece is installed and finished.


     The first step was to figure out the best way to utilize these two pieces to make the required shelf.  I thought it was pretty nice the way the grain matched up but then when I removed the template found a big knot!  After some more trial and error and establishing an even edge I was able to make this configuration:

Edges Jointed, Ready for Glue
     This is where an independent, custom shop like mine can take the time to select exactly how we think the piece will look the best.  You can make out the chalk outline of the shelf, notice the center of the shelf is pretty much the center of the swirl pattern of the Walnut.  This is a small detail that many people won't pick up on but they'll realize it's pleasing to the eye even if they don't know why.  I used my old Stanley jointer plane to prepare the edges for assembly.  My glue of choice for this type of work is Gorilla Glue.  It allows me a pretty good open time and has never failed me yet -- let's keep it that way.
     One of the pieces was laminated around 6pm with the clamps I like to use that create a flat panel.  Around 9pm or so I'll replace them with regular bar clamps and attach the other end.  Once they're set overnight they'll be good to go in the morning.  It'll be a pretty heavy piece of wood to run on the bandsaw.