 |
| Getting' Jiggy With It! |
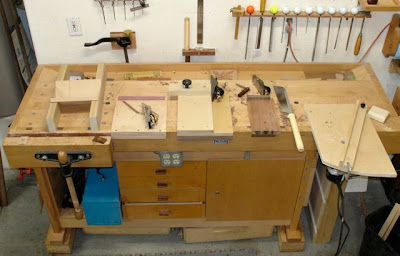
Well, there it is; a workbench with some of the jigs I've spent the past couple of day's making. Once when Adam and I were working in the shop and we needed sandpaper I pulled out my handy dandy sandpaper sizing jig. Adam chuckled and said: "you've got a jig for everything!". And you know, when you've been working with wood as long as I have it's pretty much true. There's no sense in making a jig for something you do once or twice but if you plan on doing it more often a jig or fixture is the way to go. That sandpaper jig?, you'd be surprised at how many students had detention with me at school and sized hundreds of sheets of that sandpaper!
I've mentioned that the prospect of marketing my pistol cases is pretty good, I'll make the final determination when I go to the gun show this weekend. In the process of doing that I decided to work on box making techniques and make some smaller, easier to sell projects. Since the parts you work with making boxes are fairly small in size it's important to have ways to handle them in a safe manner. As a prototype project I'm making a box that's about 4" x 6" and under 3" tall. Trying to safely work pieces that small around a 10" tablesaw is not the way to go!
What you see in the picture above, from left to right are:
- Slot Miter Jig --- used to cut a slot in the corner of a mitered box
- Large Bench Hook --- used to hold small pieces of material for planing
- Shooting Board --- used to trim and square small pieces of wood, also made a 45 degree holder for truing up miters
- Bench Hook --- an old standby that's definitely over built with dovetails!
- Small Router Table --- clamps into the end vise, uses my small trim router
The first step in the process was to cut the pieces at a 45 degree angle. This was done with a miter saw, then the pieces were trued up on the shooting board:
 |
| Shooting Board -- Truing the Edge |
A technique I've always wanted to try is where you use tape to assemble and hold mitered joints tight. Clamping can be tricky with a small project like this. The first step was to lay them face down and apply a piece of tape to the backs:
 |
| Packaging Tape aka Clamps! |
Next, the whole assembly is flipped over, glue is applied to the inside of the miters, and bottom is inserted into the groove and you simply align and tape it all up. Know what? it works! After time for drying the tape was removed and, voila; you have an assembled box!
 |
| Removing Tape from Assembled Box |
As a decorative item the edges will have a slot cut into them. Then a piece of contrasting wood, Walnut in this case, will be glued into that slot. This serves as a decorative element and also reinforces the corner. Miter joints are not the strongest since you're gluing end grain but they rarely fail. There is a series of picture frames I used to do for Diane's water colors where I used this technique with Maple frames. These were only an inch thick or so and required just a small fixture to hold them while cutting the slot.
 |
| Miter Slot Jig |
The boxes are bigger than a picture frame so that calls for yet another jig. If you can picture it, this sled rides on a couple of pieces of Poplar that are cut at a 45 degree angle. Attached to them are two pieces of 3/4" MDF that forms a trough for the box to sit in. By setting the rip fence at 3" (just a random number) and using a blade with a flat bottomed cut, as the sled is passed over the blade a nice slot is cut. The piece of Walnut and the clamp is a simple stop to ensure the same location on all sides. See the slots already cut on the top of the box?
Once the slots were completed it was finally time to get back to that wonderfully quiet world of hand tools. A piece of Walnut was selected that just need a bit of planing to be the correct thickness to fill the slot, it's about an eighth of an inch thick. That's were the large bench hook and block plane came into play:
 |
| Sizing the Miter Keys |
This bench hook has a very thin stop at the end of it which holds the piece while taking a light cut. I found that it was just as easy to hold the plane and basically pull the piece under it. Once the thickness was correct each slot was cut at 45 degrees with the other bench hook and a Japanese style saw. This bench hook has one side with a 45 degree guide (shown) and the opposite side is 90 degrees. At this point, the splines are in the slots waiting for me to cut and plane them even with the box sides. That's for tomorrow.


No comments:
Post a Comment