Showing posts with label Jigs and Fixtures. Show all posts

Thursday, March 28, 2013

Tails Around the Corner, A New Box Series


Tails Around the Corner
     I've had this idea playing around in my head for quite some time now so decided it was time to act on it.  Since I'm one of a biz zillion folks on Etsy that makes custom boxes and the Etsy business is somewhat slow now is the perfect time to try something new.  The thought I've had was to make a dovetailed box but in an unconventional way.  Having never seen this before, as far as I know it's my original design.  Rather than having two sides of the box have tails and the other side have pins I wondered what would it be like to have a tail and a pin on one side!  With the contrasting wood (Quarter sawn Sycamore & Walnut in this case) I thought it would have an interesting appearance.  The box in front is glued and sanded, the one behind isn't.  I'd be interested in any constructive opinions you may have for me.
     Dovetails are the hallmark of fine woodworking.  Whether or not it's deserved is open for opinion but traditionally it's what you'll find on hand crafted furniture anywhere in the world.  This joint is commonly used to join drawer pieces at right angles to withstand the racking and pulling and yet, stay together.  You can find any number of articles and videos on the internet to discover ways to make it.  I prefer the quiet and simple way by the use of hand tools.  I thought I'd poke around and see if there was something I could do to make the work a bit easier.  I chanced upon a YouTube video by David Barron who's a furniture maker in the United Kingdom.  In it he used a fixture that automatically lined up the two pieces when you transfer your tail markings to the pin board.  Here's what it looks like:

Fixture from David Barron
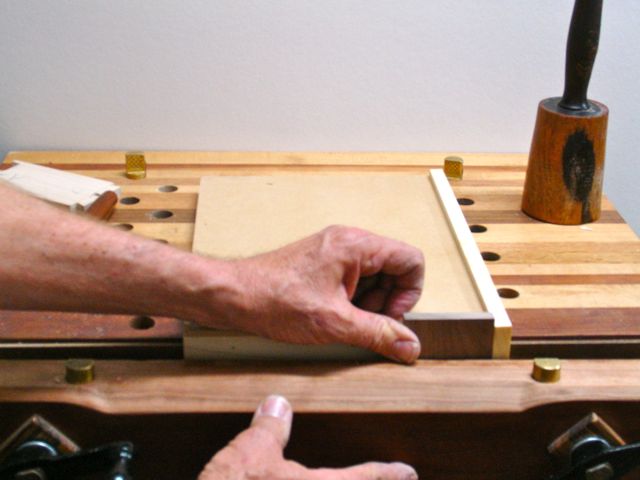
     Basically it's an L-shaped piece with a raised edge on one side.  I used a piece of 3/4" MDF, some Poplar, and Pine to make this one.  When you put it into your vise you'll clamp the pin board flush with the top and up against the raised edge.  The raised edge should be less than your thinnest board, I made mine about 1/4" since I rarely dovetail anything thinner than 3/8".

Putting in Pin Board
     Once the pin board is secure you simply set the tail board on top of it and against the raised edge.  This is a small box but if it were larger you'd want to clamp it down before you scribe the pins.

Scribing the Pins
    My hands are somewhat in the way but I think you can see how it works.  Traditionally the pin board is put in the vise, raised up to the level of a block of wood or a plane.  You then put the tail board on top of that to scribe the pins.  It's always a challenge to keep things square and lined up.  With this fixture it's much easier ---- thanks David!
     One last thing on cutting dovetails.  With the new Knew Concepts fret saw many students have asked me if I'll be using that.  Well, the one thing that keeps me from that is it's quite expensive!  Besides, if you have a wide space to remove you could use a coping saw or simply chisel it out.  You just need to use care when you set your chisel in.  The method I use is to first cut a shallow recess on my scribed line with the chisel bevel pointing towards the waste side of the joint.

First Cut to Remove Waste
     I then flip the chisel over and cut back to that line to create a "pocket":

Pocket for lack of a better word!
     The purpose of this is to give some room for the bevel, if you don't do this the chisel can be forced backwards into your scribed line.  The most common problem most people have when removing this waste is taking too much at a time, this results in a very uneven and rough cut.  Take your time, it's not a race!

Easy, Take a Little at a time
     Hope this helps all of you cut your dovetails, check out the video from David Barron on YouTube.  Here's a LINK to that to make it easier.
     If you're so inclined I wouldn't mind getting some opinions on my concept of tails around the corner.  It is a little tricky to assemble and serves no real purpose other than being unusual and decorative -- I like it!


Sunday, September 30, 2012

Tutorial: The Best Zero Clearance Plate Ever ?


Is This the One?
   

      I really don't want to fall into that "The Best -----" genre of story titles but couldn't resist.  You know what I mean at the check out counters i.e. Best Way to Lose Weight; Best 10K Time Training Program; Best $5.00 Wine on the Market; Best Dovetails Ever; and so it goes.  I always suspect those titles because really, how many Best Ways can there be to do the same thing?
     I can't take full credit for this method of making a zero clearance plate because it's something I saw years ago in a magazine and filed it away into the recesses of my mind hoping it would surface at just the right time.  Well, after using the dial indicator to set up my tablesaw that time has arrived.  Now that it's over I'm really glad I went through this process.  Making the adjustments to the saw changed the location of the blade in reference to the throat  plate so it was no longer a zero clearance set up.
     Like many of you, I've gone through the stage of using the factory plate on the saw, then making my own from plywood, and finally buying a specialized one made of phenolic and complete with adjusters and everything!  I'm Dutch and these things aren't inexpensive so I still was left with the factory plate for my rip blade and shop made plates for various sized dados.  The concept behind this plate was to use the same specialized plate for everything but make inserts customized to any blade configuration needed.  Here's where I started this process.
     The first step was to create a channel on top of the plate to accept the inserts.  I'm using 1/4" MDF so cut a bunch of strips about 1 3/4" wide.  These strips should be 8"-10" longer than the throat plate, that's not a critical measurement though; just use what you have.  To cut the channel I used a 1/2" straight bit in the router and made successive passes to achieve the needed depth.  At the same time, make a sample piece or two with the identical cuts in a piece of scrap material, I used MDF for that.  You'll need that to fine tune the width of the channel.

Router Table Set Up
     Here's my set up, it's a shop made router table set into the extension table on my tablesaw.  This way I can use the rip fence for my router table too.  Boy, this phenolic stuff is hard and smelly; actually chipped my carbide dovetail bit!  The piece sitting upright is one of the extra pieces made to set up the dovetail bit and make trial cuts before actually cutting into the throat plate. The other thing in the picture is my push stick -- use one so you don't cut a nice channel in your thumb as you finish the cuts.


     I gradually increased the depth of the channel until the MDF fit.  It's ever so slightly proud but that will be easy enough to fine tune with a piece of sandpaper.

Checking Depth

Once the channel is complete I changed over to a 14 degree dovetail bit.  Here's where that piece with the trial channel cut into it comes in play.  Use it to fine tune the depth needed.

Setting Depth

     Once that's dialed in you'll cut both sides of the channel to create a dovetailed slot for the insert to slide into.  The next step requires small adjustments with the fence to get a good fit.  Your strips should be longer than needed so you'll have plenty of pieces to experiment with.  The first step is to cut a 14 degree angle on one side of each strip.  Now comes the fine tuning.

Are We There Yet?

     The beveled edge on the strip will want to slide underneath your fence so it's best to clamp a piece of plywood to your fence, push it down tightly to the table.  I'm using a clamp close to the cutter to keep the strip down so the 14 degree bevel is consistent the entire length of the strip.  Now it's a matter of gradually cutting the piece down until it slides into the channel with just a bit of resistance.
     Each strip will need a hole drilled into it so you can remove the plate from the tablesaw.  Mine happened to be 3/4" so slide the strip into the channel, leave it proud and drill the hole completely through all of them.
Finger Holes

     By this time I was pretty tired of all the machine noise and dust so went traditional for the last couple of steps.  Insert the strip and line up the finger hole.  Clamp that into your vise and use a coping saw to make it fit.

Final Shaping

     Sure, you could use a guided bearing in your router but this works too.  I also cut a pass down the area in the back where the splitter goes then used a chisel to pop that piece out.

Not Pretty but Works!
It's a Beautiful Thing!

     Now I have about 8 of these strips ready to go for any blade I need to put on the tablesaw.  As they get sloppy I can just toss it and install a fresh one.  Make sure that when you're making your initial cut into the strip that you put your fence over it to hold it down.  For a dado blade I'd recommend that you clamp a piece of MDF over the entire insert when making that initial cut.


     Let me know if you decide to try this for your own saw, I'd be curious to hear your opinions!


Thursday, August 16, 2012

Miter Sled & Finger Joints


     Any of you that are also teachers know that the profession usually doesn't give you that immediate gratification.  On occasion I do run into former students and they tell me how they enjoyed the industrial arts or construction classes I've taught them in the past.  Keep in mind though that these were students from grade 6 to grade 12.  Since retiring and now teaching the occasional class plus giving private lessons the things I've taught to adults give me quicker feed back.
     As an example, I had a fellow woodworker take some one on one instructions on how to set up, sharpen, and use a hand plane.  That's one of the basic hand tool processes for those of us who aren't infatuated with machinery!  He shared with me how he had made a bracelet holder which needed to be oval in shape.  He started with a round form and by using the hand plane he had so carefully sharpened and tuned up was able to achieve the required shape.  Some of it still needed sanding because he wasn't able to get the plane in all of the places.  When I saw him last night he told me about that and how the planed area took the finish much better than the sanded area.  We had talked about that; a surface cut with a sharp plane versus one that's been abraded with sandpaper will have a sheen to it.  He shared that with me and I could sense his excitement and pleasure about conquering the plane.
     That brings me to the Urban Ranch Box I'm currently working on.  It's made of common, knotty pine from the local big box store.  Even that though will respond to the plane.

Surfacing the Inside

Sizing the Top on the Shooting Board

     This is an instance where as the builder and designer of the piece I can choose the lumber and decide where it will look the best.  This is the largest box of the series and will feature a full size, lift out tray.  A good sharp plane will have no problems with the knots and sap found on this fairly common lumber.
     Leroy also makes boxes and at our Sin City Woodworkers monthly meeting last night, the focus was on different jigs and fixtures we use in our craft to make work go smoother and safer.  He brought in his miter sled that he uses on his tablesaw.  We got to talking about the box making procedure and he mentioned having to set up the stops so that each piece would be sized accurately.
     The first rule of box making is that opposite sides of a box must be exactly the same size for your corners to be nice and tight.  Another important consideration is that you want the grain to flow around the box in a continuous manner.  In other words, if you cut a long side first your next piece will be a short side, then another long, then the last short.  You can't set a stop for the long side and cut both at the same time.  There are several solutions, one is a hinged stop that you can flip up or down depending on the piece being cut.
     Here's the solution I use to overcome this problem.  My miter sled is fairly short but sized for what I want to do.  After setting the sled on the tablesaw I slide the rip fence towards it.

Ready for a 6" Piece

     After mitering the first end I put in an MDF spacer.  It's identified and says that if my fence is locked at 9" and the spacer is butted up to it I will have a piece 6" long.  To make the next cut all that needs to be done is to switch to another spacer:

Spacer for a 3 3/4" Piece

     Each piece will need to have the smallest amount cut from it to have the miter go the correct way, that's what those small scrapes on the upper right are.  I've laid the cut pieces on the sled so you can see how the grain will flow around the box once it's assembled.
     If you have a larger sled and the pieces you plan to cut won't extend off the end like they do on my short sled you can easily clamp a stop block to your sled for the longest piece you need.  For an example, suppose you want a box that measures 8" x 12".  Clamp a stop block to your sled for the 12" piece and make your first cut.  Next, make a 4" long spacer to put between the piece being cut and the stop block and you'll have a perfectly sized, 8" piece.

     Very Important Safety Note
Do not leave the spacer in place when you make the cut, remove it before cutting.  You should never use a miter sled or the miter gauge that comes with your saw in conjunction with the rip fence.  It'll bind and you'll end up with a piece of wood flying back at you at about 100 mph!

Wednesday, May 16, 2012

The Last Jig

Panel Raising Jig

     Well, here it is; the last of the jigs I need to make.  This is the panel raising jig that's set at the angle of 15 degrees.  Nothing overly complicated so fairly straight forward to build.  I suppose it could have been adjustable to set the bevel for any angle but I really didn't want to get into that much detail.  Fifteen degrees seem to be the acceptable angle for raising panels.  If I ever need a lesser angle I could tilt the blade to change that pre-set 15 degrees.  For box lid that needs a small angle I'd just as soon use a block plane to do that.
     With every solution there comes another problem -- where the heck will I store all of these jigs I finished making?

Tuesday, May 15, 2012

There's an App, er; JIG for that!

Getting' Jiggy With It!

     Well, there it is; a workbench with some of the jigs I've spent the past couple of day's making.  Once when Adam and I were working in the shop and we needed sandpaper I pulled out my handy dandy sandpaper sizing jig.  Adam chuckled and said: "you've got a jig for everything!".  And you know, when you've been working with wood as long as I have it's pretty much true.  There's no sense in making a jig for something you do once or twice but if you plan on doing it more often a jig or fixture is the way to go.  That sandpaper jig?, you'd be surprised at how many students had detention with me at school and sized hundreds of sheets of that sandpaper!
     I've mentioned that the prospect of marketing my pistol cases is pretty good, I'll make the final determination when I go to the gun show this weekend.  In the process of doing that I decided to work on box making techniques and make some smaller, easier to sell projects.  Since the parts you work with making boxes are fairly small in size it's important to have ways to handle them in a safe manner.  As a prototype project I'm making a box that's about 4" x 6" and under 3" tall.  Trying to safely work pieces that small around a 10" tablesaw is not the way to go!
     What you see in the picture above, from left to right are:

  1. Slot Miter Jig --- used to cut a slot in the corner of a mitered box
  2. Large Bench Hook --- used to hold small pieces of material for planing
  3. Shooting Board --- used to trim and square small pieces of wood, also made a 45 degree holder for truing up miters
  4. Bench Hook --- an old standby that's definitely over built with dovetails!
  5. Small Router Table --- clamps into the end vise, uses my small trim router
     I have one more jig in the plans, one to cut a raised panel or lid in this case.  Rather than tilt the blade on the tablesaw it's safer to make a jig that rides on the rip fence and angles the work instead.  That way you don't have to mess around with tilting and and re-adjusting the blade angle.
   
     The first step in the process was to cut the pieces at a 45 degree angle.  This was done with a miter saw, then the pieces were trued up on the shooting board:

Shooting Board -- Truing the Edge
     By setting up the stop block each piece is guaranteed to be the same width. I'm using some quarter sawn White Oak for this prototype.  Not shown is the fixture which holds the material at a 45 degree angle, that cleans up any tear out the miter saw may have left.  After this step, a groove was cut into the inside bottom of each piece on the new router table.  I didn't take a picture of that but I was able to clamp the crevice tool of the shopvac to it and capture most of the sawdust.
     A technique I've always wanted to try is where you use tape to assemble and hold mitered joints tight.  Clamping can be tricky with a small project like this.  The first step was to lay them face down and apply a piece of tape to the backs:

Packaging Tape aka Clamps!

     Next, the whole assembly is flipped over, glue is applied to the inside of the miters, and bottom is inserted into the groove and you simply align and tape it all up.  Know what?  it works!  After time for drying the tape was removed and, voila; you have an assembled box!

Removing Tape from Assembled Box

     As a decorative item the edges will have a slot cut into them.  Then a piece of contrasting wood, Walnut in this case, will be glued into that slot.  This serves as a decorative element and also reinforces the corner.  Miter joints are not the strongest since you're gluing end grain but they rarely fail.  There is a series of picture frames I used to do for Diane's water colors where I used this technique with Maple frames.  These were only an inch thick or so and required just a small fixture to hold them while cutting the slot.
   
Miter Slot Jig


The boxes are bigger than a picture frame so that calls for yet another jig.  If you can picture it, this sled rides on a couple of pieces of Poplar that are cut at a 45 degree angle.  Attached to them are two pieces of 3/4" MDF that forms a trough for the box to sit in.  By setting the rip fence at 3" (just a random number) and using a blade with a flat bottomed cut, as the sled is passed over the blade a nice slot is cut.  The piece of Walnut and the clamp is a simple stop to ensure the same location on all sides.  See the slots already cut on the top of the box?


     Once the slots were completed it was finally time to get back to that wonderfully quiet world of hand tools.  A piece of Walnut was selected that just need a bit of planing to be the correct thickness to fill the slot, it's about an eighth of an inch thick.  That's were the large bench hook and block plane came into play:

Sizing the Miter Keys

     This bench hook has a very thin stop at the end of it which holds the piece while taking a light cut.  I found that it was just as easy to hold the plane and basically pull the piece under it.  Once the thickness was correct each slot was cut at 45 degrees with the other bench hook and a Japanese style saw.  This bench hook has one side with a 45 degree guide (shown) and the opposite side is 90 degrees.  At this point, the splines are in the slots waiting for me to cut and plane them even with the box sides.  That's for tomorrow.