Sunday, October 31, 2010

My 100th. Post!

When I first began this blog I didn't know how far it would go and how long I'd last doing it but here it is, post number 100.  Never know how many readers I actually have but since there has been a fair amount of feedback, questions, and comments it's been worthwhile to me.  Hopefully the goal of sharing my woodworking trials and tribulations have encouraged others to try the craft.  Learned a long time ago that you can't get anywhere if you're just sitting on the couch!  Yesterday Diane and I went to the Civil War reenactment at Spring Mountain ranch. I had my sample pistol case and flyers to see if I could generate some potential commissions and she had her camera to see if she could capture some good images to use as reference material for future paintings.  Other than the occasional wind gusts the weather was pretty nice and we made some contacts.
Earlier I'd mentioned that I have a couple of projects in the works.  One of them are the two frames I'm currently gilding and one of those is just about complete.  The other I'll try to improve what I did on this first one -- it's a definite work in progress this business of gilding.  The other is the box to hold my cabinet scrapers, files, burnishers, etc.  Here's how it looks at this time:


Scraper Box in Progress
This a practical project and it's allowed me to experiment with some techniques as well.  First off is the carving.  The profile of Ali is pretty self explanatory but now I've added her paws.  They're a little over sized but  were added so that I could get a grip on the sliding top to open the box -- Ali agreed to pose for them.  To finish this box I plan to use a new process I read about that (hopefully) should be  a durable one for a dining table top.  The hand rubbed finish I've been using for years on my furniture is not as durable as I'd like for that and  requires some maintenance.  Supposedly, this finish will appear as a hand rubbed one but uses gel polyurethane rather than my concoction of linseed oil, turpentine, and varathane as a final coat.  I'll keep you posted.

Wednesday, October 27, 2010

What's New in the Shop

Now that I've had the chance to see my new grandson life is back to normal -- sorta!  I don't know if I'll ever become a proficient gilder, it's a difficult art but I keep plugging away.  I've just used up 11 of the 20 books of gold and do have quite a number of frames to show for it.  While in Seattle, I visited Charles Douglas at his Gilding Studio.  We had a nice visit and I would like to take one of his 3 day workshops to get more one on one instruction on laying the gold.  Practice, Practice, and more Practice is what it will take.  A pack of 22 kt. gold is about $400.00 and has those 20 books.  Although it's expensive, the gold is really a minor part of the operation.  The preparation of the frame with 6-8 coats of gesso followed by the same number of coats of bole (clay), not to mention any carving I might try to throw in is where the cost comes in.  Thankfully my labor is pretty reasonable, truth be told I couldn't afford myself!  Here is a picture of two small sample pieces I'm doing at the same time, they'll be used to experiment with the toning process once I complete the two 16 x 20 frames  that are in the works.
It's hard to tell but the cut off piece on the left has some combed gesso, a process I've always wanted to try.  Just as the name implies, I made the gesso fairly thick and then used a comb to create the texture, it should make for an interesting frame.  The longer piece has composition ornamentation on it and is what the frame I'm almost done gilding has.  The molding is modified from our stock and then I steamed on the "fish scale" pieces all the way around.  It's destined for a painting Diane did based on a photo she took at Pike's Market when we visited there last year.  Anyway, once it's done I'll post it on the blog.

Monday, October 25, 2010

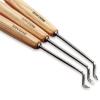
My Review of PFEIL "Swiss Made" Undercutting Tool Left


Just Right!

By Woodworks by John from Las Vegas, NV on 10/25/2010


5out of 5

Pros: Work in restricted space, Works Effectively

Best Uses: Small detailed carvings

Describe Yourself: Professional

Primary use: Personal

I found these very useful for the small areas that are carved into my picture frames. The "dog leg" design keeps the handle out of the way and allows you to cut to your design or stop cut. They make a strange sound as you cut because of flex in the shaft where it makes the "dog leg". My designs are low relief but these chisels could reach down into a pretty deep space. A little tricky to sharpen but I'm pleased with the set.

(legalese)

Saturday, October 16, 2010

One of Two Projects in Progress

Carved Lid for Tool Box
Since returning from the OPA show in Wyoming I have two projects in progress, this is one of them.  Carving is an aspect of woodworking that I want to hone my skills on and create something other than picture frames.  Picture frames demand fairly small carving just because of their size.  Any project is more interesting if there is an end purpose and that's what you see here.  I need a place to keep my cabinet scrapers and related items like files and burnishers.  As it is, they are kept in a couple of different places in the shop which is pretty inefficient! This box will be my solution to that.
It's made of materials I had left over in the shop and it's the finger jointed, Oak box that you see in the background.  The lid slides in and is made of Cherry that has been resawn and turned into a book matched panel.  The image is of Ali, my buddy -- she's an Oriental Shorthair and this is how she spends much of her day, splayed out on top of the couch watching over the house.  She's a really cool cat but like my father in law says: "jeez, don't get him started on that d#%&* cat!".  Suffice to say she's truly captured my heart and made me her chosen one.
The other thing I want to experiment on with this box is a finish I've read about that is better suited for dining tables.  Less maintenance than the finish I've always used.  Basically it's several coats of polyurethane brushed on, then lightly sanded and followed by hand wiping gel polyurethane onto the surface.  Although I stay away from surface coatings and prefer to hand rub in oil and my own top coat concoction this should stand up better to a surface like a dining table that is subject to spills.  Time will tell and I'll share the results.

Saturday, September 25, 2010

Barstools project Completed

I had the phone call yesterday I've been waiting for from Niagara Upholstery here in Las Vegas to tell me the work was done.  I picked them up this morning and the work John did was excellent.  Definitely will use him again and recommend his work to anyone.  Here are a couple of shots of the completed stools, I'm pleased with the results.  The over-all height is about 42" with the seating being approximately 16" square. Top of the cushion is at 32" which should be just right for my clients counter height.


3/4 View showing the grid and footrest
    
Head on View

Saturday, September 18, 2010

Making a Spokeshave

I've always been intrigued with the thought of making my own tools, sure, we woodworkers often make jigs to help build projects but making a tool is another thing.  At the beginning of this year I used a gift certificate from Lee Valley to buy their small, spokeshave kit.  I regularly use a metal Stanley #151 in my work to ease corners and put chamfers on the ends of pieces but thought that a small, wooden bodied spokeshave would be just the right challenge for my first, shop made tool.  Here's a picture of the final result:

I made it out of 2 pieces of Chakte Kok with a strip of Australian Lacewood in the middle.  In retrospect, the Chakte Kok may be a little soft as it chipped ever so slightly at the ends of the wear strip.  An advantage to this kit is that it came with enough of the brass wear strip to make another spokeshave body.  I used water stones to sharpen the blade and the cut it makes is nice.  There will be a learning curve to using this though.  I'm accustomed to pulling a spokeshave towards me but am finding that this works better when it's pushed away.   This project was pretty time consuming and required lots of thought and precision.  I worked on it between other projects and enjoyed the process -- even when I'd make the occasional mistake like grabbing a 7/32" bit instead of a 7/64"! What the heck, a little dowel, a little epoxy, and you'd never know it happened.  

After gluing the blank together you need to drill and tap holes for the adjustment screws to thread into the wood.  Obviously, these must be perfectly square and aligned to the body.  The kit even supplied the tap needed.  In this first picture, the holes are drilled and taped and I'm preparing to cut out the angled section for the ware.  The tape was to see the line better, I made a series of cuts with the dovetail saw which were then chiseled out.
Cutting the Ware
Once the ware was correctly sized the next step was to insert the blade into the body. It needed to be recessed so that it was flush with the bottom of the body.  You can see the brass piece that will become the wear strip at the front of the blade.
Blade recessed into the Body
Next was to fit the brass wear strip in front of the blade.  The ends are dovetailed into the body at about 10 degrees and the strip is also filed to a 45 degree angle to match the ware.  Once the clearance between the blade and wear strip was correct holes were drilled and the entire wear strip was filed and shaped to fit flush into the body.
Wear Strip Installed

Now comes the final cutting and shaping of the spokeshave.  I learned a technique where you use a glue stick to attach the pattern to the wood, it's very easy to remove with a scraper.  I also drilled holes for the area where you put your thumbs when using the shave.  Much easier to drill a radius than it is to cut one, a forstner bit worked well for this.
Pattern in place, ready for the Bandsaw

After filing and sanding to get the final shape, one that felt good in my hands I used the 3 part, top coat finish I use on my furniture.  First coat wet sanded with 220, followed by successive coats with 400 and 600 grits.  After honing and sharpening the blade it was time to test it out.  Here's a couple of photos of the results on a piece of hard Maple.  I'd suggest taking this on for your first, shop made tool if you should get the urge!  Glad to answer any questions if you run into a problem.
Rounding over the Edge


Chamfer on the End