Thursday, January 31, 2013

Stanley 140 Trick Without the 140!


     When I teach dovetails I like to mention the Stanley 140 trick because I like how it gives the inside of the case a more finished look plus it's a nice way to establish the edge.  However, I don't have a set of skewed, rabbet block planes nor do I have the $400.00+ to buy Lie-Nielsens beautiful pair.  So, where does that leave me?  One way I've accomplished this technique is to use a rip blade on the tablesaw and cut a small slice off the end of the board being dovetailed.  This certainly works but I always hesitate showing this because it probably isn't the safest way to go about it.  Holding the piece on end against the fence to remove an eighth of an inch or so is probably not OSHA approved.  It could be safer if you used a tenoning type jig that would straddle the fence.  Another downside is that you probably keep a combination blade in your saw which won't cut a flat shoulder so you'd need to change the blade anyway.

Table Base
     All of that being said, there's still a couple of "buts"; not everyone has a tablesaw and it's a safer and quieter operation to do with only hand tools.  For that reason I wanted to experiment with it.  This is what I've been working on in between projects.  It's a sofa/console table made of Sapele.  Initially I referred to it as the Star Jasmine table but have decided to not do any carving on it.  There will be a drawer at either end with a shelf on the bottom.   The shelf will be a framework of the Sapele with two sections of radio weave caning.  As you can see, I've been working on the half blind dovetails that connect the table.   This is a good place to practice them before I get to the drawers.  All traditional joinery for this project.


     I thought of two different methods to modify the Stanley 140 trick without having the skewed set of planes.  They both start out with marking the length of the tail on both ends of the board.  This piece is the center one and three inches wide.

Scribing the End of  the Board
     This shoulder was then cut with my dovetail saw for both of the methods I wanted to try.

Cutting Shoulder Line
One End, Sawn
     On one end, I cut it as if it were a tenon but left it over-sized.  The approximate size of the material being removed is 1/8" by 1/2".


     What I did to the other side was to use a chisel to remove the material almost to the scribed line.  Not sure which method is preferred but you can experiment with both and see what suits you.  I think the grain structure and type of wood you're using could determine your choice.

Chisel Work

    To flatten the cut and make it uniform was be done by taking the small router plane and setting it to the required depth, 1/8" in this instance.
Setting the Router Plane
    I had also thought of using a rabbet block plane like I do on tenons but it can be too easy to cut a taper, especially on a narrow half inch wide piece like this is.  As long as pressure was maintained on the plane, the resulting cut was level.  You could also place a piece of wood that is the same thickness to support the plane on the other side.  Skewing across the board and taking a partial cut on the ends as you began your cut made things easier.

Refining the Cut

     The only slight drawback is that the router plane dug into the shoulder a bit but a chisel remedied that.

Squaring Shoulder
     Did it work?  I think it did.  Would it have been easier to set up a rip blade, fence, and tenoning jig on the tablesaw?  Probably but since I wasn't in any rush this was a good way to hone my hand skills and gives me a technique to share with my students.  I'd be interested in hearing from other hand tool woodworkers and get your opinion on this.

Sunday, January 27, 2013

All Over 'cept the Shipping


     Here's the first photo of the custom chess piece case completely finished:


Ready to be Shipped to Washington D.C.

     I'll be the first to admit that this project took a lot longer and was much more complicated than I initially planned for.  Let's just say to duplicate it will cost about $200.00 more than this one does and leave it at that!  That being said, this was a wonderful project, one that definitely kept me on my toes and thinking every step of the way.  When you open it up, it will lay completely flat and look like this:

Open with Half Exposed
    If you're a chess player you're familiar with the pieces, there is space for 4 pawns on the left, then comes the bishop, castle, and knight, while the king and queen go at the right.  Under the cover is the same arrangement for the pieces of the opposing team.

Installing Hinges
     The final stages of a project can be some of the most challenging.  As an example, let's talk about the hinges.  I'm using quality brass hinges so naturally brass screws are a must.  Even though they're a bit touchier to install I prefer to use a traditional, slotted screw.  Anytime you use brass screws you run the risk of twisting them apart.  This is especially true with a hardwood like Walnut and a small, #4 screw.  Each screw hole was first pre-drilled and then pre-screwed with a steel screw.  Once all of them were installed, the steel screw was removed and carefully replaced with a brass screw.  Yes, that's beeswax there, that's my insurance and not one of these little screws twisted apart.

     Once the hardware was installed it was time to get the grid work in place.  Talk about a jigsaw puzzle!  Each piece is numbered on the end and installation starts by placing the long pieces along with the required spacers in to the case.

Long Dividers and Spacers In Place

      Once these are installed, they will be held in position by the two, short end pieces. You can see one laying outside of the case in the above picture.  Putting these in position requires everybody to cooperated and stay in line!

Side One Installed, One More to Go
     The final piece to this puzzle are the long, outside pieces.  The way I designed this is that they will hold the entire grid in place.  There are only four screws that keep the grid in place, two in each of the long, outside pieces.  There is enough space for the grid to "float" within the box.  That part of the design is to compensate for seasonal changes that will probably occur in the eastern part of the United States where this box is headed for, not too much of a concern here in the desert where are average humidity is well below 10%!

Screwed in Securely

     Getting those four, little screws in was a challenge and I knew it would be.  I was showing a fellow woodworker the grid and he was wondering how I'd accomplish that.  On the pawn side of the box there is only 1 5/8" to work in and the king/queen gave me about 2 1/4".  Well, I pre-drilled the holes to begin with.  The tool I'm using in the picture above is an old Stanley No. 3400, Yankee screwdriver.  It's one I bought at Silvera Lumber in Antioch, CA when I worked there as a teenager in the 60's!  At that time I probably didn't have any real use for it and bought it because it was a cool little tool.  If you check Ebay, there are 3 available ranging for under $20.00 each.
     To sum it up, this was a great project and I'm grateful for the trust my client put in my work based on my website and Etsy store.  I've been fortunate to have positive feed back from other clients on these and that's the only way to build my reputation.  Couldn't have done this without the internet and it's long distance reach.


Saturday, January 26, 2013

Morado aka Bolivian Rosewood


     The focus of the emails I've been receiving from Etsy is for all of us sellers to gear up for and promote items that can be sold for Valentine's Day.  Hate to be so commercially oriented but with the lack furniture commissions need to find something to keep me in the shop and feed my wood addiction!  Etsy has proven to work towards that end so I really can't complain.  The other day I was in Peterman Lumber and they had a couple of 4' long pieces of a really interesting looking wood called Morado.  Here's a picture of where they look like at the end of today:

Valentine Presentation Boxes (unfinished)
   
    There's always a challenge trying to design something with a limited supply of wood and these were no different.  The wood has some beautiful coloration as you can see and will be finished with shellac and wax to emphasize that.  The lid on the box at the upper right is spalted on one edge which is pretty cool.  The wood comes from tropical South America, mainly southern Brazil and Bolivia.  As is common with some of these exotics there are a couple of other names it goes by, notably Pau Ferro, Caviuna, and Jacarenda.  It's pretty hard and it seems that there were a couple of interlocked streaks that simply refused to be smoothed by planing.  I was having a conversation with one of my students and he was wondering if there are just some pieces of wood that won't be tamed with a plane, no matter how carefully it's set up and how sharp the blade is honed.  Well, after tackling this particular piece of wood I think he may be right!  Another thing we discussed is how making small items like these boxes seems to be just as time consuming as larger items like cabinets, chairs, or tables.  Makes it somewhat difficult to price projects like this according to the time spent.  Much easier to charge more for an item when it's a large size.
     Keeping time and eventual cost in mind I wanted to be as efficient as possible in making them.  Simple construction of mitered corners and a solid bottom that could be assembled using only glue and packaging tape.

Glued and Taped Together 
     Although it takes a bit of time, each of the inside corners were protected from glue ooze out with a small piece of tape.  What makes this kind of construction appealing is being able to have the grain continue all the way around the box.  Three of the four corners will be a perfect match, the remaining one is usually okay.  I tried a different way (for me anyway) to keep track of the pieces, let me explain it to you.
     It's incredibly easy to flip a piece upside down or end for end and at first glance the grain seems to be aligned.  These boxes are pretty small so what I did was to put a piece of tape the entire length of the board.  Next up was to cut the miters using a sled on my tablesaw.  As I cut each piece I marked both sides of it with a sharpie right on the tape. It's also critical that opposing pieces are exactly the same length if you want the final box to be square.
     Step One:  After cutting a 45 on one end I use a quick piece of scrap wood as a stop block.  It's placed between the rip fence and the end of the short piece.  Hold the wood tight, remove the stop block and make the cut.

First Short Side
     Step Two:  Flip the piece over and trim just enough of it to create the next 45 degree end.

45 Degree cut the Right Direction
     Step Three:  Use another scrap piece to cut the long piece and cut it.

Making the Long Side
     This system is an easy way to make mitered boxes.  Since I'm designing them based on the amount of material I have the lengths don't need to be exact.  The stop blocks are just pieces of scrap but they  ensure that opposing ends are the same length and the boxes will turn out square.  After all pieces were cut, the bottom of each one had an 1/8" wide slot cut into it for a Masonite bottom that will be lined with ultra suede.  With the tape protecting the inside from any squeeze out it's a fairly quick and efficient way to make a box.

Thursday, January 24, 2013

Technical and Lots of Engineering Required


     Don't get me wrong, I'm not complaining here it's just that I've realized how much engineering and design work this chess case requires.  It's been a fantastic learning experience and if we challenge  ourselves, everything we do should be.  Glad I didn't take this commission on when I was first contacted about it back on the fourth of December! At that time I thought there was a chance I'd be able to finish and deliver it in time for Christmas ---- boy,  would I have been wrong.
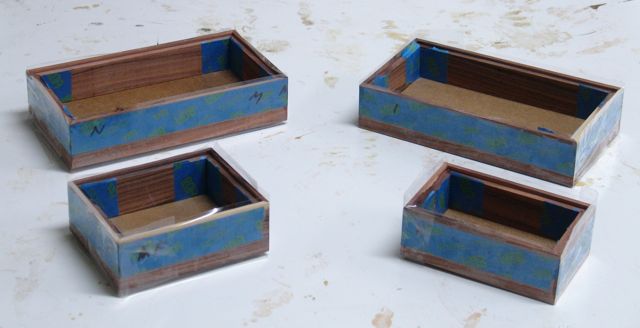
     When you work with wood, all of the time you've invested can be ruined with one slip up or mis-measurement.  For some reason, separating the two halves of the chess box was turning into a mental stumbling block.  Just the box alone, without the intricate egg crate dividers for the interior has taken over 6 hours.  One slip up and all of that time and material would have been lost.  Here's how the completed and oiled box looks sitting on the saw:

Ready for Surgery
Tape to Accent Where to Cut


     The case needs to be neatly sawed right through the center of it, I placed tape on the cut line so it would show up better.  As you can see, the case is pretty good size so I had to be very steady as I passed it over the blade.  The first to be cut were the short sides, these weren't cut completely through.
     Once both were cut, the blade was raised up to cut completely through and each long side was cut.  This is done to prevent the sides from closing together which is apt to happen if you try cutting all four sides completely through.


     I had a comment from one of my readers the last time I shared this technique commonly used in box making.  It was suggested that using a utility knife was easier than a flush cut saw like I've done in the past --- he was right!

Using a Utility Knife to Complete Separation
     Even though a flush cut saw is designed to cut flush, the teeth can still dig into the wood if there's any angle on the blade.  With this operation you can't see all of the blade so the utility knife was a good choice.  Notice the spacers placed in between the two halves, just a bit of insurance that the wood wouldn't tear.
     Next up was trimming the edge smooth with a block plane.
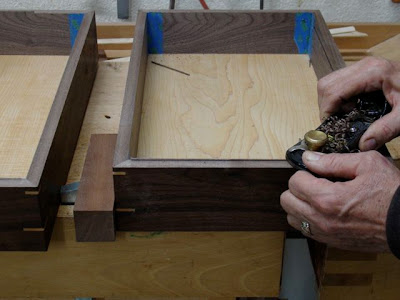
Trimming Flush

     Recesses were cut for the hinges, I generally rough them out with a trim router and shop made template.  Even though I line the template up carefully it's about 1/16" smaller than the hinge to allow me to make final adjustments with a chisel as needed.

Hinge Template
     Finally I get to see if all of my careful engineering, measuring, cutting, etc. is correct and very happy to say it was as you can see here.

One Half with Cover Sheet

     The way all of these pieces fit together will only require 4 screws to hold the entire assembly in place.  They all interlock but there's a bit of wiggle room to accommodate seasonal changes.  The cover sheet now has a slot between the two finger holes.  There is a Maple toggle that goes on the piece of Walnut you see in the bottom of the case that will keep everything in its place.  This project is so close to being complete I can almost taste it.  A coat of shellac on the interior, setting the hinges and the clasps and we'll be in the mail next week.  I have time to let the finish cure for a few days so that's the plan.
     In the meantime I'm also working on a series of boxes to put on the Etsy store as Valentine's Day presents.  Etsy keeps sending messages to gear up for Valentine's and I'm trying to heed them -- must feed my wood addiction!

Wednesday, January 23, 2013

Recent Students


     This year has started out with several students which has been fun.  I've had a flyer at Woodworker's Emporium by their plane and chisel displays that has proven to be a real good location.  Seems as if there are enough people out there, interested in using these tools that buy them but need some one on one instruction to get them started.  I've enjoyed doing this, still the teaching part I've made a career out of but on a different level.
     One of my recent students was a lady who called me up and wanted to start working with wood but had no idea of how to go about it.  She went to one of the big box stores thinking she'd buy a workbench to start that endeavor.  The salesman sold her, what he said, was enough materials to build a bench of her own. It was a bit of a challenge but here she is, proudly standing by the bench we came up with:

Marie's Workbench
     The top is one of those 23" wide, laminated knotty Pine boards available at those stores.  Hopefully it'll be strong enough for her purposes.  They also sold her a 4' length of 1" x 12" which I decided to rip into 2" wide pieces and nail/glue to the long edges.  Throw in some miscellaneous pieces of 2x3 and 2x4 and we had a bench in the making!  Since she's in the student stage I was able to explain about how wood expands and the things we need to take into consideration when we join them.  The pieces on the end (battens?) are screwed into over-sized holes to allow some movement.

Really Getting Into The Work

     In my instruction I only use hand tools because of the liability factor and also expect my students to bring their own.  She had purchased a battery operated set that included a small skill saw and drill so I checked her out on those as well.  The first time we met she learned how to make a lap joint with her skill saw and chisels but we decided making all of them for the workbench would be a bit much!  Those were all cut by me with a dado head, quicker and more accurate.  The goal was for her to have a stable and strong workbench so she could pursue woodworking -- I think we accomplished that!
     On Saturday I had a father and son for students.  They had purchased a number of planes (Wood River) from Woodworker's Emporium and also chisels and a dovetail saw.  We were pretty ambitious in trying to do plane set up and use and dovetails.  I must admit that I was pretty impressed with the planes, right out of the box they were able to take some pretty decent cuts with them so we didn't have to spend a lot of time honing and flattening the blade.  At least now they've experienced my system of setting the tool up to use.  Our main focus was how to lay out and cut dovetails.  I've found that a single one cut out of a piece of Alder about 3" wide is a good starting point.  I have to credit Gary Rogowski and his 3 minute dovetail for the inspiration but it works as you can see here:

A Tale of Two Tails
 
  I won't point out which was the Dads and which was the sons but I did sense a little competition!  Their chisels need a lot more sharpening and honing to make this task easier.  I had them use my Lie-Nielson chisels as a comparison and they quickly saw the importance of having a sharp chisel.  I always stress to students though that they don't need top of the line tools, just finely sharpened ones to make the cutting as easy and precise as possible.  I still use my Stanley chisels I bought in the 70's as a carpenter for bench work.
     All in all, having students keeps me on my toes and is a good way to keep the craft going.  Now it's back to the chess case.  This is where patience comes in, hand rub a finish coat, wait over-night, and repeat!  May take some time but sure like the results better than a quick spray of lacquer!

Monday, January 21, 2013

Shadow Box Project


     I've started an interesting project that came to me unexpectedly.  My friend Christian Brisepierre who owns Woodworker's Emporium here in Las Vegas called me the other day.  He told me about a client of his that needed a shadow box built but he was swamped so would I be interested in taking this on, I was. He emailed me the contact information and a sketch and that's how it started.  Here's what the sketch looked like:

  As you  can see, it's pretty complete and detailed.  I called the man up and we discussed the project.  A time was arranged so we could meet and he even came with the materials all set to go.  I didn't realize that one of our "big box" stores sold dimensioned, clear Pine but that's what he brought over.  Quality wasn't bad either so that eliminated two steps for me, drawing the plans and buying the materials.


     We discussed his plans and his vision for the project, decided on my fee and the work began.  This will be a two sided shadow box that will sit on a table, this way the contents can be seen from either side.  After setting up a dado head, the side and top pieces were rabbeted to accept the 1/4" plexiglas.   After re-adjusting the fence, the joinery was cut on the ends of each piece.

Rabbets cut on Ends
     After adjusting a small router plane for the exact depth, these cuts were quickly smoothed out and brought to the required dimensions.

Stanley # 271
     Next up was to cut the dados required for the shelves.  Here's were I really had to be accurate with my measurements to make sure the "egg crate" would all slip together.  The dado head couldn't cut deep enough into the 2 1/2" wide shelves so that cut needed to be finished up by hand.  I decided to only make them deeper on the center section.  After marking the required depth, a dovetail saw was used to get there:

Deepening the Slot
     This was followed up with some chisel work:

Removing the Waste
and now the egg crate went together --- well, almost!  Remember I mentioned that my client had brought the material over for this project and I said it was pretty nice looking stuff?  Well, looks can be decieving!  He had brought over 2 pieces, 3/8" x 24" to cut the shelves from.  One of those must of had quite a bit of tension in it because after it was cut to the 11+" length both pieces took a twist and wouldn't fit into the slots without forcing them.  That just wasn't acceptable.  Lucky for me I had recently purchased a piece of clear Pine for a future box series so used a foot of so of it to make new shelves so that took care of that problem.  I'm hoping that I can use the material he brought for feet on the boxes I have planned so I won't need to charge him for the material too.
     Another slight problem is that the pieces from the "big box" store weren't consistent in thickness.  They were off enough that they barely fit into the groove on one end but were loose on the other.  I decided the best way to tackle that was to plane them down:

Smoothing the Boards
    My preference is always to create planed surfaces as opposed to a sanded one.  Now that things are done here's a shot of the almost completed project:

Dry Fit Looks Good
     You can see things went together well, there's a uniform rabbet on both sides to accommodate the plexiglas.  The last thing will be to shape a molding that the client will screw to the box.  This way he'll be able to remove it and change the items displayed.  Another plus about this commission is that he will assemble and finish it so my end of this project is almost complete!

Saturday, January 19, 2013

At Last --- the Case is Assembled


     It seems as if it's been a long time coming but the case is now assembled and the miter keys are glued in and drying.  Between my on-going fight with the flu (which I'm determined to win!) and the complexity of the inserts this project is taking longer than I had expected.  Let me give you a photographic essay of the entire assembly process.
     It started with preparing all of the pieces for the glue up and also getting the clamps pre-set and ready to go.  As always, a dry fit is a good habit to insure that things were going to go well.

Ready for Glue-Up
     No matter how well prepared I am there's always a certain level of stress that kicks in when it comes time to assemble a project.  Doesn't seem to matter if it's a simple or complicated one the stress is there.  I'm using 3 clamps on these mitered joints.  The blue tape on the inside is there in case of glue squeeze out, makes it a little easier to clean up.  I'm using Old Brown Glue which is in the background along with an acid brush and a damp paper towel to clean any glue off of my fingers and keep things as neat as possible.  Glue up went well so here's how it went into the laundry room to dry.

Assembled
The green tape you see on the outside is there to identify the proper assembly sequence so the grain pattern is continuous.
     The next day it was time to cut the slots to reinforce the miters and add a decorative element to the case.  At the time I made it, I thought my jig was over-kill and way to large, however;  I must have known I was going to get this commission.  I was glad to have the extra size of it to support this case.

Cutting the Slot for the Keys
This is a good sized box,  roughly 7" x 12" x 18" so I had to be sure to hold things steady.  The purpose of this key is to reinforce the miter by adding some long grain to long grain glue surface.  A miter on its own doesn't have a lot of strength since it's mostly a end grain to end grain joint.
     After planing a piece of Maple so that it was a snug fit, it was cut into triangles for the keys.  This was easily done with a bench hook and a Japanese fine cut saw.

Cutting the Keys
I had a lesson with two students today on cutting dovetails and this bench hook was part of our discussion.  This is a definite example of over-kill.  Bench hooks are great shop made appliances and really don't need the strength or finesse of a dovetail joint.  All that's required is a couple of pieces of scrap glued/screwed together like the one in the back ground.  Making the dovetailed one is a great practice piece to keep your dovetail skills up to date.  The other bench hook was used to hold the spline material for planing.


Cardboard Glue Applicator


     Once the keys were all cut it was time to put them in place.  You can see I use a very sophisticated and high tech glue applicator.  I've found that for a narrow space like this a piece of cardboard is all you need.  First step is wiping it onto the sides of the slot.


Glue on Bottom of Key
Next, I put a small amount of glue on the bottom of the key.  As the key is pressed into the slot this glue will squeeze up the sides.  It's important that the key is fully seated in the slot.  At our last Sin City Woodworkers meeting the subject of a "rubbed glue joint" came up.  This is an example of that.  Once the glue has been applied you rub it back and forth in the slot until you can feel it start to grab.  At that point you just let it go.  Here you can see how it'll end up.


The technique on this box is one I've done before.  After the splines are dry they will be planed smooth and the entire box will be finished.  The separation is between the shorter splines in the middle of the box.  Notice the mallet?  I've learned from experience that the spline material may swell up when the glue gets on it making it almost impossible to seat it my hand.  That's where the mallet comes in.
     Once the box is separated it'll be time to install the hinges and the catches.  First up though will be the egg crate divider system needed for the chess pieces. Yes, I'll make the deadline for delivery!

Thursday, January 17, 2013

Chilly Las Vegas Update

   
     As you may have read in the news, here in Las Vegas we've been faced with some pretty cold temperatures lately.  For many of you, low's in the 20's and high's in the low 40's are par for the course but that's not the case for us!  I've been lucky if I can get the shop into the 40's and that low temp really effects gluing and finishing.  Since there is a deadline I needed to get the interior pieces of the chess box shellacked.  My finish for them will be shellac and wax.  Thankfully here's what was completed yesterday when we had an afternoon high of 45 degrees or so.

Inside PIeces Shellacked
     I was able to do this after finding this information on Zinssers website regarding their shellac, something I didn't know but glad to know now.  Here's part of what it said:


Shellac's Great Properties

Shellac has such remarkable properties that if it were just recently discovered it would be hailed as a miracle finish of the 21st century.
  • All-natural – Shellac is an all-natural resin of insect origin that is harvested regularly and is therefore a renewable resource.
  • Fleeting alcohol odor – Shellac is dissolved in denatured ethyl alcohol. It has a fleeting, antiseptic odor that dissipates quickly as the product dries.
  • Easy to use – Shellac is user-friendly and virtually goof-proof. It can be applied with a brush, pad, sprayer, or wiping cloth.
  • Super-fast dry time – Shellac dries to the touch in MINUTES and, in most cases, can be sanded or recoated in a little over half an hour
  • Cold temperature application – Unlike other finishes shellac can be applied in cold temperatures (40o F. and below) without concern over proper drying and curing.
I only copied a couple of them but the last one on the list  made me happy.  I've been using an air brush at about 20 psi and find it works great for this application.  I first used this for sealing picture frames, it's much easier than brushing or padding and there's almost no chance of runs, drips, or errors.  Before these are put into the case they will be rubbed out with wax.
     In the meantime, I've been pre-finishing the top and bottom panels for the case.  Wish I could show you how nice this Maple looks, here's the best shot I could get.

Three Hand-Rubbed Coats
     It's probably more of a tiger stripe Maple than a curly one but it has the chatoyance I wanted.  Of course, that figure comes with a price.   The best way to smooth it is with a card scraper.

Scraping Smooth
     The grain wants to tear out even with a smooth plane set up for a light cut with a tight mouth opening.  With the card scraper the initial passes allow you to actually feel the stripes but they work themselves down with each pass.  You can see here that the scraper is making about 90 shavings with a bit of dust thrown in to let me know I need to create a new burr!

Card Scraper Results
     At our woodworkers group meeting last night I learned that the chess pieces I'm making this case for are considered to be what's referred to as "tournament size".  I thought they were really large but then I've only seen small chess sets with the little plastic pieces.  Apparently the size of the boards squares are a regulation 2 1/4".
     This project has been an interesting one to say the least.  Not only am I  learning a bit about chess pieces but also the complexity involved with making all of these "egg crate" compartments to fit them to.  It's much more complicated and time consuming than I imagined --- I'll know for next time!

Saturday, January 12, 2013

First Look!


Pieces Mitered, Corners Match
      Seems like you're sitting in the theater and they do their First Look clips while you're waiting for the feature presentation doesn't it?  It's funny, I drew the case out to scale to get a sense of the proportions but now that I see the actual box it seems larger.  Notice a couple of things, you can see inside that the grid work I previously made does fit in.  Kind of felt like I was burning the candle at the wrong end by doing the grid first and then building the box around it.  Worked out fine though, I left just shy of 1/16" to allow some play in the dividers.  There's bound to be some humidity changes in Washington D.C. where this project is headed compared to my bone dry desert!  The other thing to notice is how the grain pattern continues around the box.  That's always a concern when doing boxes.
     The over-all height of this box is 6 3/4" which is pretty wide to cut miters on.  I double-checked the squareness of my jig before starting to cut the pieces, seems as if it always needs a bit of adjustment before a new project.  Notice the bolt head at the right side of the fence in this picture?

Cutting Short Sides
     When I built this jig I made it adjustable.  You can see the red mark which is an arrow.  There's an oversized hole for that bolt which allows me to pivot the fence as needed for square.  The critical part when building boxes is that the opposing sides have to be exactly the same length.  For the short pieces I used a large combination square held against the edge of the table as a reference point.  If you do this it's wise to mark where to hold the square just in case the edge isn't parallel all the way across --- it should be but why take chances.

Cutting Long Sides
     For the longer sides I used a small combination square as a stop block.  In case you're wondering why to use this method keep in mind that you want the grain to continue around each corner and the entire box.  This means you need to cut the pieces in sequence, i.e.; short, then long, then short, and finally the last long.  It would be easier to set a stop block, cut both long pieces then reset the stop block for the two short pieces but now the grain pattern has been ruined.
     See that heater close to me?  It's been extremely cold the past couple of days and that's supposed to continue till mid-week.  Managed to get my little work area up to 52 degrees, early morning temp was in the upper 30's in the shop so it's definitely time to bundle up.  I finished todays work time up by cutting the dado's for the top/bottom panel and cutting those panels to size.  Tomorrow after Church I'll cut the joinery on them and then use a scraper to smooth the surface.  I always finish the panels before I assemble a box which may be a challenge with our current cold snap.  Don't want to use the propane heater while I'm finishing.  My plan is to put the oil in the house tonight to warm up then take it out to the shop to apply it.  I'll be able to bring the pieces into the laundry room to dry, sure am glad Diane likes the smell of fresh oil!  Have to check specifications for shellac which I what the interior of the box will be.