Showing posts with label Custom Box. Show all posts

Tuesday, April 9, 2013

UpDate on Latest Etsy Custom Order and Mystery of the Planer


    First of all, what the heck happened to our spring like weather?  Over the weekend I washed and put away what I call my "winter over-alls", the heavy stone-washed Carharts with the double knees and all!  In the summer time I switch to a pair of their denim ones instead. Also put away the heater figuring that with our daytime highs reaching the upper 80's I surely wouldn't be needing that either.  Well, the wind blew (30-50 mph) and the temps dropped down to the 50's which for most of you is still downright balmy but for us desert rats ---- not so much!  Work goes on just the same, just wanted to complain a little.  We're supposed to get close to a high temperature record on Thursday which was 88 degrees back in 1985.
     Fell one day behind in my schedule for the two boxes due to some adjustments on my planer.  You may remember my post where I had rotated all of the carbide cutters to have a fresh edge.  This is after having the planer for 7 years or so.  Well, the cut became worse instead of better and there was a huge amount of snipe at both ends of the board.  Turns out that the in feed and out feed roller were out of adjustment and putting way to much pressure on the stock as it was being fed into the cutter.  Somewhat of a mystery, there's only .02 difference between the height of the cutter compared to the rollers.  Only thing I can imagine is that over the years the cutting edge wore down and the performance deteriorated ever so slightly, then when the cutters were renewed every thing went the other way.  Oh well, just a mystery that may come up whenever the blades are changed.  Once done I was able to accurately plane the Walnut to fit the slot at each corner of the boxes.


Measuring Key Length

     I really do relish the quietness of hand work, the length of the key was set with a small combination square and placed on a bench hook.


Cut to Length
   
     For this I use a Japanese razor saw which makes quick work of cutting the key.


Gluing Keys in Place

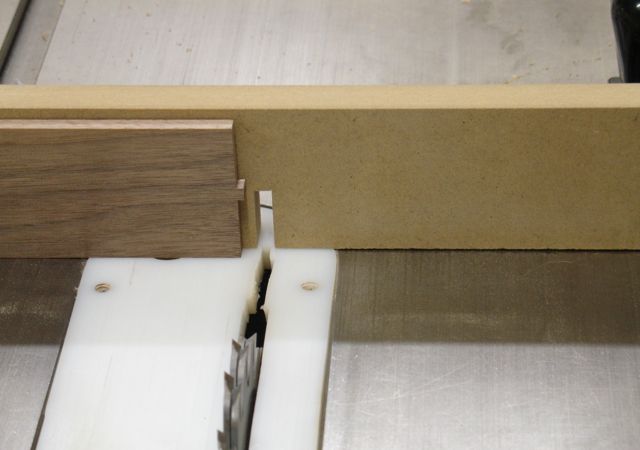
     The final step is to glue the key into the slot previously made on the tablesaw.  High tech work here with your standard toothpick glue applicator and a small hammer to set it firmly into the slot if needed.  Adding miter keys to the joint can be interesting,  many times I make the key fit snugly into the slot but too snugly!  You know that because the glue causes the grain to swell and you can barely fit it into the slot -- that's where the little hammer comes in.  This was done yesterday morning and due to the unusually cold weather decided to wait until today to cut and finish them off.  On a typical spring day here in the desert the glue would set up in a matter of hours but with the drop in temperature decided giving it 24 hours was a wise choice.
     Off to the shop to get these boxes completed and shipped out as promised.

Sunday, March 17, 2013

Bound for Chicago


Ready To Go!
     Well, I was able to keep to the timeline and the box is now packaged and ready to bring to the post office first thing in the morning.  I tell you, this is one big cigar box!  I'm anxious to find out what its intended purpose will be.  To get this job there have been 18 Etsy convo's (that's what communication is called on Etsy) but it has worked out.  This is a paint grade project made of Baltic Birch plywood and Maple.        
     As usual,  it was built as a solid cube and then cut apart on the tablesaw.

Trimming the "Flash"
     The process I use is to cut two opposing sides completely through and then lower the blade to leave just a thin sliver of wood for cutting the other two sides.  The prevents the box from closing over the blade and creating a snipe at the end of the cut.  This sliver of wood is easily cut with either a utility knife or saw.  Then, all that remains is to plane it smooth.  That pile of tape is what was around the perimeter of the box to make the glue clean up easier.
     In the previous blog I mentioned trying the method of making an integral  dust check by cutting a groove before assembling the box and that worked well.  In the picture above you can see the step on the inside of the lid.  Here is a picture of the box and lid where it's easier to see how the dust check works.

View of Dust Check
     A slight chamfer was planed on the dust check to relieve the edges before glueing and pinning it into place.  Probably the largest lift off lid box I've made to date.  Next comes the shipping.  The shipping weight is 10 pounds so I was sort of apprehensive.  When I gave the quote I figured about half of that weight.  Turns out that USPS priority mail with an expected Wednesday delivery is about $40.00. For comparison, FedEx is asking $102.51 and it gets there the same day except they guarantee delivery before 12pm.  I know which one of those would be my option.

Saturday, March 16, 2013

Chicago Bound, Custom Etsy Box


      This Etsy business is pretty cool, I mean how else could you get the opportunity to build something for someone half way across the country?  Last Wednesday afternoon (the 13th.) I had a convo on Etsy asking about making a custom box in the style of a cigar box.  My goal is to answer any and all requests I get and have found it's well worth while.  Well, this cigar box has turned out to be 16" square and 6" tall --- that's a lot of cigars!  After 16 Etsy convo's  that included a sketch I got the job.  It's a rush job but glue can only dry so fast!
     The project will be made out of Maple and Baltic Birch plywood and the client will paint it when it arrives.  Like all projects, the first step was to square and dimension the lumber.  As a "hybrid woodworker" I utilize my saw for the rough work and then a #7 Jointer plane for the final passes.

Truing up the Edge
     Something satisfying watching the shavings curl up through the throat of the plane.  Reminds me of students I've had and their satisfaction after sharpening and setting up their own planes.
     Next up was cutting the miters for the box.  This was accomplished on the tablesaw with a jig:

Cutting Side Miters
     Since this box is square it was easy enough to set up a stop block one time and cut each piece exactly the same size.  I hadn't put it into my plans or bid but decided that 6" is a pretty tall box to miter.  Took the extra step of cutting a slot for a spline to reinforce the work.

Cutting for Spline
     This was done by setting a stop block and then testing the depth and location on some of the extra pieces I made.  I imagine I'm not the only one that finds this to be true; if I cut an extra side just in case something goes wrong I never need it.  On the other hand,  if I don't have an extra piece or even enough material to make on, something does go wrong.  Since this was the weekend and a rush job I decided to make 6 pieces for the box and no --- I didn't need the spares!
     There was a technique I saw in Fine Woodworking Magazine quite a while ago that I wanted to try on this box.  Since it's a lift off lid it definitely needs a dust check to align the bottom and lid together.  What they showed in this article was to dado a groove on the inside of the box before assembly.

Dust Stop Dado
     When you separate the lid from the box you cut towards the center of that dado.  Next step will be to make a dust check that will be glued into the box portion and the lid will sit securely on top of it.  Seems like it should work like a charm, sure hope so!
     Glue up was next, thankfully Diane was able to give me a hand getting the clamps in place.  We hit 86 degrees today so that means you need to move quickly so the glue doesn't set up before the clamps are in place.  I used three different band clamps to get it together.

Clamped Up
     You can see the ends of the masonite splines sticking up out of the corners.  The tape is there to make any glue squeeze out easier to clean up.  After the box had dried for a few hours I was able to attach one panel.

There's a Box In There Somewhere!
     To accomplish that I was able to separate my torsion boxes which just happen to be the same width as the box.  Since glue makes everything so slippery the first thing I did after applying a bead of glue was to use my 23 gauge pinner to hold things in place.  About 3, one inch pins on each edge is all it took.  The building block supplies enough weight to for the glue to form a strong bond.
     Time for dinner but before I call it a night I plan to flip the box over and attach the other panel.  That way it'll be ready to work after church tomorrow.  I may need to put the slightest bit of putty over the pinner holes but this box will be painted and that's more than enough to conceal them.  Even though the client offered to pay extra for a rush job couldn't see doing that, sometimes we work better under some pressure.  As it is, I bought a box from Box Brothers so if all goes well I should have no problem taking it to the post office first thing on Monday.

Sunday, January 27, 2013

All Over 'cept the Shipping


     Here's the first photo of the custom chess piece case completely finished:


Ready to be Shipped to Washington D.C.

     I'll be the first to admit that this project took a lot longer and was much more complicated than I initially planned for.  Let's just say to duplicate it will cost about $200.00 more than this one does and leave it at that!  That being said, this was a wonderful project, one that definitely kept me on my toes and thinking every step of the way.  When you open it up, it will lay completely flat and look like this:

Open with Half Exposed
    If you're a chess player you're familiar with the pieces, there is space for 4 pawns on the left, then comes the bishop, castle, and knight, while the king and queen go at the right.  Under the cover is the same arrangement for the pieces of the opposing team.

Installing Hinges
     The final stages of a project can be some of the most challenging.  As an example, let's talk about the hinges.  I'm using quality brass hinges so naturally brass screws are a must.  Even though they're a bit touchier to install I prefer to use a traditional, slotted screw.  Anytime you use brass screws you run the risk of twisting them apart.  This is especially true with a hardwood like Walnut and a small, #4 screw.  Each screw hole was first pre-drilled and then pre-screwed with a steel screw.  Once all of them were installed, the steel screw was removed and carefully replaced with a brass screw.  Yes, that's beeswax there, that's my insurance and not one of these little screws twisted apart.

     Once the hardware was installed it was time to get the grid work in place.  Talk about a jigsaw puzzle!  Each piece is numbered on the end and installation starts by placing the long pieces along with the required spacers in to the case.

Long Dividers and Spacers In Place

      Once these are installed, they will be held in position by the two, short end pieces. You can see one laying outside of the case in the above picture.  Putting these in position requires everybody to cooperated and stay in line!

Side One Installed, One More to Go
     The final piece to this puzzle are the long, outside pieces.  The way I designed this is that they will hold the entire grid in place.  There are only four screws that keep the grid in place, two in each of the long, outside pieces.  There is enough space for the grid to "float" within the box.  That part of the design is to compensate for seasonal changes that will probably occur in the eastern part of the United States where this box is headed for, not too much of a concern here in the desert where are average humidity is well below 10%!

Screwed in Securely

     Getting those four, little screws in was a challenge and I knew it would be.  I was showing a fellow woodworker the grid and he was wondering how I'd accomplish that.  On the pawn side of the box there is only 1 5/8" to work in and the king/queen gave me about 2 1/4".  Well, I pre-drilled the holes to begin with.  The tool I'm using in the picture above is an old Stanley No. 3400, Yankee screwdriver.  It's one I bought at Silvera Lumber in Antioch, CA when I worked there as a teenager in the 60's!  At that time I probably didn't have any real use for it and bought it because it was a cool little tool.  If you check Ebay, there are 3 available ranging for under $20.00 each.
     To sum it up, this was a great project and I'm grateful for the trust my client put in my work based on my website and Etsy store.  I've been fortunate to have positive feed back from other clients on these and that's the only way to build my reputation.  Couldn't have done this without the internet and it's long distance reach.


Thursday, January 24, 2013

Technical and Lots of Engineering Required


     Don't get me wrong, I'm not complaining here it's just that I've realized how much engineering and design work this chess case requires.  It's been a fantastic learning experience and if we challenge  ourselves, everything we do should be.  Glad I didn't take this commission on when I was first contacted about it back on the fourth of December! At that time I thought there was a chance I'd be able to finish and deliver it in time for Christmas ---- boy,  would I have been wrong.
     When you work with wood, all of the time you've invested can be ruined with one slip up or mis-measurement.  For some reason, separating the two halves of the chess box was turning into a mental stumbling block.  Just the box alone, without the intricate egg crate dividers for the interior has taken over 6 hours.  One slip up and all of that time and material would have been lost.  Here's how the completed and oiled box looks sitting on the saw:

Ready for Surgery
Tape to Accent Where to Cut


     The case needs to be neatly sawed right through the center of it, I placed tape on the cut line so it would show up better.  As you can see, the case is pretty good size so I had to be very steady as I passed it over the blade.  The first to be cut were the short sides, these weren't cut completely through.
     Once both were cut, the blade was raised up to cut completely through and each long side was cut.  This is done to prevent the sides from closing together which is apt to happen if you try cutting all four sides completely through.


     I had a comment from one of my readers the last time I shared this technique commonly used in box making.  It was suggested that using a utility knife was easier than a flush cut saw like I've done in the past --- he was right!

Using a Utility Knife to Complete Separation
     Even though a flush cut saw is designed to cut flush, the teeth can still dig into the wood if there's any angle on the blade.  With this operation you can't see all of the blade so the utility knife was a good choice.  Notice the spacers placed in between the two halves, just a bit of insurance that the wood wouldn't tear.
     Next up was trimming the edge smooth with a block plane.

Trimming Flush

     Recesses were cut for the hinges, I generally rough them out with a trim router and shop made template.  Even though I line the template up carefully it's about 1/16" smaller than the hinge to allow me to make final adjustments with a chisel as needed.

Hinge Template
     Finally I get to see if all of my careful engineering, measuring, cutting, etc. is correct and very happy to say it was as you can see here.

One Half with Cover Sheet

     The way all of these pieces fit together will only require 4 screws to hold the entire assembly in place.  They all interlock but there's a bit of wiggle room to accommodate seasonal changes.  The cover sheet now has a slot between the two finger holes.  There is a Maple toggle that goes on the piece of Walnut you see in the bottom of the case that will keep everything in its place.  This project is so close to being complete I can almost taste it.  A coat of shellac on the interior, setting the hinges and the clasps and we'll be in the mail next week.  I have time to let the finish cure for a few days so that's the plan.
     In the meantime I'm also working on a series of boxes to put on the Etsy store as Valentine's Day presents.  Etsy keeps sending messages to gear up for Valentine's and I'm trying to heed them -- must feed my wood addiction!

Saturday, January 19, 2013

At Last --- the Case is Assembled


     It seems as if it's been a long time coming but the case is now assembled and the miter keys are glued in and drying.  Between my on-going fight with the flu (which I'm determined to win!) and the complexity of the inserts this project is taking longer than I had expected.  Let me give you a photographic essay of the entire assembly process.
     It started with preparing all of the pieces for the glue up and also getting the clamps pre-set and ready to go.  As always, a dry fit is a good habit to insure that things were going to go well.

Ready for Glue-Up
     No matter how well prepared I am there's always a certain level of stress that kicks in when it comes time to assemble a project.  Doesn't seem to matter if it's a simple or complicated one the stress is there.  I'm using 3 clamps on these mitered joints.  The blue tape on the inside is there in case of glue squeeze out, makes it a little easier to clean up.  I'm using Old Brown Glue which is in the background along with an acid brush and a damp paper towel to clean any glue off of my fingers and keep things as neat as possible.  Glue up went well so here's how it went into the laundry room to dry.

Assembled
The green tape you see on the outside is there to identify the proper assembly sequence so the grain pattern is continuous.
     The next day it was time to cut the slots to reinforce the miters and add a decorative element to the case.  At the time I made it, I thought my jig was over-kill and way to large, however;  I must have known I was going to get this commission.  I was glad to have the extra size of it to support this case.

Cutting the Slot for the Keys
This is a good sized box,  roughly 7" x 12" x 18" so I had to be sure to hold things steady.  The purpose of this key is to reinforce the miter by adding some long grain to long grain glue surface.  A miter on its own doesn't have a lot of strength since it's mostly a end grain to end grain joint.
     After planing a piece of Maple so that it was a snug fit, it was cut into triangles for the keys.  This was easily done with a bench hook and a Japanese fine cut saw.

Cutting the Keys
I had a lesson with two students today on cutting dovetails and this bench hook was part of our discussion.  This is a definite example of over-kill.  Bench hooks are great shop made appliances and really don't need the strength or finesse of a dovetail joint.  All that's required is a couple of pieces of scrap glued/screwed together like the one in the back ground.  Making the dovetailed one is a great practice piece to keep your dovetail skills up to date.  The other bench hook was used to hold the spline material for planing.


Cardboard Glue Applicator


     Once the keys were all cut it was time to put them in place.  You can see I use a very sophisticated and high tech glue applicator.  I've found that for a narrow space like this a piece of cardboard is all you need.  First step is wiping it onto the sides of the slot.


Glue on Bottom of Key
Next, I put a small amount of glue on the bottom of the key.  As the key is pressed into the slot this glue will squeeze up the sides.  It's important that the key is fully seated in the slot.  At our last Sin City Woodworkers meeting the subject of a "rubbed glue joint" came up.  This is an example of that.  Once the glue has been applied you rub it back and forth in the slot until you can feel it start to grab.  At that point you just let it go.  Here you can see how it'll end up.


The technique on this box is one I've done before.  After the splines are dry they will be planed smooth and the entire box will be finished.  The separation is between the shorter splines in the middle of the box.  Notice the mallet?  I've learned from experience that the spline material may swell up when the glue gets on it making it almost impossible to seat it my hand.  That's where the mallet comes in.
     Once the box is separated it'll be time to install the hinges and the catches.  First up though will be the egg crate divider system needed for the chess pieces. Yes, I'll make the deadline for delivery!

Thursday, January 17, 2013

Chilly Las Vegas Update

   
     As you may have read in the news, here in Las Vegas we've been faced with some pretty cold temperatures lately.  For many of you, low's in the 20's and high's in the low 40's are par for the course but that's not the case for us!  I've been lucky if I can get the shop into the 40's and that low temp really effects gluing and finishing.  Since there is a deadline I needed to get the interior pieces of the chess box shellacked.  My finish for them will be shellac and wax.  Thankfully here's what was completed yesterday when we had an afternoon high of 45 degrees or so.

Inside PIeces Shellacked
     I was able to do this after finding this information on Zinssers website regarding their shellac, something I didn't know but glad to know now.  Here's part of what it said:


Shellac's Great Properties

Shellac has such remarkable properties that if it were just recently discovered it would be hailed as a miracle finish of the 21st century.
  • All-natural – Shellac is an all-natural resin of insect origin that is harvested regularly and is therefore a renewable resource.
  • Fleeting alcohol odor – Shellac is dissolved in denatured ethyl alcohol. It has a fleeting, antiseptic odor that dissipates quickly as the product dries.
  • Easy to use – Shellac is user-friendly and virtually goof-proof. It can be applied with a brush, pad, sprayer, or wiping cloth.
  • Super-fast dry time – Shellac dries to the touch in MINUTES and, in most cases, can be sanded or recoated in a little over half an hour
  • Cold temperature application – Unlike other finishes shellac can be applied in cold temperatures (40o F. and below) without concern over proper drying and curing.
I only copied a couple of them but the last one on the list  made me happy.  I've been using an air brush at about 20 psi and find it works great for this application.  I first used this for sealing picture frames, it's much easier than brushing or padding and there's almost no chance of runs, drips, or errors.  Before these are put into the case they will be rubbed out with wax.
     In the meantime, I've been pre-finishing the top and bottom panels for the case.  Wish I could show you how nice this Maple looks, here's the best shot I could get.

Three Hand-Rubbed Coats
     It's probably more of a tiger stripe Maple than a curly one but it has the chatoyance I wanted.  Of course, that figure comes with a price.   The best way to smooth it is with a card scraper.

Scraping Smooth
     The grain wants to tear out even with a smooth plane set up for a light cut with a tight mouth opening.  With the card scraper the initial passes allow you to actually feel the stripes but they work themselves down with each pass.  You can see here that the scraper is making about 90 shavings with a bit of dust thrown in to let me know I need to create a new burr!

Card Scraper Results
     At our woodworkers group meeting last night I learned that the chess pieces I'm making this case for are considered to be what's referred to as "tournament size".  I thought they were really large but then I've only seen small chess sets with the little plastic pieces.  Apparently the size of the boards squares are a regulation 2 1/4".
     This project has been an interesting one to say the least.  Not only am I  learning a bit about chess pieces but also the complexity involved with making all of these "egg crate" compartments to fit them to.  It's much more complicated and time consuming than I imagined --- I'll know for next time!

Saturday, January 12, 2013

First Look!


Pieces Mitered, Corners Match
      Seems like you're sitting in the theater and they do their First Look clips while you're waiting for the feature presentation doesn't it?  It's funny, I drew the case out to scale to get a sense of the proportions but now that I see the actual box it seems larger.  Notice a couple of things, you can see inside that the grid work I previously made does fit in.  Kind of felt like I was burning the candle at the wrong end by doing the grid first and then building the box around it.  Worked out fine though, I left just shy of 1/16" to allow some play in the dividers.  There's bound to be some humidity changes in Washington D.C. where this project is headed compared to my bone dry desert!  The other thing to notice is how the grain pattern continues around the box.  That's always a concern when doing boxes.
     The over-all height of this box is 6 3/4" which is pretty wide to cut miters on.  I double-checked the squareness of my jig before starting to cut the pieces, seems as if it always needs a bit of adjustment before a new project.  Notice the bolt head at the right side of the fence in this picture?

Cutting Short Sides
     When I built this jig I made it adjustable.  You can see the red mark which is an arrow.  There's an oversized hole for that bolt which allows me to pivot the fence as needed for square.  The critical part when building boxes is that the opposing sides have to be exactly the same length.  For the short pieces I used a large combination square held against the edge of the table as a reference point.  If you do this it's wise to mark where to hold the square just in case the edge isn't parallel all the way across --- it should be but why take chances.

Cutting Long Sides
     For the longer sides I used a small combination square as a stop block.  In case you're wondering why to use this method keep in mind that you want the grain to continue around each corner and the entire box.  This means you need to cut the pieces in sequence, i.e.; short, then long, then short, and finally the last long.  It would be easier to set a stop block, cut both long pieces then reset the stop block for the two short pieces but now the grain pattern has been ruined.
     See that heater close to me?  It's been extremely cold the past couple of days and that's supposed to continue till mid-week.  Managed to get my little work area up to 52 degrees, early morning temp was in the upper 30's in the shop so it's definitely time to bundle up.  I finished todays work time up by cutting the dado's for the top/bottom panel and cutting those panels to size.  Tomorrow after Church I'll cut the joinery on them and then use a scraper to smooth the surface.  I always finish the panels before I assemble a box which may be a challenge with our current cold snap.  Don't want to use the propane heater while I'm finishing.  My plan is to put the oil in the house tonight to warm up then take it out to the shop to apply it.  I'll be able to bring the pieces into the laundry room to dry, sure am glad Diane likes the smell of fresh oil!  Have to check specifications for shellac which I what the interior of the box will be.

Thursday, January 10, 2013

Just as Advertised -- 5+ Hours Later!


The Innards! 
     If you can make out the picture at the left you'll see this is what I wanted.  Each half will be a mirror image of the other with the King & Queen in the largest niches in the center.  The wide area on the bottom/top two rows will be filled with a solid piece of Walnut which will have the locking mechanism for the inner lids.  As is my unfortunate habit, I made the joinery on the snug side but that was easy enough to fix.
     Any wood that comes off of a planer will always show some type of chatter marks.  This is true no matter how carefully the machine is set up.  I have a Powermatic, 15" Planer with a Byrd helical head.  Works great but the chatter marks are there none the less.  In lots of furniture or other wooden items you'll see those marks, I've tried to photograph them on this piece.

Lower Right, See the Vertical Lines?
     The way most folks remove them is through sanding but if you know me, I'm not a great fan of sanding.  It's messy, wastes material, and most importantly I feel it muddles the grain of the wood and is apparent through the finish.  Planing is the best way to get rid of those marks.  Short pieces can be held with a bench hook like this:

Bench Hook to Hold Small Dividers for Planing
     Longer pieces can be secured to the bench like this:

Smoothing the Long Pieces
     I now have a beautiful, bronze smoother plane that works great but you don't necessarily need a top end tool to get good results.  My main plane is an old Stanley Jack plane that I've had since the 60's.  Before I was able to afford or justify the Lie-Nielsen plane I have now I had two blades for the Stanley.  One was sharpened square and used for edge work while the other one had a slight chamfer to it so it could be used for smoothing.  I've taught many students how to accomplish excellent planed surfaces with mid-quality tools.  The key seems to be in learning how to sharpen it and then set it up properly.  Maybe it's just me but I get a lot of satisfaction creating a mirror smooth surface and piles of whispery shavings!  After surfacing both sides of every piece of this egg crate they slip together easily.  All that remains for them is to clean up and radius the top edge and then apply a few coats of shellac.
     I ended day with laminating a piece on to the edge of the Maple needed for the top and bottom panel of the case.  I need a piece approximately 10 5/8" wide, as luck would have it the piece I have ranges from about 11" on one end and 10 1/4" on the other.  That's what's meant by "random width, random length" when you buy hardwoods.  The joint will be right on the edges and more than likely be cut away for the rabbet.  Check out the chatoyance of this piece, especially to the left of the center clamp.

Love it!
     I did mess around a bit with the coloration on the iPhoto but it'll finish beautiful.  This piece will be difficult to smooth plane.  That's the down side to beautifully figured wood, the figure is caused by the grain going every which way!

Wednesday, January 9, 2013

So, You Want a Challenge?


Head Scratcher?
     You know I've been an ultra trail runner most of my life so relish challenges that pit me against the elements.  Well, I may have just taken on a big challenge that will pit me against the wooden elements and sanity!  I had a request on the Etsy store shortly before Christmas asking if I could make a box to hold chess pieces.  Initially, this was to be for Christmas but I didn't think I could accomplish it by then so we put it off for a birthday present at the end of February.  Although I'm not a chess player I've seen the game but didn't expect the pieces to be this large.  It took a bit of doing to come up with the lay-out you see there.  The largest piece is the King and it measures 2 3/16" x 9", the smallest ones are the pawn which measure 1 1/2" x 3 1/2".  My concept is to have the box open completely flat so that each side is a mirror image of the other segregated by the color of the pieces.  The dividers will slip together like an egg crate.  Here's how I got to this point today.
     The first step was to mill a bunch of Walnut 1/4" thick by 2 3/16" wide to make these dividers.  I'm thinking the key here is to keep all of the mating parts exactly the same size.  It's going to be interesting when final assembly comes along and I need to slip everything together but I'll worry about that when I get there.  I set up an auxiliary fence on the chop saw to cut these parts.  I needed 4 short sides of about 10" each and 12 of the longer pieces at 17+".

Cutting Required Pieces to Length
     My intention was to use my 6" dado set to cut the required slots but it wouldn't quite make the required depth of cut which was 1 3/32" -- it was about an eighth of an inch shy!  I used the box cutter set but had to add a few thin shims to get the required width.  Set up was crucial, these parts need to lap each other exactly.

Sneaking up on the Center
     One way to do this is by setting the blade slightly below the required height and then flipping a scrap piece over after each pass.  By raising the blade ever so slightly each time you complete a pass you'll slowly whittle away the piece you see in the center.  Once it's gone you're pretty much set, the proof can be seen here.

Stop Block Set and Depth Exact
     When the two trial pieces fit together without a gap in the middle or on the top/bottom you're right on the money.  The ends of all the pieces were cut and here's what I had at that point, this was relatively easy.

Gang Cutting, Four at a Time
     This proved to be the easier part of the dividers.  It was just a matter of cutting the ends of each long piece and the shorter pieces were carefully measured and marked with a marking knife.  By using a stop block clamped to the fence, all four pieces were cut at the same time so I ended up with what you see here:

Basic Dividers Complete

     Now things get a bit complex and required lots of talking to myself to keep it straight.  It was going to take more than talking so I got a piece of wrapping paper and drew it out full size.  Another thing I did was to number one end of each long piece so I don't have to waste any time when I get to the assembly stage.

Ready for the Short Dividers
     I'm saving that for first thing in the morning when I'm fresh.  Board number 4 will require some care as it has two slots closer together than I'd like but that's how the lay-out fell.  Once the divider is installed that will keep it strong.  In the center of the number 4, 5, & 6 boards there will be a solid block since the 4 pawns in each of those rows only need 14" of total space.  This will be where a swivel catch will be installed to secure all of the pieces in their slots when the box is close and/or carried.
     So far, things are going along as planed.  I've had quite a lot of down time fighting the flu so this project has already been built inside of my feverish mind!  Hopefully, when I get back down to a normal 98.6 it'll still look good.  It's kind of difficult to read the names of the pieces slated for each slot but if you scroll back up to the first picture it's easier to read.