Tuesday, July 31, 2012

Table Bases Assembled

Coffee Table Base

     At last, all of the bases are now assembled.  Thanks to Diane and a break in the heat I felt I could tackle the biggest base of all.  This was accomplished the same way as the end tables by gluing two legs and an apron one day then assembling the rest the following day.  I've made a bit more progress on the two, end table bases:

End Table Bases

     The insides of the legs have a very small, 45 degree chamfer cut on them.  I think that this will add just the slightest shadow line while still remaining very contemporary over-all.  When I met with the client we discussed how the Travertine would be placed on the base and concluded that since it's so heavy it's probably not going to go anywhere!  Probably true but the more I thought about it, it began to concern me.  If the table is moved in the future it could slide off if one end was higher than the other.  I'm thinking that once it starts to move a little bit it's not going to be easy to stop!
     Well, I've been told that I "pre-worry" and it's probably true.  What I've decided to do is to attach those blocks you see on the inside of the apron.  These are glued and screwed into place, the long sides of the coffee table will have two of these.  I bought some 4" long mending plates and these will be screwed to the block and then the piece of plywood that is already attached to the Travertine.  A little extra work but to my way of thinking, also some peace of mind.
     All that remains is cutting the chamfer on the coffee table then some final scraping, planing, or even sanding, as needed.  Next will be Danish oil and at least 5 coats of my hand rubbed top coat.  Delivery and installation will follow that so I'm estimating that two thirds of this commission is now done!

Saturday, July 28, 2012

OMG!! John's Using Nails

     Diane likes to give me a bit of hassle for not using nails on furniture and tells me all of China's finest from Walmart, Target, Cost Plus, etal has them!  She knows though that joinery is for things that are made to last and that's the way I like to build them.  You may recall in my Anatomy of a Leg blog how I designed the legs for this project. The L-shaped legs are closed off with a mitered piece to give them a streamlined yet structural appearance.  To clamp all of them in place would have called for specialized, shop made cauls and a whole bunch clamps.  Using an air powered brad nailer makes the work go quicker and it's much easier to line up your parts when they're covered with slippery glue!
     Here's the approach I took.  On some scrap pieces I determined where the brads should be placed so there was no chance they'd come out on the front side -- not a good option.  Masking tape was applied and a line drawn on it to mark the location:

Ready to be Nailed
     Quite easy to apply the glue, hold the back piece in position and nail it on.  Quick work to complete all twelve legs, now to conceal the holes.  I thought that the tape could serve double duty.  Just like taping the inside of a box to keep the glue off of the wood I figured that if the putty was put in with the tape in place the wood wouldn't get stained...

Famowood
           .... and I was correct, none of that unsightly stain that even Famowood can leave on the wood.  Even though these pieces are on the inside of the table and probably never be seen I don't want to have any blemishes.  If the need arrises to do this again I think the tape should be removed right after the putty has been applied.
   
Almost Invisible

     The final step before assembly is to smooth out the surfaces with a smooth plane.  This is probably one of my favorite tools, a Lie-Nielsen #4 Bronze Smooth Plane.  I took these pictures and hope that you can see the slight yet significant difference in the surface before and after the Smooth Plane has worked it's magic.  Here it is before:

Before ...
     I'm hoping that you can spot the differences.  There are ever so slight chatter marks made by the planer when the wood was surfaced.  It's subtle but if you ever examine a piece of wood in the light and see slight divots going across the grain.  They could be sanded out but planing them shears the wood and leaves what is considered a "cleaner" appearance.


And After
     It's one of those things you may not spot immediately but if it's all about the wood for you as it is for me this is an important step in furniture design and construction.
     Checking the temperature in the shop when I completed the end table pieces and seeing that it was in the high 80's I decided to give in to my impulse and get some assembly done.  I decided to go ahead since there would only be two joints to glue and get together at a time.  Hopefully the weather cooperates and gives me a low 80 degree reading in the morning.  Then I can get Diane's help to assemble the two end tables.
     Here's how they look paired up and drying.  Just checked the temp and at 4:45 this afternoon it's a toasty 101 and the glue would set up before the clamps are in place!

First Look at some Legs!

Thursday, July 26, 2012

Mortise & Tenon Joints -- My Approach

     The mortise and tenon joint is without question, one of the strongest traditional joints used in furniture construction.  This is especially true where you need to make a right angled joint where the long grain of one board is running 90 degrees to the other.  These Walnut table bases are a prime example of that.  I may have mentioned that the client I'm making these for is the son of my first principal here in Las Vegas where I began my teaching career in 1977.  At that time, we were either called woodshop or industrial arts.  I taught my junior high school students how to make a mortise and tenon joint completely by hand with auger bits, chisels, and back saws.  I reflected how my methods have changed through the years and I was able to dedicate my earnings towards some machinery.  The position I take now is that the machines are my "apprentices" that perform the grunt work and I'm the craftsman that completes the task by hand -- works for me!
     Here is the joint, ready for assembly.  Since there are a total of 24 of these for the entire project I'm happy to have the dedicated hollow chisel mortiser to cut all of them.  The stone for these tables are some pretty heavy pieces of Travertine.  The apron is a bit over 4" wide and, as you can see, the mortise goes the entire width.  This is to control any hint of twisting from the apron.  The tenon is haunched at top and bottom.  Whenever possible I'll use the measurement of a tool as the basis for the haunched area, in this instance I used width of my combination square to determine how long the haunch would be.  I'll show you later on why that's beneficial.

The Final Joint

     A dado head on the table saw was used to cut the tenons.  The length of the aprons makes using a tenoning jig on the tablesaw difficult.  The first step was to screw a fence to the miter gauge.  And yes, that is a gimlet.  Why break out a drill when a simple tool will do the job as well and quicker.

Attaching Fence to Miter Gauge

     Then, a stop block was attached to that fence and carefully adjusted for the exact tenon length but  slightly oversize to allow for final fitting of the cheeks:

Tenon Stop Block

     Whenever I do machine set-ups my habit has been to use a piece of MDF to adjust the blade height and stop block setting.  Much easier to replace a cheap piece of MDF then to go back and machine another piece of Walnut that costs close to $7.50 a board foot.


Exactly 30", Just What I Needed!

     Once the tenons were cut on both ends of the aprons it was time to decide which piece goes where.  This is where the grain and color patterns are arranged in such a way that they will flow and be pleasing to the eye.  As you get into the joinery and hand work it's really easy to mix parts up.  Just as I did earlier on the legs, machinists stamps are used to identify the mating joint parts.

End Table Parts Being Identified 
     This is how my bench is set up for doing the next phase, the hand work that is quiet and enjoyable!

Left to Right: Apron - Bench Hook & Rabbet Plane- Leg Assembly
     It only took two cuts with the backsaw to remind my that this work is much easier when it is elevated so out came my bench on bench:

Easier on the Back!
     Whether you're young or older like me, bending over the bench vise and cutting down low is pretty hard on the back.  Seems like it takes me forever to straighten up again.  I made this bench years ago and it's perfect for hand work like carving, sawing joints, chopping dovetails, etc.  Matter of fact, I'm scheduled to teach a class on making one of these next month at the WoodItIs school here in North Las Vegas.
     Now the hand work can begin.  First up is laying out the depth of the haunch, I use a spacer that is as thick as the haunch is deep:

Haunch Lay-out
     Next is the width of that haunch.  Remember I used the width of a combination square to determine that?  By simply lining it up with the outer edge of the tenon it's easy to mark off:

Width of Tenon
     The tenon is cut to size:

Cutting Haunch
   
     Then a rabbet block plane is used to trim the cheeks, shoulders, and also chamfer the ends:

Final Sizing to Fit Mortise

     Now that all of the joinery is completed the next step will be to add the piece to the inside of each leg to create that triangular, beefier appearance.

Monday, July 23, 2012

Hand Cut Chamfers: An Easy Process

     During this weekend I've taken a break from the table bases since the material I ordered won't be here until Monday.  Perfect timing since the humidity is really rising by desert standards and what work I've done is somewhat sweated upon!  Not a good picture is it?  There's been a couple of hours shop time each morning so I'm not having withdrawal symptoms.
     One of the things I did was to put the first top coat on the Maple Splendor box, when I brought it into the house last night it felt as if I took it out of an oven, temp in the shop was 104.  This morning I decided to work on the two remaining boxes in the River Runs Through It series.  Here's how they compare to the first edition:

A River Runs Through It: #1-4

     The original ones are the two in the upper right of the picture.  Once the lids have been brought to length to fit their perspective box, the next step is to put a chamfer on the ends.  When ever you cut chamfers or raise a panel for a box or door you should always go across the grain first.  My preference is to cut the piece to length, chamfer both ends, and then cut it to width.  The reason is that you have the potential for splitting off the edge at the end of your cut.  The potential for this is there whether you're cutting by hand, with a router, or a saw.
     The chamfer on these lids is about 3/16" which is penciled in on both the top and edge of the ends.  You don't need to do the long edges since the lid hasn't been sized for width yet.  I do this with a pencil and a small combination square.  Rather than use a router to do this it's an easy process using a block plane.  It's quieter, safer, and much less likely to split the piece as it goes off the end grain.  The technique is to hold the plane at the required angle and then plane evenly to the lines.  Your goal is to reach the line on the top and the one on the edge at the same time.  Takes a bit of practice but very doable with a sharpened and correctly set up block plane.  Once the ends are done the lid is taken down to it's required width and the lines are drawn on the edges, top and side.

Close Up of Chamfer
   
     Although the lines are drawn on the long edges they are not as important as the actual cut.  You'll find that by holding and maintaining the same angle on the edge that you did on the end the cut will tell you when to stop.  The goal is a clean, mitered cut that goes diagonally to the corner of the lid.  You can see the pencil line remains but that's okay, it'll erase!  Just a slight chamfer like this adds interest to the overall design, it appears to bend as it goes off of the edge.  I would discourage you from sanding this chamfer, you'll more than likely round it over and soften the edges with the sandpaper even on a sanding block.  Besides, a clean, crisp, block planed edge looks much better than a muddied up one created by sanding.
     The final step to the box was cutting a rabbet all around so that it fits into the box.  Here I use the tablesaw by first setting the required height of the blade.  Always use a scrap piece of MDF to check your adjustment.  Same thing applies here, cut the end grain first but use a backup block to get more support against the fence.  Once that's done, readjust the fence and blade height and cut as shown:

Cutting the Rabbet

     So much has been written about tablesaw safety people are reluctant to post a picture of one without making some ridiculous disclaimer like "guard removed for illustrative purposes only, always keep guards in place".  Let's face it, there are operations that cannot be done with a guard or splitter in place and as woodworkers we need to take responsibility for our own actions.  Look at the picture, the blade is only up 1/4" or so, I'm using a backer block to increase the surface on the table, and my hands are safely straddling the top of the rip fence.  Could something go wrong?, I suppose but not very likely.
     Anyway, sorry to get on my soapbox but if using the saw that way is worrisome it's almost as simple to use a backsaw to cut this part and then  a shoulder plane to finish the job.  So now that it's Monday I can head to the lumber yard to pick up the material for the aprons needed for the end tables.  Since there are so many duplicated operations on the tables I'm trying to do all the machine work for all the pieces at the same time to avoid having to set the tablesaw and mortiser up multiple times.  Then it's on to the quiet work with chisels, saw, and rabbet plane of fitting each joint -- can't wait!

Saturday, July 21, 2012

Anatomy of a Leg

   
     Well, I thought that the title might pique your interest but sorry to disappoint you, it's going to be about table legs.  This one here in particular:

Walnut Table Base -- Leg Detail
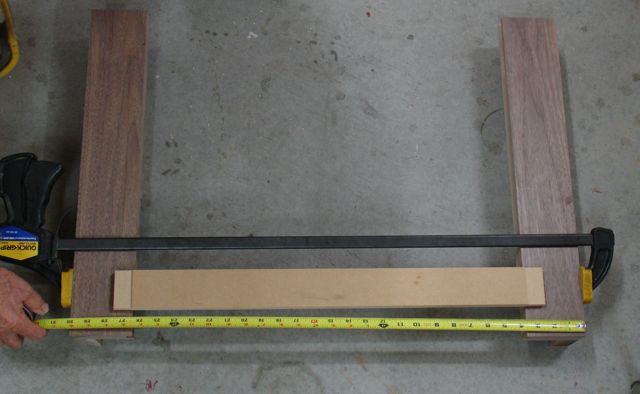
     For this commission the legs need to be strong and have some mass to offset the Travertine tops.  Another consideration for this design was that the base of the table should not be so large and overpowering that it would hide the floor.  I was given a photograph of a table they liked which had large, square legs so that's what I went with.  To save material costs and also give the base a lean appearance I decided to make the legs shown above.  The first step was to determine the widest possible pieces of sapwood free Walnut that I could yield from the material available.  This is the leg for the coffee table and the width is 4 3/8", the two end tables have a width of 3 1/2".  Speaking about the material, there wasn't enough sap free Walnut to get the aprons for the end tables so I had to special order more which should arrive Monday.
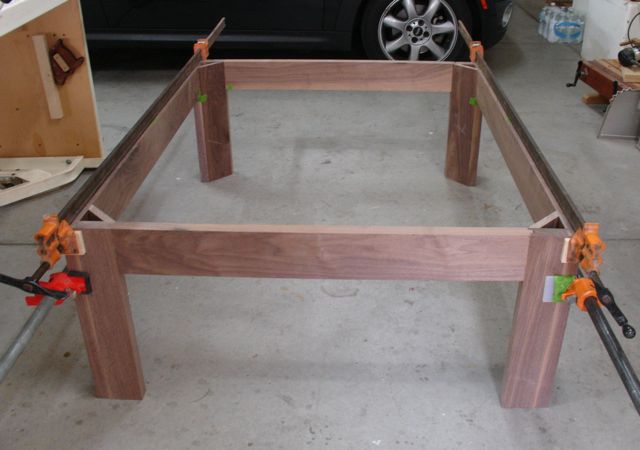
     Back to the legs, the first step was to mill the pieces and cut them to length.  A 3/8"  tongue and groove joint was milled into the edges and the assembly process was ready to be started.  I'm sure I've mentioned (complained!) about the heat.  I drink enough water to stay hydrated and will work in the shop in pretty much any temperature but the glue is a different story.  I need to work fast enough to make sure the pieces are assembled and clamped before the glue starts to set. The first glue up morning it was 82 degrees at 6am.  Here it is, ready to get it together:

Clamps, Glue, Cauls, Wax Paper, & Water Ready to Go!

Material Laid Out And Ready
     There was quite a bit of planning to determine which pieces would be joined together to form the legs. Coloration of the wood and the grain pattern was one concern but equally important was that the grain direction went the same way on both pieces.  That's because the legs will be planed after they are assembled.  That meant that the face grain of one side needs to flow in the same direction as the edge grain of the adjoining piece.  Because of the temperatures I was able to glue up four legs each morning even though the mornings got warmer each day.
     The first step to finishing the leg assembly after glue-up was to scrap the glue from the joint:

Glue Scraper


     This was followed with my favorite finishing tool, my Bronze # 4 Smooth Plane from Lie-Nielsen.  I really don't think there's a better tool to get the type of finish I'm after.

Smooth Plane 

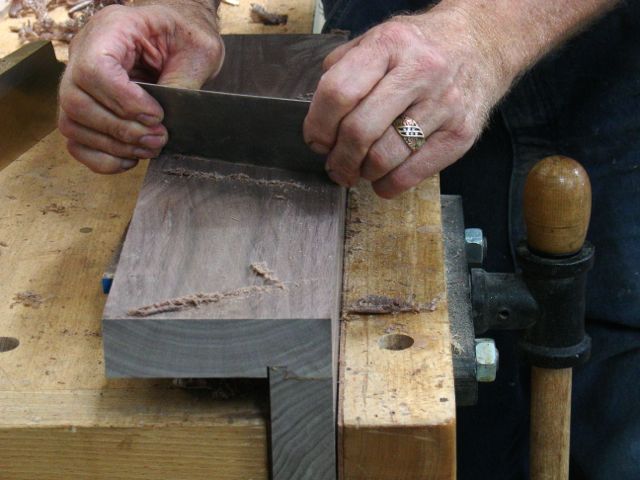
     As usual, there will be some unruly grain that even the Smooth Plane set to a fine cut and small mouth had a hard time taming, that calls for a card scraper.

Taming the Unrulies!

     Now comes the time when furniture construction can be artistic.  There are ways to display the grain of the wood to your advantage.  For these legs I wanted the grain to flame upwards from the floor.  You may have noticed in the first picture that there are letters stamped into the tops of the legs, this is to help keep things organized.  Chalk rubs off and pencil marks can be difficult to erase.  I use a set of machinists letter stamps to mark the mating parts.  Once that was done it was off to cut the mortises.
     Strength and stability are required to support the Travertine so I opted for full length, 1/2" wide mortises.  They are haunched for at the top and bottom to resist any twisting and 1 3/8" long.  This is an operation where, although I've done many by hand, I call on a power tool to do the grunt work which I'll refine by hand.  There's a trick I use on the hollow chisel mortiser:

Depth Stop with Spacer

     This haunch is about 1/2" deep so I put a spacer block on the depth stop when cutting it.  Once the haunch has been cut on the top and bottom of the mortise, the block is removed and the rest of the mortise is cut out.

Full Depth Mortise


     The final step for the leg part is to cut the mitered piece that will enclose the open L-shape of the leg.  This began with first milling the material and then cutting it oversize on the chop saw.  This makes it easier to handle when cutting the angles on the tablesaw.

Rough Cutting 

     It wasn't something I liked hearing when I talked about the quality of Walnut available these days to the guy at the lumberyard.  He kind of shook his head and said "Walnut's been a different animal lately" or words to that affect.  Maybe the demand is up or the supply is down but it's been difficult picking out the pieces I'd like to have.  In any case, once they were rough cut it was time to miter the edges at 45 degrees.

Inside Leg Pieces, notice the MDF

     Whenever I have an exact or tricky cut to make I'll make the set-up on the saw using some MDF for my sacrificial pieces.  Much rather make my mistakes on that then the Walnut!  I need 4 of these pieces for the coffee table and 8 for the end tables.  For the end tables the piece I found was wide enough to yield two pieces by flipping it over after the first cut.

Two Pieces from One Wide One

     This is a natural stopping point for this project.  The mortiser is set up to cut the mortises in the end table legs but I won't know their size until I get more materials for the apron on Monday.  It's pretty hot out there anyway and I don't anticipate any problems making them within the time frame we agreed on.  May be an opportunity to work on the boxes again!

Wednesday, July 18, 2012

Change Brain out of Vacation Mode!

     Although we had a great six day vacation in New York City I must admit I missed my shop time.  Talk about masses of humanity --- whew!  We stayed in an awesome, corner condo on the 33rd. floor in mid-town Manhattan with floor to ceiling windows so our views were spectacular to say the least.  To be honest though the congestion of people, cars, busses, bicycles, food carts, etc. was quite a change from life here in the desert.  I can only summarize it with this phrase:  "It's a great place to visit but I wouldn't want to live there".
     So now, put my brain back into woodworker mode and get to work on the table bases.  The first step was to rough cut the material for the legs.  This was more time consuming than I planned for.  Although I had specified material with very little to none sapwood I had to cut around it quite a bit to get the pieces needed.  Some of the boards had rich, dark color on one side only, the inside pieces were beige sapwood. Here are the pieces rough cut to yield as much dark Walnut as possible:

Phase One

     You can see that some of the pieces have quite a bit of sapwood on the edges, these were trimmed off of one side, then the rip cut edge was jointed so that it could be brought to finished size.

Jointing the Edges

     As you may imagine this created lots of beautiful shavings except where the grain got a bit interlocked  but since this isn't the final edge it's not a problem.  Once the legs are glued up into their L-shape I'll use a smooth plane to create the hand planed surface that's my trademark.
     The leg design calls for a tongue and groove joint and since I have a total of 12 leg assemblies to make they were all cut at the same time -- semi mass production style.  Here they are, ready to be cut to the required length and glued/clamped together.

Ready for Final Sizing and Assembly

     I wanted to get the widest possible leg from the material available, the two end table leg sections ended up being 3 1/2" wide and for the coffee table I was able to get 4 3/8" wide leg structures.  They still need some final hand work and then cut to length before glue up.  Thankfully the mornings are forecast to be a bit cooler than last week so glue ups can be done in the shop.  Really tough to glue up large surfaces when the temperature is 85+ degrees.
     The only negative aspect so far is that since there was quite a bit of sapwood there was also quite a bit of waste.  I need to order more materials than planned because of it but I wanted as much dark wood as possible.  I'll need to reorder enough for the aprons on both of the end tables.  I'm scheduled to teach a class at WoodItIs next month on making a portable work bench and if it gets enough enrollment I can possibly sell some of the sapwood pieces to my students.
     Time to get out there and cut the legs to length and begin the glue up process.  By the way, the stone is a Travertine that is primarily beige with some darker streaking.  When the stone is combined with this Walnut base it'll be a beautiful marriage!

Thursday, July 12, 2012

Vacation Post

     Since we're currently visiting New York City the work in the shop is on hold, needless to say!  Having quite the time here and today we spent much of today at the Metropolitan Museum.  WOW is all I can say. This has to be like the grand daddy of all museums and collections of art.  From Egyptian tombs and wood that has survived since hundreds of years before Christ to furniture pieces that have been here in the United States since the European's first began settling the colonies.
     There was one huge section that was in the American Studies area where they had items that had been acquired by the museum but where not on display yet.  Many of these were donated/acquired years ago.  I was drawn to the furniture section and here are a few shots of a "de-constructed" chest of drawers showing how it was put together:

From Top 
    Here you can see how the drawer runners, top stretcher, and carcass was dovetailed together, Diane pointed out that there were some nails used in the construction but mainly to attach the moldings.

Opposite Side
     It's a little hard to see through the glass case all of the pieces were in, no doubt climate and humidity controlled.
     One of the things that we lose sight these days is that the original intent of dovetails was to create a strong joint, not necessarily for visual impact or proof of our skills as we do today.  Here is the bracket foot for this "de-constructed" chest of drawers.  It's mitered and has hidden dovetails for strength, imagine the skill it took to cut and assemble this piece.  This isn't apparent if you're just looking at the chest -- all you'd see is a clean, mitered corner.  Don't know about you but this would take me some serious time to cut and assemble.


Bracket Foot with Hidden Dovetail
     Well, time to go see the musical Chicago.  We're pretty centrally located which is good so we're within fairly easy walking distance.  The traffic is something else again, no way would I want to drive the streets of New York City!  Even taking the shuttle from the airport was quite and experience.  So many people on the streets it's quite a change from Las Vegas -- I really am a small town boy at heart!

Friday, July 6, 2012

Walnut Tables

     As I mentioned in my last post it's now time to start on the latest commission.  This client has two end tables and one coffee table that has some really nice stone for tops.  The bases -- well, that's another story.  They are a faux marble finish artfully applied to an MDF apron and probably Poplar laminated legs.  Very ornate and well done for that style but they want something a bit more contemporary.  That's where I come in.  They saw the elliptical Walnut shelf and made their contact based on that piece.
     They sent me a picture of what they had in mind and it's going to be straight forward yet dramatic in appearance.  You know me, the wood is the star of the show and this will follow that theme.  The entire project will be made from 6/4 Walnut.  Peterman Lumber here in Las Vegas ordered it in for me from their California yard in Fontana.  Even though they don't stock it here there is never a shipping charge or problem when working with them.  Here's what I got:


50 plus Board Feet of Black Walnut

     These are some really nice boards.  I asked if they could select boards with a minimum amount of sap wood and at least 4 1/2" wide.  The narrowest board is 5 1/4" while the beauty on the left is 12 1/2"!  I've always had a good experience with them.  Even though I'm far from being one of their large accounts they have always treated me well and give that good customer service that makes you want to continue to do business with them.
     The plan is to first make L-shaped legs that will be closed off on the inside by a mitered piece.  These will be approximately 5" wide.  The apron will attach using mortise and tenon joinery and the finish will be natural oil with my trademark, hand rubbed and applied top coats.  The stone tops are so heavy they will just need to be laid on top of the bases with cleats that will keep it all from shifting.  Definitely not one of those tables you'll pick up easily to vacuum under!
     Now comes the exciting part, going out there and matching grain and color patterns in an artistic manner to show the wood at its' finest.  Most important now to follow the old adage: Measure Twice & Cut Once.

Smaller is Not Simpler Part II

     Before I picked up the lumber for the table base commission I just received I decided to design the handle for the Maple Splendor box.  Even though it's a small detail it needs to be right to go along with the overall design of the box.  Here's what I came up with:

Maple Splendor Handle
     I like the idea of attaching it without any screws so naturally a mortise and tenon is the way to go.  It's a little over 2 1/2" long with a 1/4" x 1 1/2" tenon.  This wood is pretty difficult to work with, exotics become desirable because of their grain patterns.  The very thing that makes them beautiful also makes them hard to work with.  After cutting the handle to rough shape and forming the tenon I found that the spokeshave I'd made a few years ago was the best tool to bring it to shape.
     Here it is, ready to be glued into the lid:


     Not to sound like a broken record but the grain on this piece is stunning.  You can see in the picture that the ends of the dovetails still need to be trimmed but that can wait.  I'm experimenting with spraying super blonde shellac on some test pieces.  It's pretty hot and above the recommended temperature to apply shellac but I'm thinning it down considerable and using an airbrush to do it.  I'll let the samples cure for a few days and then see how they rub out.

Thursday, July 5, 2012

Maple Splendor

Splendorous Don't You Think??

     Wasn't too sure if splendorous was a word but since I didn't get the squiggly line it must have passed the spell check!  I met a man (via the internet) from Virginia who saw my scrub plane on Highland Woodworking's newsletter.  He asked for more information which I gladly gave and in return, he sent me some local wood that he's been harvesting.  They were two beautiful pieces, one Curly Cherry and the other Curly Maple.  The photograph downs't begin to do it justice though, it really is a spectacular piece.  Even with my Lie-Nielsen smooth plane I still got a bit of tear out but the cabinet scraper tamed that for me.  In any case, I've decided to use this piece as the lid for another of the Slanted Dovetail boxes.
     I'm a "tails first" kind of dovetailer and in a previous blog I mentioned how I use the table saw to do the Stanley 140 Trick.  This time around thought I'd do it more safely with a tenoning jig rather than just holding the piece up against the fence and it worked fine.
Safer Way to Cut Tailboard 

     Once that was completed the tails were laid out and cut, again I cut both sides of the box at a time:


     Then before I cut off the outer sides I prefer to make a slight notch with a chisel for the dovetail saw to ride in.  I find that this is a good aid  for the saw.  By cutting just shy of the line you can pare right to your marked line.  A technique I use to refresh the edge of the chisels is one I learned about from Everett Ellenwood.  I rented a DVD of his from SmartFlix and what he does is use a piece of cardboard as stropping material.  Recommended is a smooth cardboard like a cereal box.  It's charged with a white rouge, placed on a hard, flat surface and the chisels drawn across it.

Stropping Trick
     What makes using the white rouge so nice is that you can see the track marks of the removed metal   This will show any small nicks that may be in the blade.  Once the bevel is refreshed the back is rubbed on the cardboard and you're good to go.  What I like about this technique is that it won't matter if you cut the stropping cardboard which isn't good if you're using a leather strop.  Besides, it's keeping with the green movement and recycling (that's a tongue in cheek remark!).  When I taught the dovetail class last summer we just kept some cardboard pieces on a machine top and the students were able to maintain a sharp edge on their chisels.
     One of the small problems of the slanted dovetail box is clamping it squarely when gluing up.  The tails are almost an inch and a half long so need a good caul.  What I tried on this box was to use a couple of pieces of UHMW polyethylene to press down on the tails:

Assembly Clamping Process
     These were then covered with another piece of the polyethylene and clamped to a flat surface.  You can see the try square and it was just a matter of moving the clamps as needed.  I let this dry for a few hours and then used the same technique to attach the other side and bottom.  Next up is work on the lid and trying to fashion a handle that will be functional yet not take away from the beauty of the grain patterns on the lid.

Wednesday, July 4, 2012

This is Fun!! Happy Fourth of July

Almost Ready for Finishing
     Couldn't resist posting these unfinished box pictures, I think they're a fun use of wood and somewhat playful in design.  They're roughly 2" tall and 3" x 7".  The one thing I realize though is that even though my plan was to produce a few boxes fairly quickly and price them to be what I'd call an "impulse item"  I'm guessing there is no such thing!  That's okay with me, it really isn't about the money.  For me the creative part and the process of working with the wood is what it's all about.  These are a good case in point.  Art Espenet Carpenter said it right; Time = Care rather than the standard adage of Time = Money.
   
     The lids were fun to make and I'm pleased with how they came out.  Since our humidity has been so low lately I thought it would be wise to allow some space between the rabbet on the lid and the box sides.  I'd much rather have the lid fit a bit looser than not being able to take it off if the lid expands in more humid conditions.  Having never worked with these species of wood seems like a good idea.  Many times you hear arguments/discussions among woodworkers about machine work versus hand work.  The chamfer on the top of the lid was done by hand.  Doing it manually eliminates the noise, dust, and probability of burning the wood with that spinning router bit.  Really didn't take long at all.  First of, a pencil and small combination square was used to draw the line to work to:

Chamfer Lay-Out
     I was able to clamp the lid between the bench dogs at the rabbet.  This way there was no danger of the plane hitting them.  Always go across the grain first, this applies to hand work or machine work since the the grain will tend to tear out.  This tear out will be eliminated when the edges are cut.  Here's a close up of the work on an end:

Working to the Line
     What's so cool about this is that it just gets to be a matter of muscle memory.  The line drawn on the edge and face is really just a loose reference point and your objective is to move the plane at the angle so you reach both lines at the same time.  I find that I also count strokes, the ends took about 30 each.
Once they were completed the sides had to be done, this is more a visual thing than anything else.  The goal is to create a crisp, 45 degree cut from the intersection of the lines to the tip of the lid:

Have to be Ambidextrous...

to Plane with the Grain!

     It's not to difficult to see how the edge meets the chamfer planed on the end, should make a good miter.  By putting a low bench dog in the outside vise jaw I was able to plane without any interference, this is where being ambidextrous comes in handy.  I may try spraying these smaller boxes with shellac but, the weather may not cooperate with that plan.  Most recommend temps below 85 degrees or so and that's just not going to happen.  I'll do an experiment by spraying some 1/2 lb. cut through an air brush and see what the results are.  I have a gorgeous piece of Curly Maple that I'd really like to finish with super blonde Shellac --- we'll see.