


 |
| The Total View |
Showing posts with label Walnut Table Bases. Show all posts
Showing posts with label Walnut Table Bases. Show all posts
Tuesday, November 27, 2012
Walnut Table Bases


Monday, August 6, 2012
Wood Lover's Finish Part 2
After about 45 hours of shop time the bases are ready to go to their new home. I'll need to keep them here though until the re-modeling work is completed at my clients home. We're looking at the 22nd. of this month or so. I'll put them in the kitchen, protected by some mover's blankets and let them settle into the atmosphere of an air conditioned house. This will be the last post about the table bases until I deliver and install the Travertine tops on them.
I wanted to show the final steps to the finish I blogged about in my last post. Here's a picture of the coffee table after two applications of the finish with 600 wet/dry paper. Notice the Marie Calendar's pie tin on the bench? That's what I use to keep the finish in. It's much easier than trying to get it out of a quart can.
I received a number of requests for the process and since wet sanding the first coats is pretty self explanatory I wanted to show the final process. To start, I cut denim up into small pieces; say 2" x 3" or so. The people on my street that have growing children save their denim jeans for me as the kids out grow them! Really a good deal. For the denim applications, just use a very small amount of the finish and work it with the grain of the wood a small section at a time and turn the denim as a section of it gets saturated with the finish. I'd estimate that the roughness of the denim is probably equivalent to 1000 grit paper.
It was 85 degrees at around 7am so I only worked a very small section of the bases at one time. It's almost like rubbing in a coat of wax except you want to take it off fairly soon after it's applied. For this, old towels are a good thing to use:
This whole process reminds me of being in Marine Corps boot camp and our rifle cleaning routine. On Sundays we'd drag out our sea chests to sit on and the D.I. would give us some boiled linseed oil to rub into our rifle stocks. We used our bare hands and were told that the heat caused by friction is what produced the sheen and protection. Some of you may want to use disposable gloves but I find them to be messy, plus they leave marks on the wood. Use a product like Liquid Gloves (available from Lee Valley) instead. Here's one side of the table completely done:
It seems that no matter how carefully you try to wipe every crook and cranny there always seems to be a rough spot. Usually where two surfaces meet at right angles or underneath the apron. To overcome that, wipe everything with a new towel after completing the entire piece. Position yourself so that the light hits the wood at an angle and really eye-ball the surface looking for any thick or missed areas. The beauty of this finish is that even if you find a missed spot a day or two later all you need to do is re-apply a small amount of the finish with denim. Same thing for maintenance, a thin application of the 3 part mix rubbed in and wiped off will restore it. How often should that be done?, I did my kitchen cabinets with this and the only place that needed much attention was around the sink and dishwasher. Usually I'd do that area before Thanksgiving because that's when the family came over.
Well, it looks as if tomorrow morning will be time to get back to work on the boxes for the show scheduled for the 20th. of September. Definitely want to get the bases into the house, the weather man is calling for highs in the 110+ range for Wednesday and through the end of the week. It creates problems with the wood reacting to the dryness and wanting to shrink across the grain. When I was at San Francisco State there was the opposite problem. If you cut a joint at night and waited until the next day to assemble it it was usually a pretty tight fit if the fog rolled in over-night. The challenges of working with this beautiful material, that's what keeps us going.
I wanted to show the final steps to the finish I blogged about in my last post. Here's a picture of the coffee table after two applications of the finish with 600 wet/dry paper. Notice the Marie Calendar's pie tin on the bench? That's what I use to keep the finish in. It's much easier than trying to get it out of a quart can.
 |
| Looking Good But Will Get Better |
I received a number of requests for the process and since wet sanding the first coats is pretty self explanatory I wanted to show the final process. To start, I cut denim up into small pieces; say 2" x 3" or so. The people on my street that have growing children save their denim jeans for me as the kids out grow them! Really a good deal. For the denim applications, just use a very small amount of the finish and work it with the grain of the wood a small section at a time and turn the denim as a section of it gets saturated with the finish. I'd estimate that the roughness of the denim is probably equivalent to 1000 grit paper.
 |
| First Application with Denim |
 |
| Wiping Down with a Towel |
This whole process reminds me of being in Marine Corps boot camp and our rifle cleaning routine. On Sundays we'd drag out our sea chests to sit on and the D.I. would give us some boiled linseed oil to rub into our rifle stocks. We used our bare hands and were told that the heat caused by friction is what produced the sheen and protection. Some of you may want to use disposable gloves but I find them to be messy, plus they leave marks on the wood. Use a product like Liquid Gloves (available from Lee Valley) instead. Here's one side of the table completely done:
 |
| Love the Sheen! |
It seems that no matter how carefully you try to wipe every crook and cranny there always seems to be a rough spot. Usually where two surfaces meet at right angles or underneath the apron. To overcome that, wipe everything with a new towel after completing the entire piece. Position yourself so that the light hits the wood at an angle and really eye-ball the surface looking for any thick or missed areas. The beauty of this finish is that even if you find a missed spot a day or two later all you need to do is re-apply a small amount of the finish with denim. Same thing for maintenance, a thin application of the 3 part mix rubbed in and wiped off will restore it. How often should that be done?, I did my kitchen cabinets with this and the only place that needed much attention was around the sink and dishwasher. Usually I'd do that area before Thanksgiving because that's when the family came over.
Well, it looks as if tomorrow morning will be time to get back to work on the boxes for the show scheduled for the 20th. of September. Definitely want to get the bases into the house, the weather man is calling for highs in the 110+ range for Wednesday and through the end of the week. It creates problems with the wood reacting to the dryness and wanting to shrink across the grain. When I was at San Francisco State there was the opposite problem. If you cut a joint at night and waited until the next day to assemble it it was usually a pretty tight fit if the fog rolled in over-night. The challenges of working with this beautiful material, that's what keeps us going.
Friday, August 3, 2012
A Wood Lover's Finish
No apologies to Pizza Hut and their slogan "A Meat Lover's Pizza" because as I was applying the first hand rubbed coat on the Walnut table bases I appreciated why I love this finish so much. Here's kind of a strange angled photograph to illustrate what I'm talking about:
No matter how I tried to rotate this shot it still looks strange! The bases are upside down and you're looking at a side view. What I hope you'll see is the sheen on the end table closest to you compared to the other one. The finish procedure I use, though time consuming, is one that is incomparable to any other. Granted, it's my opinion but the feel and luster is one you can't get any other way. I've shared this finish with many other woodworkers and even clients. I learned about this finish in the early 70's when I was at San Francisco State University. It's a three part mix that is hand sanded into the wood and then wiped dry. The first application is with 400 wet/dry paper, this is followed by two more applications with 600 wet/dry paper and finally a minimum of two more applications with denim which I'm guessing is about 1000 grit. For this project the first coat took about 2 hours but is well worth it. After allowing 24 hours or so for the finish to dry, the next coat will be applied.
This finish was shown to students in the woodworking program when Art Espenet Carpenter (here's a link about him) came to the University and shared it with them. This was the time when there were a couple of other well known woodworkers in California. He's in the same company as Sam Maloof and James Krenov and the three of them had a huge influence on the woodworking scene. If my memory serves me well, Art was the man who coined the phrase that "time is care" as opposed to the more popular one stating "time is money". I go for the time is care in my work, always having the goal of whatever I produce being the best that I can do.
Perfection and woodworking are very seldom used in the same sentence! In our local woodworker's monthly meeting that subject often comes up. We've been trying to understand why virtually everyone that brings a project in for show and tell will point out the small error or blemish in their own work, it's as if we want to downgrade the talent we have or something. In any case, didn't mean to get off on a tangent but the finish of a piece of furniture is the final phase of the process. I happen to be quite prejudiced towards the finish I use because it does give great results -- Ikea, Ethan Allen, et al have nothing on this. The other huge advantage is that as a craftsman working in a small shop you don't need to have spray booth and all of the related equipment. Lastly, the finish is very easy to repair if ever needed. I've even repaired a cigarette burn in an Oak bar top many years ago. Here are two more pictures to illustrate how this looks on the table bases.

Here the base on the left has its' first coat, the right one only has a coat of Danish Oil on it. I love how it enhances and brings out the natural beauty of the wood. For me, it really is all about the wood!

This one is a little harder to tell but both legs are done while the apron between them again, only has the Danish Oil.
 |
| Tables Upside Down |
This finish was shown to students in the woodworking program when Art Espenet Carpenter (here's a link about him) came to the University and shared it with them. This was the time when there were a couple of other well known woodworkers in California. He's in the same company as Sam Maloof and James Krenov and the three of them had a huge influence on the woodworking scene. If my memory serves me well, Art was the man who coined the phrase that "time is care" as opposed to the more popular one stating "time is money". I go for the time is care in my work, always having the goal of whatever I produce being the best that I can do.
Perfection and woodworking are very seldom used in the same sentence! In our local woodworker's monthly meeting that subject often comes up. We've been trying to understand why virtually everyone that brings a project in for show and tell will point out the small error or blemish in their own work, it's as if we want to downgrade the talent we have or something. In any case, didn't mean to get off on a tangent but the finish of a piece of furniture is the final phase of the process. I happen to be quite prejudiced towards the finish I use because it does give great results -- Ikea, Ethan Allen, et al have nothing on this. The other huge advantage is that as a craftsman working in a small shop you don't need to have spray booth and all of the related equipment. Lastly, the finish is very easy to repair if ever needed. I've even repaired a cigarette burn in an Oak bar top many years ago. Here are two more pictures to illustrate how this looks on the table bases.

Here the base on the left has its' first coat, the right one only has a coat of Danish Oil on it. I love how it enhances and brings out the natural beauty of the wood. For me, it really is all about the wood!

This one is a little harder to tell but both legs are done while the apron between them again, only has the Danish Oil.
Thursday, August 2, 2012
Finish Process Has Begun
Once you begin the finishing phase of a project on you know you're almost done. I couldn't of picked a more humid day to start on them. I decided that since I had a number of cuts on my hands I would wear some disposable gloves, usually I just rely on Liquid Gloves so I can feel the wood while I wet sand the finish. Honestly, when I held my hands up the water would run out of the gloves --- that's humid! I heard a little voice in my head saying "oil and water don't mix"! In any case though, now the beautiful, warm tones of the Walnut begin to show themselves.
 |
| View of One Side |
These take up a lot of room in my shop/garage so I need to find a way to work around them. Since my client won't be ready for them until the latter part of the month I'll probably set them on edge in the kitchen. So nice to have a supportive wife who suggested this. Another thing I need to figure out is how to get them up at a higher level. If the application of the Danish Oil is an indication of the time required my old back isn't going to be happy. Spent a little over two hours on this phase and it wasn't easy straightening back up. With a minimum of 4 topcoats to go I may be reaching for the ibuprofen!
 |
| And then the Other |
One of the last details was to put a slight chamfer on the inside legs. This was started with a 45 degree router bit and less than 3/16" in width; just enough to add a shadow line. The problem with a router is that it leaves rounded corners that will need to be squared off. I had considered cutting the chamfer by hand which would have been my preferred method but the size of the glue up changed my mind as lining things up would have been tricky; to say the least. The glue ups were stressful enough because of the high temperatures and needing to close the joints quickly before the glue sets up.
So, here's the process, first the detail looked like this after routing.


.... this was carefully chiseled out to the other leg. The temptation is to take it out with one pass but that usually results in a rough, chipped out area; don't ask me how I know that! Once one side is chamfered.....

.... the inner corner is cut to form the miter by angling the chisel from the drawn in line to the inside of the joint. The other leg can now be shaped in the same manner. You need to keep in mind that you first have edge grain but when you get to the other leg you'll run into end grain. Details set custom work apart from mass produced work.

It's not meant to sound like an excuse or anything but in a picture framing class I took recently the speaker said that the beauty of a frame made by hand is its' inconsistencies. This really is a true statement when you think about it. Not too long ago I created a picture frame using a beading tool. When you looked at it closely you could tell it wasn't machined by a router or CNC machine. A slight bobble here, a slightly deeper cut there, and so on. That added to it's over-all appearance. Saying that though it is important to distinguish between hand crafted beauty and crudely done work!
Tuesday, July 31, 2012
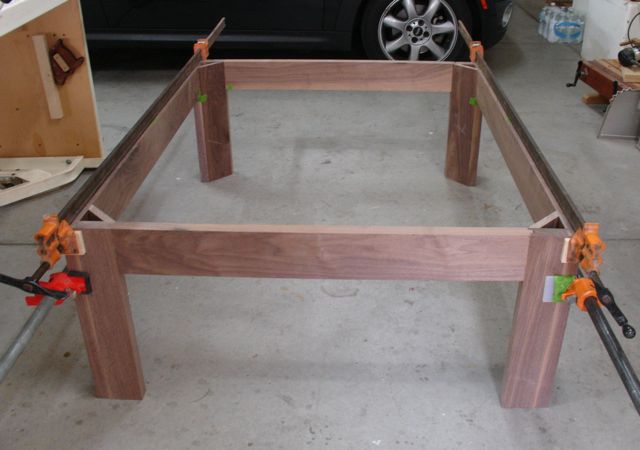
Table Bases Assembled
 |
| Coffee Table Base |
At last, all of the bases are now assembled. Thanks to Diane and a break in the heat I felt I could tackle the biggest base of all. This was accomplished the same way as the end tables by gluing two legs and an apron one day then assembling the rest the following day. I've made a bit more progress on the two, end table bases:
 |
| End Table Bases |
The insides of the legs have a very small, 45 degree chamfer cut on them. I think that this will add just the slightest shadow line while still remaining very contemporary over-all. When I met with the client we discussed how the Travertine would be placed on the base and concluded that since it's so heavy it's probably not going to go anywhere! Probably true but the more I thought about it, it began to concern me. If the table is moved in the future it could slide off if one end was higher than the other. I'm thinking that once it starts to move a little bit it's not going to be easy to stop!
Well, I've been told that I "pre-worry" and it's probably true. What I've decided to do is to attach those blocks you see on the inside of the apron. These are glued and screwed into place, the long sides of the coffee table will have two of these. I bought some 4" long mending plates and these will be screwed to the block and then the piece of plywood that is already attached to the Travertine. A little extra work but to my way of thinking, also some peace of mind.
All that remains is cutting the chamfer on the coffee table then some final scraping, planing, or even sanding, as needed. Next will be Danish oil and at least 5 coats of my hand rubbed top coat. Delivery and installation will follow that so I'm estimating that two thirds of this commission is now done!
Saturday, July 28, 2012
OMG!! John's Using Nails
Diane likes to give me a bit of hassle for not using nails on furniture and tells me all of China's finest from Walmart, Target, Cost Plus, etal has them! She knows though that joinery is for things that are made to last and that's the way I like to build them. You may recall in my Anatomy of a Leg blog how I designed the legs for this project. The L-shaped legs are closed off with a mitered piece to give them a streamlined yet structural appearance. To clamp all of them in place would have called for specialized, shop made cauls and a whole bunch clamps. Using an air powered brad nailer makes the work go quicker and it's much easier to line up your parts when they're covered with slippery glue!
Here's the approach I took. On some scrap pieces I determined where the brads should be placed so there was no chance they'd come out on the front side -- not a good option. Masking tape was applied and a line drawn on it to mark the location:
Quite easy to apply the glue, hold the back piece in position and nail it on. Quick work to complete all twelve legs, now to conceal the holes. I thought that the tape could serve double duty. Just like taping the inside of a box to keep the glue off of the wood I figured that if the putty was put in with the tape in place the wood wouldn't get stained...
.... and I was correct, none of that unsightly stain that even Famowood can leave on the wood. Even though these pieces are on the inside of the table and probably never be seen I don't want to have any blemishes. If the need arrises to do this again I think the tape should be removed right after the putty has been applied.
The final step before assembly is to smooth out the surfaces with a smooth plane. This is probably one of my favorite tools, a Lie-Nielsen #4 Bronze Smooth Plane. I took these pictures and hope that you can see the slight yet significant difference in the surface before and after the Smooth Plane has worked it's magic. Here it is before:
It's one of those things you may not spot immediately but if it's all about the wood for you as it is for me this is an important step in furniture design and construction.
Checking the temperature in the shop when I completed the end table pieces and seeing that it was in the high 80's I decided to give in to my impulse and get some assembly done. I decided to go ahead since there would only be two joints to glue and get together at a time. Hopefully the weather cooperates and gives me a low 80 degree reading in the morning. Then I can get Diane's help to assemble the two end tables.
Here's how they look paired up and drying. Just checked the temp and at 4:45 this afternoon it's a toasty 101 and the glue would set up before the clamps are in place!
Here's the approach I took. On some scrap pieces I determined where the brads should be placed so there was no chance they'd come out on the front side -- not a good option. Masking tape was applied and a line drawn on it to mark the location:
 |
| Ready to be Nailed |
 |
| Famowood |
 |
| Almost Invisible |
The final step before assembly is to smooth out the surfaces with a smooth plane. This is probably one of my favorite tools, a Lie-Nielsen #4 Bronze Smooth Plane. I took these pictures and hope that you can see the slight yet significant difference in the surface before and after the Smooth Plane has worked it's magic. Here it is before:
 |
| Before ... |
I'm hoping that you can spot the differences. There are ever so slight chatter marks made by the planer when the wood was surfaced. It's subtle but if you ever examine a piece of wood in the light and see slight divots going across the grain. They could be sanded out but planing them shears the wood and leaves what is considered a "cleaner" appearance.
 |
| And After |
Checking the temperature in the shop when I completed the end table pieces and seeing that it was in the high 80's I decided to give in to my impulse and get some assembly done. I decided to go ahead since there would only be two joints to glue and get together at a time. Hopefully the weather cooperates and gives me a low 80 degree reading in the morning. Then I can get Diane's help to assemble the two end tables.
Here's how they look paired up and drying. Just checked the temp and at 4:45 this afternoon it's a toasty 101 and the glue would set up before the clamps are in place!
 |
| First Look at some Legs! |
Thursday, July 26, 2012
Mortise & Tenon Joints -- My Approach
The mortise and tenon joint is without question, one of the strongest traditional joints used in furniture construction. This is especially true where you need to make a right angled joint where the long grain of one board is running 90 degrees to the other. These Walnut table bases are a prime example of that. I may have mentioned that the client I'm making these for is the son of my first principal here in Las Vegas where I began my teaching career in 1977. At that time, we were either called woodshop or industrial arts. I taught my junior high school students how to make a mortise and tenon joint completely by hand with auger bits, chisels, and back saws. I reflected how my methods have changed through the years and I was able to dedicate my earnings towards some machinery. The position I take now is that the machines are my "apprentices" that perform the grunt work and I'm the craftsman that completes the task by hand -- works for me!
Here is the joint, ready for assembly. Since there are a total of 24 of these for the entire project I'm happy to have the dedicated hollow chisel mortiser to cut all of them. The stone for these tables are some pretty heavy pieces of Travertine. The apron is a bit over 4" wide and, as you can see, the mortise goes the entire width. This is to control any hint of twisting from the apron. The tenon is haunched at top and bottom. Whenever possible I'll use the measurement of a tool as the basis for the haunched area, in this instance I used width of my combination square to determine how long the haunch would be. I'll show you later on why that's beneficial.
A dado head on the table saw was used to cut the tenons. The length of the aprons makes using a tenoning jig on the tablesaw difficult. The first step was to screw a fence to the miter gauge. And yes, that is a gimlet. Why break out a drill when a simple tool will do the job as well and quicker.
Then, a stop block was attached to that fence and carefully adjusted for the exact tenon length but slightly oversize to allow for final fitting of the cheeks:
Whenever I do machine set-ups my habit has been to use a piece of MDF to adjust the blade height and stop block setting. Much easier to replace a cheap piece of MDF then to go back and machine another piece of Walnut that costs close to $7.50 a board foot.
Once the tenons were cut on both ends of the aprons it was time to decide which piece goes where. This is where the grain and color patterns are arranged in such a way that they will flow and be pleasing to the eye. As you get into the joinery and hand work it's really easy to mix parts up. Just as I did earlier on the legs, machinists stamps are used to identify the mating joint parts.
This is how my bench is set up for doing the next phase, the hand work that is quiet and enjoyable!
It only took two cuts with the backsaw to remind my that this work is much easier when it is elevated so out came my bench on bench:
Whether you're young or older like me, bending over the bench vise and cutting down low is pretty hard on the back. Seems like it takes me forever to straighten up again. I made this bench years ago and it's perfect for hand work like carving, sawing joints, chopping dovetails, etc. Matter of fact, I'm scheduled to teach a class on making one of these next month at the WoodItIs school here in North Las Vegas.
Now the hand work can begin. First up is laying out the depth of the haunch, I use a spacer that is as thick as the haunch is deep:
Next is the width of that haunch. Remember I used the width of a combination square to determine that? By simply lining it up with the outer edge of the tenon it's easy to mark off:
The tenon is cut to size:
Then a rabbet block plane is used to trim the cheeks, shoulders, and also chamfer the ends:
Now that all of the joinery is completed the next step will be to add the piece to the inside of each leg to create that triangular, beefier appearance.
Here is the joint, ready for assembly. Since there are a total of 24 of these for the entire project I'm happy to have the dedicated hollow chisel mortiser to cut all of them. The stone for these tables are some pretty heavy pieces of Travertine. The apron is a bit over 4" wide and, as you can see, the mortise goes the entire width. This is to control any hint of twisting from the apron. The tenon is haunched at top and bottom. Whenever possible I'll use the measurement of a tool as the basis for the haunched area, in this instance I used width of my combination square to determine how long the haunch would be. I'll show you later on why that's beneficial.
 |
| The Final Joint |
A dado head on the table saw was used to cut the tenons. The length of the aprons makes using a tenoning jig on the tablesaw difficult. The first step was to screw a fence to the miter gauge. And yes, that is a gimlet. Why break out a drill when a simple tool will do the job as well and quicker.
 |
| Attaching Fence to Miter Gauge |
Then, a stop block was attached to that fence and carefully adjusted for the exact tenon length but slightly oversize to allow for final fitting of the cheeks:
 |
| Tenon Stop Block |
Whenever I do machine set-ups my habit has been to use a piece of MDF to adjust the blade height and stop block setting. Much easier to replace a cheap piece of MDF then to go back and machine another piece of Walnut that costs close to $7.50 a board foot.
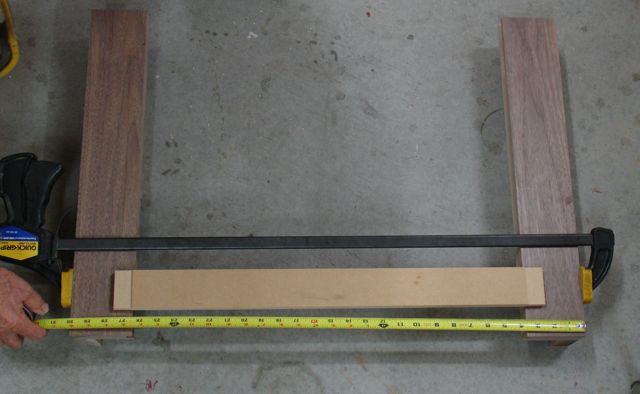 |
| Exactly 30", Just What I Needed! |
Once the tenons were cut on both ends of the aprons it was time to decide which piece goes where. This is where the grain and color patterns are arranged in such a way that they will flow and be pleasing to the eye. As you get into the joinery and hand work it's really easy to mix parts up. Just as I did earlier on the legs, machinists stamps are used to identify the mating joint parts.
 |
| End Table Parts Being Identified |
 |
| Left to Right: Apron - Bench Hook & Rabbet Plane- Leg Assembly |
 |
| Easier on the Back! |
Now the hand work can begin. First up is laying out the depth of the haunch, I use a spacer that is as thick as the haunch is deep:
 |
| Haunch Lay-out |
 |
| Width of Tenon |
 |
| Cutting Haunch |
 |
| Final Sizing to Fit Mortise |
Now that all of the joinery is completed the next step will be to add the piece to the inside of each leg to create that triangular, beefier appearance.
Saturday, July 21, 2012
Anatomy of a Leg
Well, I thought that the title might pique your interest but sorry to disappoint you, it's going to be about table legs. This one here in particular:
 |
| Walnut Table Base -- Leg Detail |
Back to the legs, the first step was to mill the pieces and cut them to length. A 3/8" tongue and groove joint was milled into the edges and the assembly process was ready to be started. I'm sure I've mentioned (complained!) about the heat. I drink enough water to stay hydrated and will work in the shop in pretty much any temperature but the glue is a different story. I need to work fast enough to make sure the pieces are assembled and clamped before the glue starts to set. The first glue up morning it was 82 degrees at 6am. Here it is, ready to get it together:
 |
| Clamps, Glue, Cauls, Wax Paper, & Water Ready to Go! |
 |
| Material Laid Out And Ready |
The first step to finishing the leg assembly after glue-up was to scrap the glue from the joint:
 |
| Glue Scraper |
This was followed with my favorite finishing tool, my Bronze # 4 Smooth Plane from Lie-Nielsen. I really don't think there's a better tool to get the type of finish I'm after.
 |
| Smooth Plane |
As usual, there will be some unruly grain that even the Smooth Plane set to a fine cut and small mouth had a hard time taming, that calls for a card scraper.
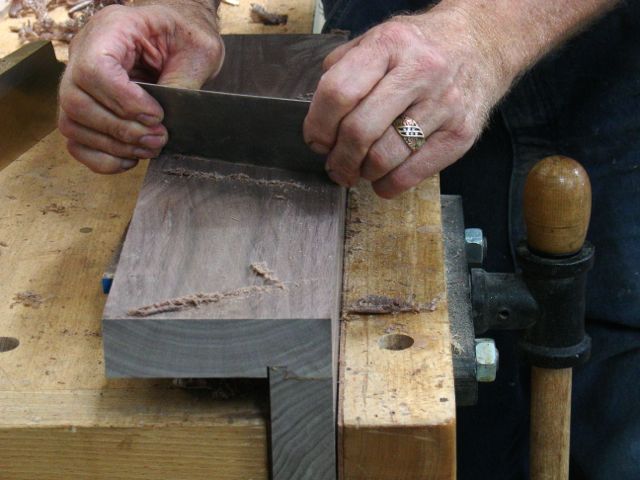 |
| Taming the Unrulies! |
Now comes the time when furniture construction can be artistic. There are ways to display the grain of the wood to your advantage. For these legs I wanted the grain to flame upwards from the floor. You may have noticed in the first picture that there are letters stamped into the tops of the legs, this is to help keep things organized. Chalk rubs off and pencil marks can be difficult to erase. I use a set of machinists letter stamps to mark the mating parts. Once that was done it was off to cut the mortises.
Strength and stability are required to support the Travertine so I opted for full length, 1/2" wide mortises. They are haunched for at the top and bottom to resist any twisting and 1 3/8" long. This is an operation where, although I've done many by hand, I call on a power tool to do the grunt work which I'll refine by hand. There's a trick I use on the hollow chisel mortiser:
 |
| Depth Stop with Spacer |
This haunch is about 1/2" deep so I put a spacer block on the depth stop when cutting it. Once the haunch has been cut on the top and bottom of the mortise, the block is removed and the rest of the mortise is cut out.
 |
| Full Depth Mortise |
The final step for the leg part is to cut the mitered piece that will enclose the open L-shape of the leg. This began with first milling the material and then cutting it oversize on the chop saw. This makes it easier to handle when cutting the angles on the tablesaw.
 |
| Rough Cutting |
It wasn't something I liked hearing when I talked about the quality of Walnut available these days to the guy at the lumberyard. He kind of shook his head and said "Walnut's been a different animal lately" or words to that affect. Maybe the demand is up or the supply is down but it's been difficult picking out the pieces I'd like to have. In any case, once they were rough cut it was time to miter the edges at 45 degrees.
 |
| Inside Leg Pieces, notice the MDF |
Whenever I have an exact or tricky cut to make I'll make the set-up on the saw using some MDF for my sacrificial pieces. Much rather make my mistakes on that then the Walnut! I need 4 of these pieces for the coffee table and 8 for the end tables. For the end tables the piece I found was wide enough to yield two pieces by flipping it over after the first cut.
 |
| Two Pieces from One Wide One |
This is a natural stopping point for this project. The mortiser is set up to cut the mortises in the end table legs but I won't know their size until I get more materials for the apron on Monday. It's pretty hot out there anyway and I don't anticipate any problems making them within the time frame we agreed on. May be an opportunity to work on the boxes again!
Wednesday, July 18, 2012
Change Brain out of Vacation Mode!
Although we had a great six day vacation in New York City I must admit I missed my shop time. Talk about masses of humanity --- whew! We stayed in an awesome, corner condo on the 33rd. floor in mid-town Manhattan with floor to ceiling windows so our views were spectacular to say the least. To be honest though the congestion of people, cars, busses, bicycles, food carts, etc. was quite a change from life here in the desert. I can only summarize it with this phrase: "It's a great place to visit but I wouldn't want to live there".
So now, put my brain back into woodworker mode and get to work on the table bases. The first step was to rough cut the material for the legs. This was more time consuming than I planned for. Although I had specified material with very little to none sapwood I had to cut around it quite a bit to get the pieces needed. Some of the boards had rich, dark color on one side only, the inside pieces were beige sapwood. Here are the pieces rough cut to yield as much dark Walnut as possible:
You can see that some of the pieces have quite a bit of sapwood on the edges, these were trimmed off of one side, then the rip cut edge was jointed so that it could be brought to finished size.
As you may imagine this created lots of beautiful shavings except where the grain got a bit interlocked but since this isn't the final edge it's not a problem. Once the legs are glued up into their L-shape I'll use a smooth plane to create the hand planed surface that's my trademark.
The leg design calls for a tongue and groove joint and since I have a total of 12 leg assemblies to make they were all cut at the same time -- semi mass production style. Here they are, ready to be cut to the required length and glued/clamped together.
I wanted to get the widest possible leg from the material available, the two end table leg sections ended up being 3 1/2" wide and for the coffee table I was able to get 4 3/8" wide leg structures. They still need some final hand work and then cut to length before glue up. Thankfully the mornings are forecast to be a bit cooler than last week so glue ups can be done in the shop. Really tough to glue up large surfaces when the temperature is 85+ degrees.
The only negative aspect so far is that since there was quite a bit of sapwood there was also quite a bit of waste. I need to order more materials than planned because of it but I wanted as much dark wood as possible. I'll need to reorder enough for the aprons on both of the end tables. I'm scheduled to teach a class at WoodItIs next month on making a portable work bench and if it gets enough enrollment I can possibly sell some of the sapwood pieces to my students.
Time to get out there and cut the legs to length and begin the glue up process. By the way, the stone is a Travertine that is primarily beige with some darker streaking. When the stone is combined with this Walnut base it'll be a beautiful marriage!
So now, put my brain back into woodworker mode and get to work on the table bases. The first step was to rough cut the material for the legs. This was more time consuming than I planned for. Although I had specified material with very little to none sapwood I had to cut around it quite a bit to get the pieces needed. Some of the boards had rich, dark color on one side only, the inside pieces were beige sapwood. Here are the pieces rough cut to yield as much dark Walnut as possible:
 |
| Phase One |
You can see that some of the pieces have quite a bit of sapwood on the edges, these were trimmed off of one side, then the rip cut edge was jointed so that it could be brought to finished size.
 |
| Jointing the Edges |
As you may imagine this created lots of beautiful shavings except where the grain got a bit interlocked but since this isn't the final edge it's not a problem. Once the legs are glued up into their L-shape I'll use a smooth plane to create the hand planed surface that's my trademark.
The leg design calls for a tongue and groove joint and since I have a total of 12 leg assemblies to make they were all cut at the same time -- semi mass production style. Here they are, ready to be cut to the required length and glued/clamped together.
 |
| Ready for Final Sizing and Assembly |
I wanted to get the widest possible leg from the material available, the two end table leg sections ended up being 3 1/2" wide and for the coffee table I was able to get 4 3/8" wide leg structures. They still need some final hand work and then cut to length before glue up. Thankfully the mornings are forecast to be a bit cooler than last week so glue ups can be done in the shop. Really tough to glue up large surfaces when the temperature is 85+ degrees.
The only negative aspect so far is that since there was quite a bit of sapwood there was also quite a bit of waste. I need to order more materials than planned because of it but I wanted as much dark wood as possible. I'll need to reorder enough for the aprons on both of the end tables. I'm scheduled to teach a class at WoodItIs next month on making a portable work bench and if it gets enough enrollment I can possibly sell some of the sapwood pieces to my students.
Time to get out there and cut the legs to length and begin the glue up process. By the way, the stone is a Travertine that is primarily beige with some darker streaking. When the stone is combined with this Walnut base it'll be a beautiful marriage!
Friday, July 6, 2012
Walnut Tables
As I mentioned in my last post it's now time to start on the latest commission. This client has two end tables and one coffee table that has some really nice stone for tops. The bases -- well, that's another story. They are a faux marble finish artfully applied to an MDF apron and probably Poplar laminated legs. Very ornate and well done for that style but they want something a bit more contemporary. That's where I come in. They saw the elliptical Walnut shelf and made their contact based on that piece.
They sent me a picture of what they had in mind and it's going to be straight forward yet dramatic in appearance. You know me, the wood is the star of the show and this will follow that theme. The entire project will be made from 6/4 Walnut. Peterman Lumber here in Las Vegas ordered it in for me from their California yard in Fontana. Even though they don't stock it here there is never a shipping charge or problem when working with them. Here's what I got:
These are some really nice boards. I asked if they could select boards with a minimum amount of sap wood and at least 4 1/2" wide. The narrowest board is 5 1/4" while the beauty on the left is 12 1/2"! I've always had a good experience with them. Even though I'm far from being one of their large accounts they have always treated me well and give that good customer service that makes you want to continue to do business with them.
The plan is to first make L-shaped legs that will be closed off on the inside by a mitered piece. These will be approximately 5" wide. The apron will attach using mortise and tenon joinery and the finish will be natural oil with my trademark, hand rubbed and applied top coats. The stone tops are so heavy they will just need to be laid on top of the bases with cleats that will keep it all from shifting. Definitely not one of those tables you'll pick up easily to vacuum under!
Now comes the exciting part, going out there and matching grain and color patterns in an artistic manner to show the wood at its' finest. Most important now to follow the old adage: Measure Twice & Cut Once.
They sent me a picture of what they had in mind and it's going to be straight forward yet dramatic in appearance. You know me, the wood is the star of the show and this will follow that theme. The entire project will be made from 6/4 Walnut. Peterman Lumber here in Las Vegas ordered it in for me from their California yard in Fontana. Even though they don't stock it here there is never a shipping charge or problem when working with them. Here's what I got:
 |
| 50 plus Board Feet of Black Walnut |
These are some really nice boards. I asked if they could select boards with a minimum amount of sap wood and at least 4 1/2" wide. The narrowest board is 5 1/4" while the beauty on the left is 12 1/2"! I've always had a good experience with them. Even though I'm far from being one of their large accounts they have always treated me well and give that good customer service that makes you want to continue to do business with them.
The plan is to first make L-shaped legs that will be closed off on the inside by a mitered piece. These will be approximately 5" wide. The apron will attach using mortise and tenon joinery and the finish will be natural oil with my trademark, hand rubbed and applied top coats. The stone tops are so heavy they will just need to be laid on top of the bases with cleats that will keep it all from shifting. Definitely not one of those tables you'll pick up easily to vacuum under!
Now comes the exciting part, going out there and matching grain and color patterns in an artistic manner to show the wood at its' finest. Most important now to follow the old adage: Measure Twice & Cut Once.
Subscribe to:
Posts (Atom)