Monday, May 27, 2013

New Box Series -- Lidded Finger Joint


     As I was wrapping up the Slanted Dovetail series of boxes I was also beginning work on another run of the Lidded Finger Joint series.  I'm not kidding, I need to get to an easier, less time consuming series to clear my head just a little bit!  Here's the end result of the first assembled one:

Clamped Up -- Fingers Crossed
     In case you're wondering why I say "fingers crossed" it's because this is a difficult glue up.  All of the finger joints need to be glued (obviously) and the lid has to be aligned on the hidden brass pin hinges and then kept square.  Looks okay but the proof will come when the clamps are removed and I can see what I've really done.  This one has some doweled joints that will be added once the glue has set up and the clamps are removed.
     The wood I used for these is Macacauba, if you'd like to know more about it go to this LINK, it's a pretty awesome wood but these particular boards were difficult to work with.  Like any project we started out planing an edge.  Prior to that though I did run it through the planer to get a 1/2" thickness.

Establishing a Working Edge
     When I build these boxes I let the size of the boards I have determine the dimensions of the boxes.  Once the pieces were ripped and planed to width they were cut to length as required.  Since it's a good design element to have the grain follow the boards around the box you need to cut a front, then a side, then the back, and finally the other side.  My system is to first set a stop block for the long dimension and cut the front:

Cutting the Front
     Next I'll insert a spacer block to cut the side piece.  Just for an example it the length of the box is 10" and the width is 6" this spacer block would be 4":

Cut With Spacer in Place
     As the pieces are cut to size, I lay them off to the side in the order they're cut and then mark them with a piece of tape to keep track of how to reassemble them:

Marked for Re-Assembly
     This Macacauba seemed to be harder than the previous batch I've finger jointed.  You could hear and feel the resistance as the dado head worked to cut the wood.  I suspect that the hardness of this material will require sharpening the blades!

Finger Jointing
     Steps that followed for this series of boxes were to cut a groove for the bottom and then cut a piece of plywood to fit.  Some of these boxes will have brass screws in the fingers so I needed to pre-drill for them.  This creates an interesting element once they're filed smooth and polished; did I mention this project is time consuming?  The lid and carefully drilling holes for the 1/8" brass pin is next.  Unfortunately, one of the lids slipped a bit so there will be a different style lid for that one!
     After the drilling is done, the hinged edge needs to be shaped so the box opens:

Fitting/Shaping the Lid
     This is a combination of a quarter round router bit and then hand planing the opposite edge so the lid will open as you see it.  Now a lid lift needs to be crafted and again, that's a combination of hand and power tool work.  After forming the piece of Walnut for the lift the process begins by using  a hinge template to remove some of the under side of the lid:

Router Work
     This is followed by carefully fitting the piece in by hand -- so much nicer and quieter!

Fitting the Walnut Lift

     Now, before assembling the box I'll plane the inside surfaces as well as both sides of the lid to get them smooth:

Smooth Plane Work
     My preference is to use liquid hide glue for these types of glue-ups.  I like the longer open time it gives me.  Unlike PVA glue, the wood doesn't seem to swell up and make assembly more difficult.  Old Brown Glue is my choice of liquid hide glue.  It also cleans up easier than PVA glues.
     I have an idea for the next series of boxes using Baltic Birch plywood cut so to emphasize the various layers, something done years ago for decoupage plaques.  Honest, these will require less hand work with just simple miter joinery, dado for the bottom, and a tinted shellac finish.  Hobby Lobby has a bunch of interesting imported knobs that will finish this series off.  Probably get started on them next week.

Sunday, May 26, 2013

It's Been a While!


     Since Diane and I are planning to try a craft fair I need to focus more on building inventory.  Doing the boxes is different from building furniture on a custom basis because you really have no idea of who your customer will be.  I must admit that I prefer furniture but this keeps me in the shop and makes me self-supporting so to speak!  The fair we're going to try to get in is held in Summerlin, during the fall, and there is a jury that will determine whether or not we qualify for a space.
     Part of the process is that we take photographs of our booth and submit them.  Hmmm, since this is our first endeavor we don't have a booth or pictures of it!  Diane does such a good job researching different booths on the internet and always has a sense of what's needed, sure do appreciate that.  We did purchase a 10'x10', white, Easy-Up shade structure that was offered by Big 5 Sporting Goods.  Didn't have any luck on Craig's List finding one in white as is required by the fair.  Next up is building the displays to hold my boxes and her dolls.  It's a process but we're up for the challenge and interested in seeing how our work is accepted by the public.  Both of our Etsy stores seem to be on a slow streak right now.
     Here are the three boxes I completed this week.  They're all of the Slanted Dovetail series and pretty darn labor intensive.  I like how they turned out though.

Sapele and Lacewood

Walnut and Curly Cherry

Walnut and Lacewood
     Looking at the photographs I'm reminded of my saying: "it's all about the wood", doubt I'll ever get tired of the beauty and variations of this material.  The two boxes with the Lacewood have a bottom  lined with a piece of 100% wool while the Curly Cherry box is lined with brown leather and features a sliding tray for more storage options.


Saturday, May 18, 2013

What's a Bench Hook? 2nd. Meeting of the Hand Tool Class


     You may recall that the first project for the class currently held at Wooditis Studio and School is a bench hook, a project I refer to as Project Over-Kill.  Why you may ask, well I've taken this fairly simple shop made appliance and added dovetails, tongue and groove, and dowels to its joinery to make it something that that will be useful but also remind the students of the struggles they may have had making it in class.
     Basically a bench hook is something you hook over your bench, picnic table, truck tailgate, etc. which allows you to secure your wood while you work it.  It works because your hand that is holding the board is putting pressure against the part hooked over the working surface.  Below, I'm putting a chamfer on the bottom of a lid with a block plane.  Other uses are for sawing and chiseling -- they really are a great addition to any woodworkers tools.

Bench Hook in Action

     Although two students were unable to make it to class Thursday those who were here accomplished both parts of the dovetail and will no doubt be gluing up next session.  There is much that goes into making dovetails.  The process begins with carefully transferring the tails onto the pin board:

Transferring Markings

     Something anyone who's done dovetails probably realizes is that since the joint is hand cut and the two parts make a perfect match you need to label the pieces.  I'm sure I'm not the only one to cut a perfect joint only to find out I used the wrong end of the board!  Well, in a class situation you also need to make sure it's your board and not a classmates -- note to self for next class.
     Once your marking is done it's time to make the cuts:

Saw Cut Straight Please

     Here's where we learn that the success of sawing really depends on the body mechanics we use.  Here we see some good form with a Japanese style saw.  The handle is nestled next to her forearm, the saw is parallel to the board, and it looks like she's on track.
     Once the saw cuts are made to separate the pins it's time to chop out the waste between them:

Chopping Out the Waste
     This is the part of the work that takes time and requires a sharp chisel.  We had a session on sharpening to underscore that.  As I told them, sometimes you're lucky and the joint goes together easily but other times you may have to fiddle around with it for quite some time to get things to fit.  I know that there are furniture builders who make this joint on a daily basis and theirs will almost always drop right into place.  For most of us though, it's a bit more effort.
     Just a reminder, next week we'll meet on Wednesday instead of Thursday.  I'll be there shortly after 5:00 in case you want to catch up or get some extra help on your project.  We'll be cutting the material for the tool tote and give the dovetailing a rest while we start with lap joints.  See you then.

Monday, May 13, 2013

Summer is Here -- 99.3 Degrees in the Shop @ 5:00pm


     Oh boy, I think it's pretty early in the year for hitting 100 degrees in the shop but Mother Nature probably doesn't care what I think.  Now comes that crucial time where any glue ups will need to be done first thing in the morning or else inside on the kitchen island.  I'll work out there until my sweat causes the woods grain to raise or I fear rusting my tools!  Time to get my habit of drinking at least 70-80 ounces of water to make it through the day that's for sure.  The important thing I needed to get done today was to replace the cane in the Star Jasmine table that was accepted into the Design in Wood competition, the table needs to be delivered on Thursday, 5/23.
     The upside of doing one of a kind work and not pigeon holing myself into the same work processes is that it keeps me motivated.  The downside is that I need to re-train or familiarize myself with a process every time I do it.  Caning is no exception!  I've done a number of jobs using pre-woven cane and some requiring hand weaving but not enough to feel 100% proficient.  Diane and I both find that when we blog our work we will go back to it to jog our memories on a process.  With that in mind, here's a pictorial essay on how to cane with pre-woven cane.  I get my supplies from Frank's Cane & Rush Supply and found him to always be helpful either by phone or email so he's recommended by me.

     Here's the completed project:

Shelf Re-Caned (whew!!)
     I have to admit to some apprehension starting this since the table has already been accepted, just adds a little more stress to not slipping with a chisel and gouging the work.  The main difference is that this Radio Weave is actual reed whereas the other was paper.  Don't think I'll be using the paper product again although it's held up fine in a wine cabinet.  The process begins with soaking cane and the spline for at least two hours in room temperature water.
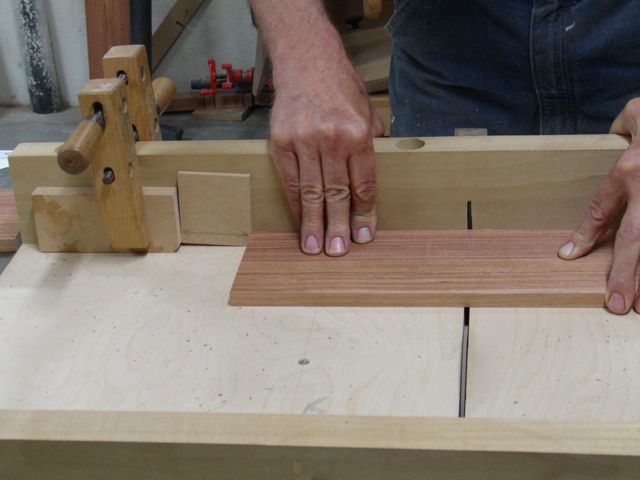
Pre-Mitering Reed


     Before I put the spline in to soak, I generally cut the miters but leave it slightly over-sized.  For that, a bench hook and Japanese razor saw it perfect.  Final fitting is done with a utility knife but I like having that first miter cut somewhat accurately using the bench hook as guide.


Beginning Step


     After the cane has been in the water for at least two hours it's laid onto the frame.  The process begins by pressing it into the groove using a wedge and working it in a little bit at a time. At this point, it's good to use your other hand to pull the overhanging piece up a little, this allows you to press it further into the groove.


     As you work your way around you need to anchor things into the groove.  You can use wedges for this but in my experience cutting short pieces of cane and lightly tapping them in place works better.  I'm using a wide wedge made of MDF which is nice for the width but the MDF begins to deteriorate in a fairly short time, better to make it out of wood.  I saw one video on YouTube where a large, metal one was used for this step.  My plan is to make one from wood and add a thicker section on top, maybe a dowel.  Really hard on the palm of your hand as you continually work the cane into the groove!


Trimming the End
     Although this looks rather unsafe it's okay if your chisel is sharp and you keep things under control.  Having those fingers on the outside isn't the safest but I keep them "out of the line of fire" of the chisel.  What's happening here is that now that the cane is pressed into the groove it's time to trim the pieces on the outside.  It begins by pulling out the strands that are parallel to the weave.  Most tutorials I've seen on this show using a utility knife which to me is more dangerous and much harder to control.  The goal is to trim the ends just below the top of the groove.  The slicing motion with a utility knife is hard to control and there's a definite risk of slipping out of the groove and slicing the wood.  It also has the tendency to pull and distort the weave.  You can rest the chisel on the inside edge of the groove, angle it downward, and trim them off without the risk of slipping out to cut the frame.  The chisel does have to be very sharp for this though.

Final Trimming


     Just about done trimming the ends of the cane.  Palm of my hand getting kind of sore by now!  The piece of spline is in temporarily for now on the right, long side.


Putting Glue in the Groove


     Finally time to glue the second piece into place.  Michael, from Frank's Cane recommends ordinary PVA glue like Elmer's Glue-All.  According to him the drying time for it and the cane is the same.  Previously I used Liquid Hide Glue which he told me dries slower than the PVA so the cane maybe dry but the glue isn't fully cured and that could result in the cane pulling loose.  Made me wonder if that's what happened with the previous cane and was the cause of the waffling.


See the Mallet?


     The longest sides are glued in first.  The tricky area is the miters at the corners.  If you undercut them it's easier to get a good fit.  As I mentioned, I precut them before soaking to give me an accurate angle then trim them with a utility knife to fit.  I use a rubber, dead blow mallet which is blurred in the picture but you get the idea.  Don't beat on the reed spline too hard because you can deform it.
     All that remains is to let it dry thoroughly for a couple of days inside the house and then re-apply the top coats.  I plan to do another coat on the top of the table and it'll be ready to take to the Design in Wood competition next Thursday.

     By the way, I just gave the panels a little tap and they sound as if they're as tight as the proverbial drum!


First Class Meeting 5-9-2013


     After all of these years teaching there's still a bit of apprehension whenever I start a new class or meet a student for the first time.  I've told myself that's a good thing; having had complacent teachers that "just go through the motions" and as a rule, didn't get much from their class.  Woodworking is a passionate endeavor for me and I want to share that.
     There's an even mix of male/female in this class with four of each.  Skill levels range from novice to those with quite a bit of experience that want to add some hand tool skills to their repertoire.  The goal for the first to sessions is to try to keep the class pretty much at the same place on their project which is this bench hook:

De-Constructed Bench Hook
    My aim is to familiarize them with marking techniques, chisel, plane, and dovetail saws as they build this project.  It's one they'll be able to use in their future work.  Class started with a demonstration on how to lay out the dovetails -- then they were on their own.  Once all the layout was completed another demonstration showed cutting and chopping out the waste.  We accomplished quite a bit with all getting the tails laid out and cut.  First thing next Thursday will be transferring them, cutting the pins,  and hopefully completing the project so we can start work on the tool tote.  Here's some candid shots of them hard at work.  It's interesting to see the different approaches and body stances they use.  They're definitely concentrating on their work -- looking forward to see how the fitting portion of the joint goes.  One thing I've stressed is that cutting the joinery in 3/4" thick material is much more difficult then when we use the 1/2" thick material for the tool tote project.


Saturday, May 11, 2013

What -- Making Candy in the Shop?


Candy Thermometer but no Candy
     First of all the exciting news is that my entry of the Sapele Hall Table was excepted into the Design in Wood competition sponsored by the San Diego Fine Woodworkers Association.  Here's a view of the table, actually one of the pictures I submitted:

Sapele Elliptical Hall Table with Drawers
     There was one slight problem and that is that the caning on the bottom shelf began to waffle!  My suspicion is that the cane was so dried out from being in my 100+ degree  shop in the summer that it was unable to re-hydrate and stretch tight.  It was fine for a few weeks but as it became accustomed to the indoor conditions the waffling began.  I had already ordered replacement from Frank's Cane before the table was accepted -- couldn't stand seeing the waffle, seems as if my eye went right to it!
     Of course that meant I needed to disassembly the shelf, bring it out to the shop, and remove the existing caning.  Even without the pressure of the upcoming competition I wasn't looking forward to this needed task knowing that one slip of the chisel and we'd be back to square one.
     I had used Old Brown Glue for the cane so wanted to double check with Patrick on the website to get his advice on the best way to rehydrate the glue.  That brings us to the top picture and the candy thermometer.  For some restoration work I'd used a water and vinegar solution but his suggestion was water and a steam iron to about 150 degrees.  Didn't want to use a steam iron and risk raising the grain so did the compromise thing and heated the water instead.  The small bottle was used like a syringe to suck up some heated water and then squirt it where needed.

Removal in Progress
     My first thought was to remove the reed that holds the cane in by stripping sections out as I went.  I figured that the more layers of reed I removed, the easier it would be for the water to penetrate and dissolve the glue.  That was a good start but I discovered it worked better if I elevated the shelf so the water would run downhill at the bottom of the groove.

It's Working!!
     This allowed me to pry it out and pull up at the same time.  The tool I'm using is one of a set of those high quality carving tools offered by Harbor Freight for less than $10.00 for a complete, professional set!  There was a sign to tell you more water was required, a cracking sound that sounded just like I imagined the wood would make if it was splitting.  Kind of alarming but it turned out to be the glue cracking because it was too dry.  More water = no more splitting sound.
     Here you can see a before and after cane removal.  The plan is to let it dry completely until Monday, then I'll make a thin scraper that will just fit inside of the groove to remove any residue and re-cane.

One Down, One to Go


Tuesday, May 7, 2013

Getting Ready for the Hand Tool Class


      As of today there are 7 students enrolled in the Hand Tool Woodworking class that starts this Thursday at Wooditis here in Las Vegas.  I've spent much of the morning preparing the stock for the two projects.  Jamie bought the materials we need and brought it over to my shop so I could prepare it for the class.  Our first project will be the bench hook that I refer to as Project Overkill.  Bench hooks are really a pretty simple shop made appliance but very useful.  I designed this one to incorporate dovetail and tongue and groove joinery -- all hand cut!

Bench Hook Material
     We're using Alder for the base and Poplar for the two hooks.   You can see the deconstructed one in the back ground.  Alder is a good material to make your first dovetails in and they're fairly large so students have to deal with small pins or tails.  I'm a tails first guy so the Alder is the first material they'll work on.  The Poplar is a bit harder which is a mixed blessing; yes it takes more effort to saw but tends to pare and chisel smoother.  Of course, just when you think you know how a wood will react it throws you a curve ball.  I'm planning on being able to complete this project during the first two class sessions.
     The other project is a tool tote inspired by the one in Jim Tolpins book, The New Traditional Woodworker. This will take the remaining 4 weeks of the class.  I've modified it some as you can see in this photo.

Tool Tote Material
     I made the prototype out of Alder but Jamie and I decided that the Poplar, being harder, would chisel and cut more cleanly for them.  Sometimes the Alder seems to just fold or dent when paring, even with an extremely sharp chisel.  It's hard to see in the picture but I've also designed it with dovetails on one end and pegged lap joints on the other.  This way they'll get the chance to experiment with both types of joints.
     All that remains is to run off my hand out for cutting dovetails and make a detail drawing showing the layout for the tails.  Looking forward to this class, teaching is always rewarding.


Wednesday, May 1, 2013

FOUND -- The rest of my Mallet!


Easier With a Handle
     If you read my last blog you know my mallet that I've had for 40+ years finally decided it had done its last joint and broke at the handle.  I considered taking the Dutch way out and trying to repair it but that would have just been a temporary fix at best.  So I bit the bullet and went shopping on the net.  I  prefer to buy from like minded folks like me, those small shops making hand crafted items because that's what they love to do.  Diane and I fall into that category with our Etsy stores.  Anyway, I found a seller on Ebay that goes by New England Hardwoods, here's a LINK to his store.  I shared that gorgeous flame Birch mallet on facebook and it's a beauty!

Too Thick in the Middle


     Of course, I had to perform a Pegandectomy to put this mallet on the wall.  Hey, I'm a teacher and part of my credential allows me to make up words as needed!  This mallet is a bit fatter than the old one.


Out With the Old


     The first step to a successful Pegandectomy is to surgically remove the old peg.


Replacement Peg being Bored


     This is followed by carefully boring another hole to compensate for the larger girth of the replacement mallet.


Looks Like it Belongs


    The new peg is carefully sized and inserted with compatible glue and allowed to dry.  No stitches or sutures required if sized properly!  As you can see, the entire Pegandectomy operation was a success and the flame Birch mallet has found itself a new home!