Showing posts with label Lidded Finger Jointed Box. Show all posts

Monday, June 3, 2013

The Question is not ……..


    …….. what's it worth?  Rather it's this:  what is the public willing to pay during these economic times?

First Coat of Watco
      This morning I did the final sanding and applied the first coat of Watco to the four boxes in the current Lidded Finger Joint series.  The wood is Macacauba and I really think it contrasts nicely with the brass pins in the corners of the joinery.  Here's a close up of that feature:


Brass Pinned Finger Joints
     I've been involved in a forum thread about how to price your work.  Even a small run of boxes such as these take an enormous amount of time to produce.  Add the hardness of the wood and the time it takes to complete the joinery you're looking at boxes that should sell in the $300-$500.00 price range but the question is, would there be a market?  Prior to 2008 or so I would say definitely yes.
     On the pricing forum there is much information and formulas for calculating your overhead, material costs, and then paying yourself a salary for your efforts.  Even if you have a  home shop and don't have a huge overhead for that like me, you'll still be hard pressed to sell an item like this and make tons of money!  On Etsy these will be around $200.00 and the same at a craft show I may participate in this fall.  The disposable income that craftsman such as myself could tap in to before seems to have dried up!  I haven't had a furniture commission all year and marketing attempts have not resulted in any leads.  The past two months have seen the Etsy market slow as well and it's not just me.  Others on the various teams and forums report the same thing.
      So, what's a guy to do?  I can't lower my quality standards -- couldn't live with myself then!  Use cheaper materials -- wouldn't have the same market appeal.  Sell out to an off-shore concern (China) to produce my work at a pittance and then just market it?
     Neither of these are options in my book so I imagine I'll just keep on doing what I'm doing.  Stretch my creativeness and produce furniture and boxes that hopefully will sell.  I know I have the abilities, getting that Sapele Hall Table accepted into the Design in Wood show seems to prove that out.  I suppose it's just a matter of waiting it out, things are bound to get better aren't they?


Saturday, June 1, 2013

Lidded Finger Jointed Box Assembled


     One of the things that sets these boxes apart is the brass pins in the fingers.  These are quite time consuming but I think, they're worth it.  The process begins with pre-drilling the fingers on a special jig I made for the drill press.  After the box is glued up and assembled those pre-drilled holes have brass screws put into them.  This can get tricky!  The screws need to be inserted far enough to completely conceal the threads but not so far that they break off.  Inevitably, if they break it'll be below the surface -- don't ask how I know that!  That requires carefully drilling out most of the screw and then putting in a new one.

Two Down -- Thirty-Eight to Go
Almost There


      Next is to clip off the heads from each of the screws with a pair of nippers, notice how it leaves quite a pointed end sticking up.  This can't be sanded so a file is used to work each screw until it's almost flush with the surface.  If you try to sand the pointed piece you'll not only tear the paper it will also ruin your sanding pad!


Yes, That is a Power Tool!

     Those of you that follow my work know that I pride myself on the hand tool usage but also that I'll refer to myself as a Hybrid Woodworker.  In other words, although hand tools are preferred there are times a power tool does the work much quicker and more efficiently.  Hard enough to make a decent hourly wage on these as it is!  I'm using a Bosch, 6" random orbit sander which is a fantastic machine.  I initially purchased it in the late 1980's to wax a fiberglass boat we had at the time.  It's probably the best r/o tool out there.  A hand tool choice would have been a plane to flush the ends of the finger joints but the addition of the brass changes that.  I begin with 100 grit on the r/o, then 150 grit on a finish sander but do hand sanding with 220 and a cork block prior to applying the finish.   That's work for tomorrow as it approached 93 degrees and I was starting to sweat on the wood!
     I was able to set the power tools aside to cut the chamfer on top of one of the lids.  This is for the box that "flipped its lid" and had to be modified.

Chamfer on End
     This is an example of that quiet hand work.  Simply draw a line for the width of it, hold the block plane at what seems like a proper angle, and plane until you hit the line.  Always do the end grain first as it'll have a tendency to split.  After both ends are done you can do the edges.  The angle I chose was just one that looked right to me. Instead of using a protector to lay it out I locked my hand to the angle I felt was "just right" and chamfered each edge.


Meet at the Corner
         Once the lines meet at the corner that's your clue  telling you that you're done!  The object is to have a single chamfer all the way around the edge of the lid.  A router bit would probably do it quicker but, in my opinion, it would need to be planed smooth to eliminate the chatter marks so why bother setting up the router and creating all of the noise and dust?


Monday, May 27, 2013

New Box Series -- Lidded Finger Joint


     As I was wrapping up the Slanted Dovetail series of boxes I was also beginning work on another run of the Lidded Finger Joint series.  I'm not kidding, I need to get to an easier, less time consuming series to clear my head just a little bit!  Here's the end result of the first assembled one:

Clamped Up -- Fingers Crossed
     In case you're wondering why I say "fingers crossed" it's because this is a difficult glue up.  All of the finger joints need to be glued (obviously) and the lid has to be aligned on the hidden brass pin hinges and then kept square.  Looks okay but the proof will come when the clamps are removed and I can see what I've really done.  This one has some doweled joints that will be added once the glue has set up and the clamps are removed.
     The wood I used for these is Macacauba, if you'd like to know more about it go to this 
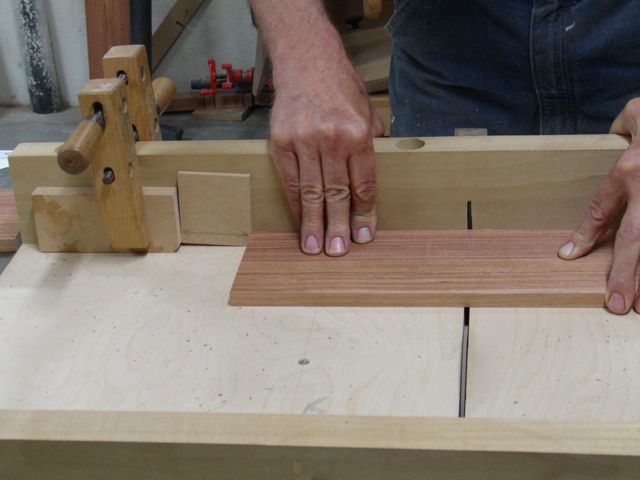
LINK, it's a pretty awesome wood but these particular boards were difficult to work with.  Like any project we started out planing an edge.  Prior to that though I did run it through the planer to get a 1/2" thickness.

Establishing a Working Edge
     When I build these boxes I let the size of the boards I have determine the dimensions of the boxes.  Once the pieces were ripped and planed to width they were cut to length as required.  Since it's a good design element to have the grain follow the boards around the box you need to cut a front, then a side, then the back, and finally the other side.  My system is to first set a stop block for the long dimension and cut the front:

Cutting the Front
     Next I'll insert a spacer block to cut the side piece.  Just for an example it the length of the box is 10" and the width is 6" this spacer block would be 4":

Cut With Spacer in Place
     As the pieces are cut to size, I lay them off to the side in the order they're cut and then mark them with a piece of tape to keep track of how to reassemble them:

Marked for Re-Assembly
     This Macacauba seemed to be harder than the previous batch I've finger jointed.  You could hear and feel the resistance as the dado head worked to cut the wood.  I suspect that the hardness of this material will require sharpening the blades!

Finger Jointing
     Steps that followed for this series of boxes were to cut a groove for the bottom and then cut a piece of plywood to fit.  Some of these boxes will have brass screws in the fingers so I needed to pre-drill for them.  This creates an interesting element once they're filed smooth and polished; did I mention this project is time consuming?  The lid and carefully drilling holes for the 1/8" brass pin is next.  Unfortunately, one of the lids slipped a bit so there will be a different style lid for that one!
     After the drilling is done, the hinged edge needs to be shaped so the box opens:

Fitting/Shaping the Lid
     This is a combination of a quarter round router bit and then hand planing the opposite edge so the lid will open as you see it.  Now a lid lift needs to be crafted and again, that's a combination of hand and power tool work.  After forming the piece of Walnut for the lift the process begins by using  a hinge template to remove some of the under side of the lid:

Router Work
     This is followed by carefully fitting the piece in by hand -- so much nicer and quieter!

Fitting the Walnut Lift

     Now, before assembling the box I'll plane the inside surfaces as well as both sides of the lid to get them smooth:

Smooth Plane Work
     My preference is to use liquid hide glue for these types of glue-ups.  I like the longer open time it gives me.  Unlike PVA glue, the wood doesn't seem to swell up and make assembly more difficult.  Old Brown Glue is my choice of liquid hide glue.  It also cleans up easier than PVA glues.
     I have an idea for the next series of boxes using Baltic Birch plywood cut so to emphasize the various layers, something done years ago for decoupage plaques.  Honest, these will require less hand work with just simple miter joinery, dado for the bottom, and a tinted shellac finish.  Hobby Lobby has a bunch of interesting imported knobs that will finish this series off.  Probably get started on them next week.

Saturday, June 23, 2012

Extremely Labor Intensive

First Coat of Finish

     I'm not sure how others who work with wood feel about this but there are times on a project where I question the direction a project is going in.  Maybe I feel it's taking more time than I thought it would or should, maybe there's a set back or a failure, or what I envisioned in my mind is not what's happening.  Then, after working through all of those negative thoughts, I apply the first coat of finish and my vision is just as I'd anticipated.  Now all of the time spent has been justified and most of the problems are forgotten and lessons are learned.  Kind of like Marine Corps boot camp, only the good memories remain.
     The dark, reddish wood is called Macacauba and I just had a vision of brass being the perfect highlight for it.  Time consuming process because each finger was predrilled before the box was assembled to make sure they're all in the exact location.  Once the box was assembled the hole was enlarged ever so slightly so a brass screw could be inserted.  Well, brass is soft and Macacauba is hard so in my trial piece the screw twisted apart before it went in beyond the threaded part.  That added a step to the process:

 
Brass Screw Sequence (4 down; 48 to go!)
     I needed to cut the screw down first (right in picture) from the original 1" length (center in picture).  Then pre-drill each hole and drive the screw in until the threads were below the surface.  Next the head (left in picture) was cut off which ends up a little point at the bottom of the box.  This needs to be filed first, then sanded flush with the wood.  At the time I was wondering if it would be worth the effort but after seeing the first coat of finish I feel it was.  This process, just like so many others in woodworking, had it's finer points.  There was a fine line between the screw driven deep enough or else having the head twist off. That's what I feel makes this craft exciting, you're never really in control of what the wood wants to do. Just when you think you may have a technique figured out some bit of gnarly grain or tiny knot reacts in a way to let you know  you're really not in full control here.
     Now is time to start on the slanted dovetail series of boxes.  This style of boxes is predominately done by hand with dovetail saw and chisels.  The plan is to do one in Cherry & Leopardwood, one in Walnut & Zebrawood, and another in all Maple.  Looking forward to spending some quiet, relaxing work on those.

Friday, June 22, 2012

Whatever Was I Thinking?

     The morning started off with some pretty cool temperatures in the shop -- 83 degrees.  Because of that I figured if I got right on it at 7 am I could assemble the finger jointed boxes before the heat set in.  Here's the results:

75 % Isn't the Best Results!

     Unfortunately the Brazilian Satinwood box at the lower left isn't going to leave the shop.  During the assembly process, one of the Walnut pegs hit the groove the bottom sits in and went off by about an eighth of an inch.  That resulted in the box being out of square the same amount -- bummer.  I'll cut it apart to save the top piece and repurpose it for another box in the future.  I attempted planing the side of the lid but it's not up to my quality standards for leaving the shop.  The lid has some red coloration in it so hopefully I can design a different box for it.  Lots of work left to do on these though.
     For starters, each finger of the Macacauba boxes in the background will need to be pre-drilled for a brass screw.  Once that's done and the screw is inserted, the head of it will be cut off and then filed and sanded level with the sides for decorative accents.  Total of over 60 screws between the two boxes!  The Satinwood box will be somewhat easier, all that it needs is to have the Walnut pegs cut flush, planed, sanded, and finished.
     Here's what I started the morning with:

Yeah, What Was I Thinking??

..... and this is only for the Brazilian Satinwood boxes.  The insides of the each edge was taped to make any glue squeeze out easier to remove.  Almost wish I was an octopus for this assembly job.  The sequence was to apply glue to the fingers for the back and it's corresponding side.  These were assembled and the bottom was inserted into the groove.  Next, a brass pin and washer was put into place and the lid attached to the one side.  Now comes the fun part, gluing the remaining joints, fitting the hinge pin and the fingers in their proper place and all the time trying to be expedient so the glue won't set up in the heat before all's assembled.  I started with the smallest box and worked my way up.  For work like this I prefer to use Liquid Hide Glue as it allows more open time than other glues do.  Plus, it is reversible by soaking the joint with water.  I'd considered doing that for the box that went astray but decided not to. I've spent an incredible amount of time on these so far so if I want to make at least welfare wages on them it's not worth saving at this time.
     You may notice that the lids of the boxes have a different look than the rest of the box does.  That's because they are pretty much finished prior to assembly.  The way things go on this design with the hidden hinge pins once it's glued together that's it -- no more adjustments or fixes.  I'm pleased with how they feel when you open/shut them and hope they'll be a project someone will want.

Sunday, June 17, 2012

Smaller? Yes -- Easier?, No!

     As a furniture maker, an area where I can really let the wood "speak to me" is taking the time to match grain patterns and coloration of the wood.  This is one of those things that many people will look at and like but not necessarily know why one piece of furniture appeals to them more than another.  Since my preference is to keep the wood in it's natural color rather than staining it it's very important to my design ethic.  Here's a in progress photo of the series I'm calling the Lidded Box:

Lidded Box Series in Progress

     The challenge here was to keep all of the pieces and ends straight so the grain flows seamlessly around the box.  The reddish colored ones are made of Macacauba and will be joined with brass screws that will be cut off and filed even with the surface.  You can see the trial piece on the left.   The others are the Brazilian Satinwood.  They will be joined with Walnut pegs which will result in a nice contrast.  Here's a photo of that experiment:

Satinwood with Walnut Peg

     I'm looking forward to seeing how this will end up, I like it so far!  The next phase will be to fine tune the finger joints which are 1/2" wide.  This is one of those machine operations where if there was only one box to do it probably would have been just as fast to do it completely by hand but ..... with four boxes in this series making a jig and taking the time to set it up was well worth it.
     The real trick here was to keep the ends, front side, and back side organized.  After many trials the first step is to cut the side piece which is then used to set the proper spacing for the front/back:

Using the Side to set the Front
     After the first finger is cut the side piece can be set aside and the remaining joints can be cut:

Finishing the Fingers


     You may have noticed the chalk markings on the pieces of Macacauba, here is the goal:

All in a Row

     Not only did I need to keep the grain pattern in mind, especially with the Macacauba; it was important to make sure the right side faced out and the top and bottom were kept in their proper location.
     The next step was to cut the top finger from the front and back pieces.  This is to make room for the lid which will pivot on a brass pin.  This was cut oversized on the tablesaw and then planed to fit.  When I planed the Brazilian Satinwood the shavings were really cool!

Cool Shavings -- Brazilian Satinwood


     The final things accomplished before leaving the 98 degrees was to design a set up which would allow me to drill the holes in the center of each finger for the pegs and, of course; make the dowels from Walnut with the dowel plate.

Making the Walnut pegs

     The Lie-Nielsen Dowel Plate is well worth its' cost, can't think of any other way to get accurately sized dowels out of any species needed.