Showing posts with label Box Series. Show all posts

Monday, May 27, 2013

New Box Series -- Lidded Finger Joint


     As I was wrapping up the Slanted Dovetail series of boxes I was also beginning work on another run of the Lidded Finger Joint series.  I'm not kidding, I need to get to an easier, less time consuming series to clear my head just a little bit!  Here's the end result of the first assembled one:

Clamped Up -- Fingers Crossed
     In case you're wondering why I say "fingers crossed" it's because this is a difficult glue up.  All of the finger joints need to be glued (obviously) and the lid has to be aligned on the hidden brass pin hinges and then kept square.  Looks okay but the proof will come when the clamps are removed and I can see what I've really done.  This one has some doweled joints that will be added once the glue has set up and the clamps are removed.
     The wood I used for these is Macacauba, if you'd like to know more about it go to this LINK, it's a pretty awesome wood but these particular boards were difficult to work with.  Like any project we started out planing an edge.  Prior to that though I did run it through the planer to get a 1/2" thickness.

Establishing a Working Edge
     When I build these boxes I let the size of the boards I have determine the dimensions of the boxes.  Once the pieces were ripped and planed to width they were cut to length as required.  Since it's a good design element to have the grain follow the boards around the box you need to cut a front, then a side, then the back, and finally the other side.  My system is to first set a stop block for the long dimension and cut the front:

Cutting the Front
     Next I'll insert a spacer block to cut the side piece.  Just for an example it the length of the box is 10" and the width is 6" this spacer block would be 4":

Cut With Spacer in Place
     As the pieces are cut to size, I lay them off to the side in the order they're cut and then mark them with a piece of tape to keep track of how to reassemble them:

Marked for Re-Assembly
     This Macacauba seemed to be harder than the previous batch I've finger jointed.  You could hear and feel the resistance as the dado head worked to cut the wood.  I suspect that the hardness of this material will require sharpening the blades!

Finger Jointing
     Steps that followed for this series of boxes were to cut a groove for the bottom and then cut a piece of plywood to fit.  Some of these boxes will have brass screws in the fingers so I needed to pre-drill for them.  This creates an interesting element once they're filed smooth and polished; did I mention this project is time consuming?  The lid and carefully drilling holes for the 1/8" brass pin is next.  Unfortunately, one of the lids slipped a bit so there will be a different style lid for that one!
     After the drilling is done, the hinged edge needs to be shaped so the box opens:

Fitting/Shaping the Lid
     This is a combination of a quarter round router bit and then hand planing the opposite edge so the lid will open as you see it.  Now a lid lift needs to be crafted and again, that's a combination of hand and power tool work.  After forming the piece of Walnut for the lift the process begins by using  a hinge template to remove some of the under side of the lid:

Router Work
     This is followed by carefully fitting the piece in by hand -- so much nicer and quieter!

Fitting the Walnut Lift

     Now, before assembling the box I'll plane the inside surfaces as well as both sides of the lid to get them smooth:

Smooth Plane Work
     My preference is to use liquid hide glue for these types of glue-ups.  I like the longer open time it gives me.  Unlike PVA glue, the wood doesn't seem to swell up and make assembly more difficult.  Old Brown Glue is my choice of liquid hide glue.  It also cleans up easier than PVA glues.
     I have an idea for the next series of boxes using Baltic Birch plywood cut so to emphasize the various layers, something done years ago for decoupage plaques.  Honest, these will require less hand work with just simple miter joinery, dado for the bottom, and a tinted shellac finish.  Hobby Lobby has a bunch of interesting imported knobs that will finish this series off.  Probably get started on them next week.

Thursday, March 28, 2013

Tails Around the Corner, A New Box Series


Tails Around the Corner
     I've had this idea playing around in my head for quite some time now so decided it was time to act on it.  Since I'm one of a biz zillion folks on Etsy that makes custom boxes and the Etsy business is somewhat slow now is the perfect time to try something new.  The thought I've had was to make a dovetailed box but in an unconventional way.  Having never seen this before, as far as I know it's my original design.  Rather than having two sides of the box have tails and the other side have pins I wondered what would it be like to have a tail and a pin on one side!  With the contrasting wood (Quarter sawn Sycamore & Walnut in this case) I thought it would have an interesting appearance.  The box in front is glued and sanded, the one behind isn't.  I'd be interested in any constructive opinions you may have for me.
     Dovetails are the hallmark of fine woodworking.  Whether or not it's deserved is open for opinion but traditionally it's what you'll find on hand crafted furniture anywhere in the world.  This joint is commonly used to join drawer pieces at right angles to withstand the racking and pulling and yet, stay together.  You can find any number of articles and videos on the internet to discover ways to make it.  I prefer the quiet and simple way by the use of hand tools.  I thought I'd poke around and see if there was something I could do to make the work a bit easier.  I chanced upon a YouTube video by David Barron who's a furniture maker in the United Kingdom.  In it he used a fixture that automatically lined up the two pieces when you transfer your tail markings to the pin board.  Here's what it looks like:

Fixture from David Barron
     Basically it's an L-shaped piece with a raised edge on one side.  I used a piece of 3/4" MDF, some Poplar, and Pine to make this one.  When you put it into your vise you'll clamp the pin board flush with the top and up against the raised edge.  The raised edge should be less than your thinnest board, I made mine about 1/4" since I rarely dovetail anything thinner than 3/8".

Putting in Pin Board
     Once the pin board is secure you simply set the tail board on top of it and against the raised edge.  This is a small box but if it were larger you'd want to clamp it down before you scribe the pins.

Scribing the Pins
    My hands are somewhat in the way but I think you can see how it works.  Traditionally the pin board is put in the vise, raised up to the level of a block of wood or a plane.  You then put the tail board on top of that to scribe the pins.  It's always a challenge to keep things square and lined up.  With this fixture it's much easier ---- thanks David!
     One last thing on cutting dovetails.  With the new Knew Concepts fret saw many students have asked me if I'll be using that.  Well, the one thing that keeps me from that is it's quite expensive!  Besides, if you have a wide space to remove you could use a coping saw or simply chisel it out.  You just need to use care when you set your chisel in.  The method I use is to first cut a shallow recess on my scribed line with the chisel bevel pointing towards the waste side of the joint.

First Cut to Remove Waste
     I then flip the chisel over and cut back to that line to create a "pocket":

Pocket for lack of a better word!
     The purpose of this is to give some room for the bevel, if you don't do this the chisel can be forced backwards into your scribed line.  The most common problem most people have when removing this waste is taking too much at a time, this results in a very uneven and rough cut.  Take your time, it's not a race!

Easy, Take a Little at a time
     Hope this helps all of you cut your dovetails, check out the video from David Barron on YouTube.  Here's a LINK to that to make it easier.
     If you're so inclined I wouldn't mind getting some opinions on my concept of tails around the corner.  It is a little tricky to assemble and serves no real purpose other than being unusual and decorative -- I like it!


Saturday, October 27, 2012

A Dutchman for a Dutch Man!

   
     My uncle, who's Dutch like me, will be celebrating his ninetieth birthday next month and there is a luncheon planned in his honor.  Anyone who can survive ninety years deserves to be honored!  Well, this presented somewhat of a problem because after all, what do you possibly get for someone when they've spent nine decades here on this earth?  After all, I've only done six+ of them and my favorite gifts seem to be gift certificates to tool places.  A passion of his has always been music, he's been involved with it for all the time that I can remember so that seemed to be the perfect starting point.
     I recently bought some Sapele and plan to  eventually make a sofa table from it.  It seems similar to African Mahogany with a very pronounced ribbon grain.  Since I'd like to incorporate some carving in the table I thought this would be the perfect opportunity to see how this wood works.  Here's the motif chosen for the pencil box I'm making for my uncle.  By the way, I'm swearing any of my relatives to secrecy on this project -- please don't tell him about it.


     What could be more appropriate for a life long musician than the treble clef.  Here it's in the early stages of carving but in spite of the interlocked grain I feel like it's coming along okay.  The box itself  will have a sliding top and dovetailed corners.  Always up for a challenge and this wood proved to be just that.  The back of the box was pretty straight forward and my goal was to make as small of tails as possible.  Not only is the grain interlocked but it also has the tendency of wanting to split as you pare off the ends.  So far, so good.
     When I got to the front of the box I started with a half pin but the remainder of the box had remain intact to house the groove the lid would eventually slide into.  Well, you can see there is a bit of a gap above the middle pin.

Whoops!

     Good time to follow my heritage and create that Dutchman to fill the gap.  The story I've always heard is that this term came about because the Dutch are frugal and thrifty people, that sounds so much better than cheap!  Rather than tossing the entire board which would be wasteful, a sliver is glued in to take up the slack.  It's best to do this from a cut off of the board so that the match is as close as possible. You could use a hand saw to cut this sliver but I used the tablesaw instead.

Beginning of the Dutchman

     Use a push stick and don't cut all of the way through cut off piece.  If you're lucky you'll only need to do this once.  Prior to fitting it into the gap I use a bit of sandpaper to taper the end.  Always pay attention to the grain direction, it needs to match the joint.

Dutchman Glued In

     For these boxes my preference is to use Liquid Hide Glue, it has a pretty long open time and cleans up well.  Once the glue was dried, a zero-set saw was used to cut it flush.

Dutchman Trimmed Flush

     This was followed by careful planing with my block plane.  I've put a slight camber on this blade but even with the low cutting angle of the block plane the Sapele wants to splinter if you plane off the edge.  Very important to not only plane from the outside in but also pick up the plane without dragging it back over the edge.  The plane did a great job cleaning up the dovetails.

Upper Left Pin Remains
      Here you can see the results of careful planing.  The wood takes on a different appearance, obviously the pin on the upper left remains to be planed flush.  With the interlocking grain of this wood, even a smooth plane set for a super fine cut creates a bit of tear out.  Before doing the final work I'll need to experiment to see what the best way to finish the surface will be, it may call for a cabinet or card scraper with a very small burr.
     By the way, this is the first project I was able to use the new marking gauge that I made.  Beautiful, thin line that was easy to work to.  The sides for this box were resawn from a piece of 4/4 Sapele, here's how that line looked.  I always scribe the line from both sides and then bandsaw between them.

Scribed Prior to Re-Sawing

Tuesday, September 4, 2012

Just Like It Never Happened (almost)


Cleaned up and Ready for the Next Project


     There's a company that advertises on TV, they're a disaster clean-up firm and their ad states: Just Like It Never Happened  It seemed appropriate to use their slogan for this blog.  Whenever I'm working on a project things get to be a little disorganized which I really don't like.  Hate wasting time trying to find a tool because I was too involved to put it away in the proper place.  You end up tripping over bits and pieces, vacuum hose, extension cord, etc. and it really ruins the work atmosphere.  That's why years ago I began the habit of cleaning up the shop after every project so things were organized and ready to go on the next one.  This picture is the results of that effort this morning.  I'm donating a bunch of usable pieces of Walnut to a school and gave my neighbor a good sized box of firewood to boot.  Now I can move around without tripping and find whatever I need -- good feeling!
     I've wrapped up the final boxes for the show and begun to catalog them.  Diane has used her computer savvy to help me format a page for the labels and price tags.  This morning, before the sun hit the west side of the house I applied shellac to the last three boxes:

Final Shellac

     The box on top is the last of the dovetailed ones and since it's made of Walnut and Canarywood I've decided to call it Canary Tails.  The lid for it is in the foreground and then there are two more gilded lids that go to the Curly Maple boxes behind them.  After the shellac has cured for a week or so I'll rub them out and they'll be set for the show on the 20th. of this month.  Seems like I've been working on these for quite a while and I guess that's true!  Really looking forward to the show, I'll post the announcement next week for all of the details.
     One thing I've been noticing while working on the tablesaw is that I get some burning  on occasion when ripping.  It could be the blade is somewhat dull after all of the work I've been doing with exotic woods but I'm inclined to think that after all these years, the top has moved a bit so the blade is no longer in line and square to the table.  It's entirely possible since I move the saw around and all of that is done by grabbing on to the top.  If my memory serves me correctly there are only four bolts securing it, the hard part is checking the alignment.  In the past I've been able to use feeler gauges and get the rip fence parallel to the blade but have never messed with the tabletop alignment.  There are several systems that you can buy that cost in the $100.00 plus range and my pockets just aren't that deep!  As with most research these days, the internet was consulted and I found lots of different methods and suggestions.  What I came up with is pictured here.

Harbor Freight, Pine, and a Bolt

     At first I purchased a dial indicator with an arm and magnetic base for about $45.00.  Just couldn't get it to adjust and hold its' position to check the arbor run out.  Besides, to check whether or not the blade is parallel to the table and also that the rip fence is parallel to the miter gauge slot you need to have a way for the dial indicator to travel in the slot.  I made this sled out of a piece of pine and then drilled/tapped a piece of UHMW Polyethylene to attach it to.  Here's a close up view:

Sled Close Up
        The carriage bolt is bedded in the pine so that's secure.  The purpose of the slant is to allow the indicator to tilt when the throat plate is removed and get as close to the center of the arbor as possible.  Have I used it yet?, nope; it's too hot in the shop right now and I know that making these fine adjustments can be trying so I'll wait until I'm well rested and the temperature is lower.  Hope it works but I'll keep you posted.

Thursday, August 30, 2012

Latest Box, Sneak Peek


     Sometimes as we work by ourselves, enjoying the solitude of the shop and becoming completely immersed in what we're doing you get the urge to share your work.  This is not an ego thing or being a braggart; it's just that you're really pleased with how something you envisioned in your mind actually turned out.  That's this box here, it's a take on the slanted dovetail series but the sides are inverted.  Here's the first peek at it:


Called the BowTie Box
Long View
     This idea has been in my head since the first of the slanted dovetail series of boxes.  In my mind it seemed doable although not too easy.  I believe in challenging myself and this design did that.  The first step in the process was to cut the side piece from some 1 1/4" Walnut.  My saw blade tilts left so I needed to place the rip fence on the left side of the blade to avoid trapping the off-cut and risk the possibility  of it shooting back.  This was a 20 degree angle and I used a rip blade for this task.  Now I needed to remove the marks made be the blade during this step.


The best way to take care of that was with a card scraper. It was a bit tricky drawing the scraper without messing up the intersection of the two angled cuts.  Here's a close up taken during that process.  I'll need to burnish the scraper after this but for the most part I created a lot of nice curls.

Working on the Sides

     Next up was to figure out how to lay out the dovetails to really make this box unique.  The contrasting wood used in this box is Brazilian Satinwood and it really is quite a contrast to the Walnut!  To figure out a pleasing tail lay out an off-cut was traced on a piece of graph paper and then I played around with a couple of different lay outs.  Once that was done it's time to cut the tails.  I generally cut both sides at the same time.

Tail Lay-Out
     It's always wise to do something to mark the waste area -- I'd bet that everyone who's ever cut dovetails is guilty of removing the wrong part!  You'll notice I cut the shoulder which really helps make a tighter fit, in this case I wish I would have made it a bit deeper.
     After the tails were cut, chiseled, and squared it was time to transfer them to the side pieces.

Transferring Tails
     After the lines are scribed there's a technique I use to help me see the required lines.  You know that being a retired teacher I'm bound to have some chalk. By simply rubbing the chalk on the piece and then wiping off the excess it'll stay in the lines and make it easier to see.

Chalk Enhanced Lines
     You can see it works better on the end grain than it does on the face but it really helps you see the line to cut to.  As always, when cutting the pin board you cut inside the line.  Chopping out this uneven tail is somewhat challenging.  I had anywhere from a half an inch to 1 1/4" to remove.  After the saw cuts were done, you need to use a piece of the off-cut ripped out of sides to secure the piece down for chiseling.

Chiseling the Pins


     You may notice there is an extra cut in the middle of the material being removed.  I've found that it's easier that way.  Work continued and once completed the box was glued together.  I almost always use a cabinet glue from Lee Valley for my work but for this project decided to try Gorilla Glue.  That's always my choice for book matched panels and it's never failed me so thought I'd use it on this glue up as well.                    
     As that was drying I worked on the lid for this box.  I've mentioned that many times the amount of wood I have will determine how it's used.  In this instance I had one small piece of the Brazilian Satinwood left.  It was hot glued onto two pieces of walnut to create a "sandwich", then that was cut on the bandsaw and reassembled so it looked like this:

Completed Bow Tie Lid
     This was after it had been planed smooth, you can see I'm laying out the cuts so that the design is centered.  This was a good planing process, starting with the cabinet scraper, then the jointer plane, and finally the smooth plane to get it smooth.  It's always enjoyable to me; that planing process where you put that final, smooth surface on your wood.

Tools for Surfacing

     At this point, the rabbets have been cut into the lid, the bottom has been glued in to place, and all that's left is the final smoothing and finish.  That will have to wait until tomorrow morning, the humidity is up again and my perspiration is causing the wood to swell, after all; it is the monsoon season.

Saturday, August 25, 2012

Miscellaneous Hand Tool Ramblings

   
     It seems as if I'm on a countdown to the September 20th. show date and completing bits and pieces of different boxes.  There's still one more box I have in the works that I haven't even begun, of course; in my mind it's almost built.  I'm currently working on a pair of boxes that will have a carved and gilded top similar to the Gilded Cat Series.  I used the few, remaining pieces of Curly Maple for them.
     These are mitered with keys across the corner.  It seems as if my table saw is not quite in alignment because even with the jig I carefully made, the miters were off ever so slightly.  It must be time to use a dial indicator and adjust the table to make sure the blade is perfectly aligned to the miter gauge slot.  That's the downside to having the saw on a base, I'm sure that pulling it around by the top all these years has tweaked it a bit.  Until I get the time and the patience to do that I knew these miters needed to be refined.  That's where a shooting board comes in handy.

Shooting Board with 45 Degree Guide

     This shooting board is fairly small and was made when  I began working on the box series.  It uses a  dedicated a block plane and really works well.  I know that a table sawn miter is good enough for glue up but, as I said, theses were slightly off.  Check out the difference in the end grain where the block plane has begun to cut on the outer edge:

Planed vs. Sawn Edge

     I'm going to assume that a planed edge would have better glue strength than a sawn edge.  The same argument can be applied to finishing a piece.  If the wood is sanded, the fibers are abraded.  That will affect how the finish looks on the piece of wood.  By the same token, if that finish is planed the pores are wide open and the difference is apparent.  Sounds like a good argument to me, maybe I'll have to run an experiment!
     In any case, after these two boxes were glued up and ready for the next step which was to cut slots for Walnut keys.  Each edge has two slots.  Once again, here's an other good step for hand tool work.  I imagine you could just throw a sander to the wood but this is a cleaner, more accurate way to go about it.

Trimming Keys

     By putting my fingers on the back of the blade it helps to prevent the teeth from marring the work.  Saws like this that have no set to them are used to trim keys, plugs, or joinery even with the surface of the project.  Just like my example of sawn vs. planed edges, the same thing applies here.  The saw leaves a rough finish:

Paring Chisel to Refine Keys

     Here I'm using a 1" wide paring chisel.  I sharpen these to 25 degrees unlike the bench chisels sharpened at 30 degrees.  I had just sharpened this paring chisel and the Walnut shavings curled off like a piece of chocolate you might find on a Marie Callander's pie!  It was an easy process paring them flush with the surface of the box.  I know it's hard to see in the photo but there is a definite difference with the pared keys on the left and the sawn off keys on the right.  All of these little nuances add up to (hopefully) create wooden furniture, boxes, or whatever with a higher level of quality found commercially.

Thursday, August 23, 2012

Rain?? RAIN !! OMG -- *&%$^ RAIN!!!!

 
    Well, Tuesday night the weatherman said we had a pretty good shot at rain today starting in the late morning.  He also predicted that the lows could even be in the upper 70's and I was overjoyed!  Finally the temps were going to be a bit lower so I could spray shellac on the boxes and lids that I have been waiting to do.  Sure enough, at 6am the temps were just as he'd predicted and our usual blue and clear skies were cloudy and gray.  Since I don't like to disturb the neighborhood before 7am or so I had breakfast, read the paper, and then headed out to the shop.  After preparing the area on the side of the house with drop cloth, turntable, sawhorses, and boards to hold all of the parts I proceeded to tack cloth everything and prepare the air brush and shellac.  Must admit, I was feeling good!!
      I sprayed the bottoms of all the lids and the insides of the boxes and went back into the shop to work on hinge mortises.  Things were going fine when I started hearing the pitter patter of our much needed rain.  My first instinct was great, we're in a drought situation and really needed this --- then it hit me, I had 4 lids and 8 boxes out there with a fresh coat of shellac on them!  I moved pretty fast in spite of the knee I that had just been shot with rooster juice to get them indoors.  Probably muttered more than my share of "non-family friendly" words but it was a bit of panic.  In spite of it all, I managed to get them dry and finished by the days end.  Here they are inside with 5 coats of shellac on them:

Done & Drying
     The way I was able to conquer the weather was to make a temporary spray booth inside the shop, just inside the roll-up door.  This way I wouldn't get the overspray all over the shop or Diane's car but still have enough air circulation Here's what that looked like:

Makeshift Spray Booth
 
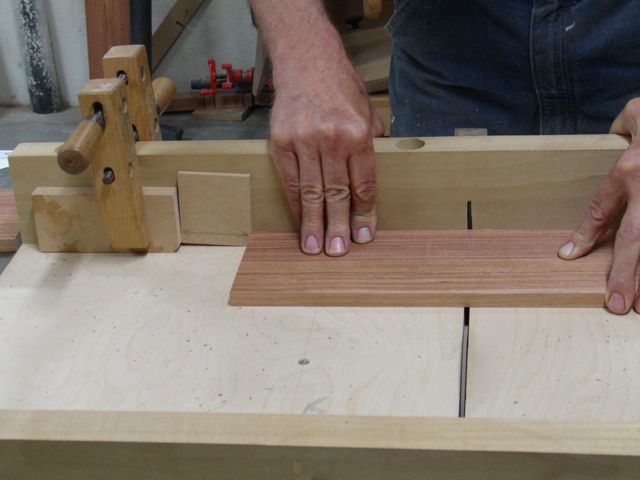
     With the garage door open to the street I didn't want to leave the shop unattended so found plenty to do to keep busy.  The one thing carried over from yesterdays jig making session was to fine tune the depth of the router and cut the mortises.  Worked great! Since I was planning to spray the shellac I didn't want to make too much sawdust so this was done while I was waiting for the rain to evaporate from the boxes and lids.

Mortising the Large, Urban Ranch Box
This was another case when I was really glad I had my bench on bench.  So much easier doing this type of work at a higher level.  My workbench is about 38" from the ground and this portable bench raises the work another 9 inches.  Speaking of the work bench, the class I was going to teach at WoodItIs didn't have enough people sign up so it won't be held.
     My procedure for the shellac is to spray 2 coats about 45 minutes apart and then let them dry for a few hours.  Everything is then lightly sanded with some 400 grit paper and wiped of with a tack cloth prior to being resprayed.  I generally put an additional 3 coats on them, spaced about 45 minutes apart. Once the shellac has cured at least a week it'll be rubbed out and waxed.  Since I was in the process of finishing,  I didn't want to raise any dust so it was time for that wonderful, quiet handwork.
     The large Urban Ranch Box (pictured above) has a tray that is about two thirds the width of that box.  Since it is pretty large I decided it would be a good one to divide in two.  The first step is cutting the stopped dado to accept the divider.  This will house the divider and is located above the groove for the bottom.  Approximately 1/4" wide, 1/4" deep, and 3/4" tall.


Lay Out of Divider Dado

     The outside of it is outlined with a the 3/4" chisel for the sides, the 1/4" wide for the top and then removed with a 3/16 wide chisel.  With the soft pine it was fairly easy going provided the chisels were as sharp as possible.

Stopped Dado


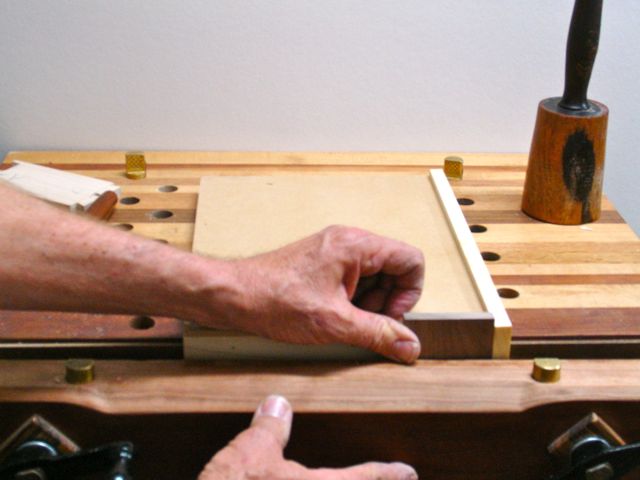
     Once they were both done it was time to make the divider piece.  Like I mentioned, no power tools on this operation due to the shellacking process and it was great to work without the noise and dust of the power tools.  Once the divider piece was cut to rough size, a marking gauge laid out the 1" size required.


Divider Ready for Planing 
     You can see how the divider with stopped dado looks.  Although I darkened in the scribed line so it would show up in the picture, the neat thing about using the marking gauge is that it will "feather up" when you're almost to the line.  That's the term I used with my students, not sure if that's the correct term or not but it got it's point across to them.  If you look closely at this picture you'll notice a very thin sliver of wood, that's what I refer to as feathering up:

Feather: Lower Left and Upper right

     Here's the tray almost ready for assembly.  Still need to sand the inside and then it'll be ready to go.  That'll be the first thing I'll do in the morning.


Mitered Tray with Stopped Dado Divider

Tuesday, August 21, 2012

Oxymoron: Softwoods can be Harder to Work than Hardwoods!

   
     This is a discussion that I'm sure many other woodworkers have had.  It seems as if the opposite should be true but you'll find that it may be more difficult to cut softwoods cleanly than it does to work with hardwood.  This is especially true when it comes to hand cutting joints or mortises for hinges.  At our last Sin City Woodworkers the focus was for the members to bring in various jigs that they had either bought or made and share them with everybody.  One of the members brought in a very complicated and technical jig for routing the recesses for butt hinges and although it did the job, getting there was definitely not half the fun!  Anyone who's ever used small butt hinges knows how temperamental that process can be.
     As luck would have it, the Urban Ranch series of boxes I'm working on now need those small, brass, butt hinges.  They are 1" wide and since the pine I'm using is 1/2" wide there is very little, if any) room to make a closed mortise.  This is where the frustration set in.  No matter how I went about scribing the outline of the hinge, the thin piece remaining towards the inside of the box would split off.  Marking gauge, sharp chisel, marking knife ---- made no difference.  I gave in and decided to just mortise all the way across but since I'm using inexpensive hinges from Lowe's they're pretty thin so there isn't even 3/16" of depth required.  By the way, I discovered all of this on scrap pieces of pine.
     Combined with my frustration and the memory of the hinge jig brought to the meeting I recalled how we'd make a "quick and dirty" jig to hang doors when I worked construction in the 70's.  At that time it wasn't real common to have pre-hung doors so we'd make a quick U- shaped piece, tack it on the door and jamb, then use a router to rough it out.  Figured that should work equally well for this operation.  Here's what I came up with:

Hinge Mortising Jigs

     I'm using 1" and 1 1/2" hinges so needed both sizes.  In the foreground is my test piece and it shows I need to lighten the cut just a little to increase the gap between the lid and the box.  The first step was to hold a piece of MDF upright and cut the opening for the hinge on the table saw.  Here I'm almost done, notice the hinge laying there?  That's used to make the opening exactly the correct size, carefully make your cuts as you sneak up on the measurements.

Tablesaw to Cut Opening
      I used a piece of Walnut to attach the jig to, any scrap of wood will do.  Before that though, I cut the piece of MDF so there was the same amount of jig on both sides of the opening, in this case I used 1 1/8" as the distance I wanted to attach the hinge from the edge of the box.  This way, if the edge of the jig is lined up with the outside edge of the box they'll line up during assembly.  You could also draw a center line for the hinge and then use center lines on whatever project you're making to line them up.  When you attach the piece of MDF to the strip of wood, position it where you want the hinge to be on the box.  If you're cutting the mortise completely across the box it doesn't matter as long as you can cut the entire thickness of the box.  If you're making a housed mortise you'll need to calculate where the mortise will be located on the edge.  I used a brad gun and a spot of glue for that step.
     Here's how it all works together:

Jig in Use

     First line up the edge of the jig with the edge of the box.  Then cut the mortise with a short, 1/2" straight dado bit with a top mounted bearing or any other size you have.  Since the box and lid were made as one and then cut apart you can be assured the hinges will line up.  If the hinges were of Brusso quality you'd probably be better off making more than one pass to cut the recess but these inexpensive ones aren't mortised very deep at all.  The only down-side to this jig is that you need one for each different size of hinge.  Since most of us probably use the same style and size of hinges for what we usually build that shouldn't pose too big of a problem.