 |
| Tails Around the Corner |
I've had this idea playing around in my head for quite some time now so decided it was time to act on it. Since I'm one of a biz zillion folks on
Etsy that makes custom boxes and the Etsy business is somewhat slow now is the perfect time to try something new. The thought I've had was to make a dovetailed box but in an unconventional way. Having never seen this before, as far as I know it's my original design. Rather than having two sides of the box have tails and the other side have pins I wondered what would it be like to have a tail and a pin on one side! With the contrasting wood (Quarter sawn Sycamore & Walnut in this case) I thought it would have an interesting appearance. The box in front is glued and sanded, the one behind isn't. I'd be interested in any constructive opinions you may have for me.
Dovetails are the hallmark of fine woodworking. Whether or not it's deserved is open for opinion but traditionally it's what you'll find on hand crafted furniture anywhere in the world. This joint is commonly used to join drawer pieces at right angles to withstand the racking and pulling and yet, stay together. You can find any number of articles and videos on the internet to discover ways to make it. I prefer the quiet and simple way by the use of hand tools. I thought I'd poke around and see if there was something I could do to make the work a bit easier. I chanced upon a YouTube video by
David Barron who's a furniture maker in the United Kingdom. In it he used a fixture that automatically lined up the two pieces when you transfer your tail markings to the pin board. Here's what it looks like:
 |
| Fixture from David Barron |
Basically it's an L-shaped piece with a raised edge on one side. I used a piece of 3/4" MDF, some Poplar, and Pine to make this one. When you put it into your vise you'll clamp the pin board flush with the top and up against the raised edge. The raised edge should be less than your thinnest board, I made mine about 1/4" since I rarely dovetail anything thinner than 3/8".
 |
| Putting in Pin Board |
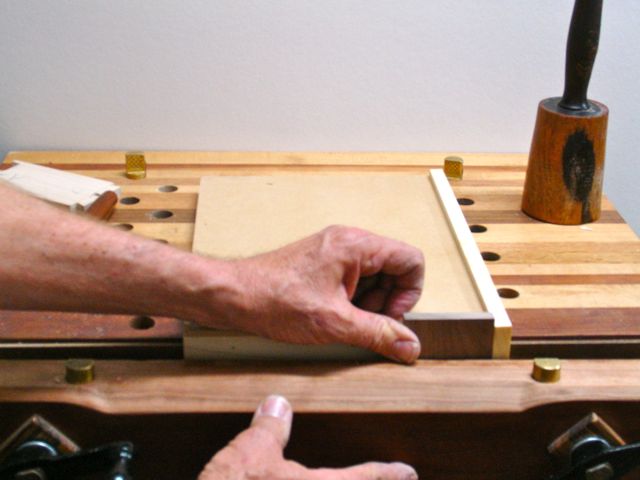
Once the pin board is secure you simply set the tail board on top of it and against the raised edge. This is a small box but if it were larger you'd want to clamp it down before you scribe the pins.
 |
| Scribing the Pins |
My hands are somewhat in the way but I think you can see how it works. Traditionally the pin board is put in the vise, raised up to the level of a block of wood or a plane. You then put the tail board on top of that to scribe the pins. It's always a challenge to keep things square and lined up. With this fixture it's much easier ---- thanks David!
One last thing on cutting dovetails. With the new
Knew Concepts fret saw many students have asked me if I'll be using that. Well, the one thing that keeps me from that is it's quite expensive! Besides, if you have a wide space to remove you could use a coping saw or simply chisel it out. You just need to use care when you set your chisel in. The method I use is to first cut a shallow recess on my scribed line with the chisel bevel pointing towards the waste side of the joint.
 |
| First Cut to Remove Waste |
I then flip the chisel over and cut back to that line to create a "pocket":
 |
| Pocket for lack of a better word! |
The purpose of this is to give some room for the bevel, if you don't do this the chisel can be forced backwards into your scribed line. The most common problem most people have when removing this waste is taking too much at a time, this results in a very uneven and rough cut. Take your time, it's not a race!
 |
| Easy, Take a Little at a time |
Hope this helps all of you cut your dovetails, check out the video from David Barron on YouTube. Here's a
LINK to that to make it easier.
If you're so inclined I wouldn't mind getting some opinions on my concept of tails around the corner. It is a little tricky to assemble and serves no real purpose other than being unusual and decorative -- I like it!


Any trouble assembling the last side (pins on one side, tails on the other?)
ReplyDeleteJohn
Hi John,
ReplyDeleteI do like your idea for the dovetailed box. Having tails and pins visible on each side invites investigation, picking the box up and turning it to see what is going on. Go for it!
Rob
Okay, two votes in favor so I'll keep working on it. It's tricky but like you say Rob, it invites investigation which hopefully will encourage people opening their wallets!!
ReplyDeleteThese are really neat, just love your designs!
ReplyDelete