Friday, December 30, 2011

How Was Your Christmas?

     I sincerely hope that those of you that read my blogs that your Christmas was a wonderful occasion that you were able to spend with family and friends as we celebrate the birth of Christ.  Sometimes it's hard to keep sight of that as we open our presents to see what "Santa Claus" has brought us and I hope he too, was good to you.  Two years ago, I asked for and received the small spokeshave kit from Lee Valley.  Breanna got that for me and it was a good challenge to make it and I use that tool often.  This year I asked for a scrub plane blade from Hock Tools.  In case you're not familiar with what the heck a scrub plane is here's Wikipedia's definition:

The scrub plane is a type of plane used to remove large amounts of wood from the surface of lumber, such as when eliminating cup or twist in the first stages of preparing rough stock, or when reducing the thickness of a board significantly. Scrub planes generally have a short soles, a relatively narrow but thick blade, a very wide mouth, and a deeply curved edge (of about a 3 inch radius) to make a deep, gouging cut.

     For woodworkers that use lots of power tools, the power jointer has pretty much eliminated any use for this style of plane but since I don't use or have a jointer I can see the need for it.  After doing my internet research I decided to attempt to make my first plane.  It will be based on the Krenov style but modified/customized to suit what I think I need.  There were a few references on the construction of this plane and the fact that the traditional style plane patterned after James Krenov didn't necessarily lend itself to becoming a scrub plane.   The reason cited was the lack of a handle or tote which made it difficult to get enough power behind the tool.  Well, I found a design on a forum where there was more of a saw type of handle that I decided to use for my "plane to be".
     Here's the parts:

Starting Point
       What you're looking at is the two pieces of Walnut that will make up the plane.  I drilled a few 1 3/16" holes to begin to form the handle.  You can see the rough outline of the shape, very similar to a saw handle.  The dowel will be used to wedge the blade into the plane itself and it's pretty obvious that the blade has a radius, just like Wikipedia's definition.  This blade comes from Ron Hock who is well known for the quality of his blades, I gave you the link for his business in the opening paragraph. The long, yellowish piece of wood is Canarywood left over from my dining table and it will be used for the sides.  Last of all is the Purple Heart which will be laminated to the bottom for the sole.
Roughed out Handle
   
    Making the handle was interesting.  First of all, the ramp that the blade rests on is cut at 45 degrees.  Since there is a fairly large screw head that holds the blade and chip breaker together I needed to route a groove for that to fit in to.  I needed to bring it down a bit more than this to accommodate the thickness of the sole but that was fairly easy to to with a chisel.


     The width of this piece is 1 9/16" and when I gripped it, it's way too thick to be comfortable.  That's when things on the bandsaw became interesting!


Looking Like a Plane ??
     As you can see, I made the handle much thinner and that was a challenge.  There's a well known furniture maker, Sam Maloof, who had a very, unorthodox (unsafe?) method of using the bandsaw.  I've seen it in videos and he has most of the blade exposed and he makes these free hand cuts to form the arms, back slats, and other parts for his chairs.  I figured that if he could do it I'd give it a shot as well and it worked!  The next step is to laminate the Canarywood sides onto the rest of the plane, they will be pinned with Ebony dowels.  There's a slight quandary in that I don't want to spend tons of time yet with spokeshaves and files to shape the plane until I know it will function as it should.  In any case, I'm enjoying the process and that's really what it's all about.  The front of the plane will resemble an infill plane with the somewhat bulbous grip but I'm hoping for a lot of control. The primary function of this plane will be to level and smooth one side of any board that happens to be cupped or warped.  Once I have one side leveled the surface planer can be used to bring the board to a uniform thickness.

Thursday, December 22, 2011

For Connor -- He Unwrapped it Today

Step Stool for Connor

     Now that Christmas has passed I can post my blog about making Connor's step stool.  I must admit that it's much nicer than the one I made for his Mom when she was his age but you know, my skills have improved over that time.  I used machine cut finger joints to join the top to the sides and hand cut dovetails on the stretchers for the bottom.  This project was suggested by my neighbors Mom when she asked me what I was making for Connor's Christmas present.  Hard to believe, but her daughter (my neighbor) was in my first class when she was in seventh grade!
     I stayed with the theme of Walnut and Maple for this step which can also be used as a stool.  With it, Connor can reach the counters to brush his teeth and be a big help for Mom!  To make it special I found an image on Yahoo of the letter C.  I thought this was pretty cool because it's the Cookie Monster from Sesame Street and Jennifer and I watched that together all of the time.


The first step to making this was to create a template which was done on the scroll saw.  By using a guide bushing set on a router I first created the recess of the letter in the top of the step stool.  As you can see, the template was clamped to the top and then routed out.

Template clamped on, ready for Routing

     Once the outline was complete, a small router plane was used to remove the rest of the material inside the outline of the C:

Router Plane used to Complete Recess

        I had already made the C part out of a piece of Maple so it was glued into the recess and planed smooth:


     Once I got the step stool to this point I realized I should have relieved the bottom a bit just in case it sat on an uneven surface.  Now that all was assembled there is no way to cut it on the bandsaw so the only option was to use a coping saw.  Heck, I've taught hundreds of students how to use one so it was a logical choice:
Coping Saw Work
At this point I had the choice of either filing both sides smooth or else making a pattern so that a router could be used to smooth out the curve, that was my choice.


This is by far the easiest way to have two identical surfaces and contours on a project.  If this cut was only made on one surface a file, spokeshave, and sandpaper would have been just fine but if you want to insure that both profiles are identical a template is the way to go.  You can see I have quite a bit of material to remove but with the template clamped onto the sides, located by the bottom of the step stool and the center line both sides will be identical.


Template and Guided Router Bit

Now comes the hard part, waiting until Christmas for Connor to open this present.  Then I'll be able to post it on the blog.

Hope all of you that follow my blog had a Merry Christmas!!

Sunday, December 18, 2011

Still Working on It!

My Ali Girl

     Yesterday morning Diane was looking through some Etsy sites and told me there was a wood working site named Two Dog Woodshop, she suggested that I have a One Cat Woodshop!  Silly as it seems she planted a seed in my mind so I scanned a photograph of when Ali was the cover girl on Cat Fancy Magazine and made it my carving challenge.  Believe it or not; you're looking at about 4 hours worth of work and it's far from perfection but ......... I feel my skill level continues to improve.
     When I'm out in my shop, fully engrossed in what I'm trying to achieve, time means nothing.  I remember conversations in our car pool as we went up the mountain to work.  Several of us were at that point of retiring and many of my co-workers were concerned with what the heck would they do all day.  You know, you can only take so many trips or hit so many golf balls.  Thank God that I have a past time that keeps me engaged and brings in some extra money besides.  Let's talk about the carving work, here it is in a better shot:

Ali Carved 12-18-2011

     I can still recall my very first exposure to carving, it was in Boy Scouts and we were told to bring a bar of soap to the next meeting.  The scoutmasters name was Bill Hinkle and he showed us how to carve a fish out of that bar of soap.  I remember him saying, when we asked how to do it, just cut away everything that doesn't look like a fish!  Sounds simple enough but there's much more to it as I'm learning.  With this carving I'm trying to give a sense of dimension and I think there's a certain degree of success.  One of her front paws is up in the air so the other one has to be brought back some, same with her rear legs. My goal is to show different layers which can be achieved by rounding over the edges and creating shadows to show depth.  A characteristic of the Oriental Shorthairs are their large ears and wedge shaped face.  Looking down at Ali here on my lap that's pretty obvious.
     Anyway, that's what's kept me busy for part of the weekend, the process that goes hand in hand with carving is maintaining  sharp chisels but that's another subject all to itself!

Tuesday, December 13, 2011

Santa's Surprise

Shh, don't tell anyone!

     Well, my current project (which is actually done) is a surprise so I can't say too much about it.  You know how it is, Christmas is right around the corner and my grandson's name starts with a C so that's about as far as I can go with my blog for now.  I like the letter C that I found on Yahoo images since it's the cookie monster and Jen and I used to watch Sesame Street together all of the time.  It's a nice, playful looking one and it's an inlay on someone's Christmas present -- sorry, that's all I can say for now but I'll post it all after Christmas.

Monday, December 5, 2011

TV Tray Redux is Complete

TV Tray in Use
     Here is the culmination of the Design Process blog that some of you have been following.  It's been a while since we began this series on September 30th. but in the mean time I also completed a birthday present for my grandson and new studio furniture for Diane.  Things like that really don't matter because for me everything keeps rolling around in my head on how to solve design and construction problems.  In my opinion, these tables solve the problem of having a tray that can be used for eating or holding drinks and snacks for a get together with friends but yet be attractive when they are not in use.  You may remember the old TV trays, plastic, brass, and phony wood tops that you had to hide in the closet.  They only came out when needed.  This set, on the other hand, looks good just sitting there!

Waiting to be Used

     The design I was after was to have the three of them make a statement when they're together.  They can be arranged as shown, with the widest end out, or reversed with the shorter end out.  This would depend on where you keep them.  In this case they are tucked into a curved wall in our house.
     One design element that needed to be addressed is that when they are not in use, I didn't want a "sea of legs" as Diane put it.  That's the reason for going with only three legs per table.  The prototypes seemed to work and now that we've used them they are very stable.  When you look at them straight on you're not overwhelmed by that sea of legs!
   
To me, the tables have a sense of movement.  Angling the legs out not only added stability but also some life.  The legs taper towards the bottom and their face is beveled as well.  Small, subtle features like this is what gives them life and movement.

It's all about the Wood
For me, my design process is centered around the wood.  Black Walnut was used for the frame and the legs.  The inset tops are Zebrawood which was resawn and then book matched.  In my designs I like joinery details to show.  In this case, the leg tenons go through the top and are splined with maple to mimic the coloration of the Zebrawood.

Thursday, December 1, 2011

Custom Picture Frame Molding with a Lie-Nielsen #66 Beading Tool

PART FOUR: FINISHING TOUCHES

Completed Frame with it's Painting


     The customized frame is now complete and looking back over this project I realize how much I enjoyed creating the custom profile using the #66 Bronze Beading Tool from Lie-Nielsen.  As I mentioned, I've made scratch stocks before for my furniture work and taught students in my classes how to make them as well but this tool makes it much easier.  It's much easier to set the distance that you want the profile to be from the edge, just nice to use all around.
     When I delivered the painting I noticed how much the color and finish of it matched a dresser the client had in their bedroom.  As usual, photographs on blogs really don't do the project justice but you can see the gleam the finished frame has,  notice the left, top corner?  Another thing you may notice is how the areas that were profiled with the beading tool are slightly darker.  That's because the Smoked Poplar didn't cut as cleanly as a hardwood might but it gives a nice shadow line and adds some dimension to the frame.
     We're unsure as to who the artist is of this painting as it's unsigned.  Appears to be the master of the house talking to the kitchen maid -- maybe she broke a dish or something!  If anyone recognizes this work let me know who you think may have painted it.  Many people tend to think of a frame being jewelry for the painting and I hope I achieved that with this one.

Monday, November 28, 2011

Custom Picture Frame Molding with a Lie-Nielsen #66 Beading Tool


PART THREE:  ASSEMBLY OF THE FRAME


     Something you should know when you create this type of profile is that you now have nothing but angles!  Usually I use a sled on my tablesaw to cut frame member to length but since there is a 15 degree beveled cut on the back of the profile it's now more like cutting crown molding.  I find it best to do this with my miter saw which I have mounted on a cabinet.  The saw is mounted in a recessed area in the center so the remainder of the bench becomes a support table.  I suppose if you have a Tiger Stop all of this trial and error process isn't needed but if you're a one of a kind, one-man shop you have to become inventive!

My version of "Tiger Stop"

My solution is to mark the length of the longest frame leg first (always a wise choice).  I lay a strip of tape on the cabinet top and clamp a stop block a bit further than what I need.  Mark a line on the tape and make the initial cut.  The length is then checked against the actual painting.  Let's suppose it's 3/8" too long -- now it's a simple matter of marking another line 3/8" from the first one, re-positioning the stop block and you're good to go!  After cutting both long legs I drew another line for the short legs of the frame.  These happened to be exactly 12" shorter so I marked a line from the stop and that's all there is to it.  

For picture frames it's vital that both pieces are exactly the same length or else your corners will be off.  To check them, I lay them back to back.  Do this before you remove your stop block in case you need to make a slight adjustment to one of your pieces.


Checking Length 


24" x 36" sight, It's pretty big!
     Assembling the frame had a bit of a challenge.  I use biscuits, glue, and then clamps which isn't a production process but does result in a strong frame.  The problem I encountered is that the Smoked Poplar started to swell the moment the glue hit the surface which meant there was no play what so ever, matter of fact, I could barely get the biscuit into the slot!  Thank goodness I'd asked Diane to help me align the parts and we were able to wipe out all of the glue with some wet paper towels.  The solution to this problem is the same technique I use with Basswood frames.  Each slot is cut twice.  After the initial cut I adjust the fence slightly higher and make another pass.  If you're so inclined, the slot is good when it measures .165 - .170, the initial cut with my biscuit joiner is .155.  Not much difference but it makes getting all four corners glued and clamped much easier and less stressful so I find it well worth the extra time it takes.  Here's the frame clamped up and ready for the next steps.


    After allowing the glue to set up overnight inside the house (cold in the shop) I'm ready for the final finishing work.  Something I've found to be indispensable for this phase of frame making is the tadpole sander.  With all of the profiles available it's easy to find one that matches your particular cove, bead, line, etc. All that's needed is to wrap some sandpaper around them and work the wood.  Here is a before and after shot.
Before Tadpole Work

After Tadpole Work


 I thought it was interesting that I could get the tadpoles to stand up in the profile, guess that means they were a very good fit for the cutter.  Just completed oiling the frame with the Watco natural and it really gives it a rich, Walnut appearance.  Next time you visit the blog you'll see a completed picture and frame!   

Saturday, November 26, 2011

Custom Picture Frame Molding with a Lie-Nielsen #66 Beading Tool

PART TWO:  BEADING THE FRAME

Lie-Nielsen #66 Bronze Beading Tool
     Wow, isn't' that a thing of beauty?  Even the guy who gave it to me and is a power tool fanatic admitted to the beauty of this tool -- said he'd buy it just to put it on display!  The tool is based on the Stanley #66 which I believe was manufactured from the 1880's to the 1940's.  The quality of this Lie-Nielsen tool is outstanding and the only preparation work needed was to polish the faces at each cutting edge.  Before electric routers came along this was the tool to use to make moldings and profiles.  Another tool was Stanley's #45 plane which cut profiles rather than scraped them like the beading tool does.  I've worked with the #45 and believe me, set up and use of the beading tool is much easier.  Matter of fact, I e-bayed the #45, it just didn't seem worth the effort to me.  
     
Left Side Planed -- Right Side from the Planer
     Before beginning the beading process, the show face of each board was planed with a smoothing plane.  It's an important step that is often left out by some but if you look at the picture on the left I think the result is obvious.  To do this, I use another Lie-Nielsn tool, a Bronze smooth plane.  Electric planers, no matter how good they are will tend to leave chatter marks all across the board.  You can see them pretty clearly and they're magnified once the board has a finish on it and the light reflects off of the surface.  In my work, this is a pretty important step.


As I mentioned in part one, I cut the first bead for the sight edge before cutting the rabbet out.  That was done with the cutter on the far right in the picture above.  The question will be asked: "How long did that take you to do?" and the answer was less than 25 minutes.  This frame required two pieces 4' long and another two at 3'.  You need to have a bit extra since it's difficult to start and stop the beading tool right at the end of a board.

First Profile: Sight Bead
     To use the beading tool the first step is to set the depth.  This is done by holding your piece of wood on the sole of the tool, sliding the cutter to the required depth, and tightening it in place.  The fence is then located on whatever side works best for you and your ready to go.  The first few passes are critical.  The tool is pulled towards you and it's important to tilt the trailing edge up so the cutter basically just scribes the wood at first.  It doesn't take much to maintain pressure against the board with the fence.  After the cutter has scribed its profile into the board you can take deeper and deeper cuts.  Sounds corny but you just have to listen to the wood -- the sound the cutter makes will let you know if you're trying to remove too much material at one time. 

All Pieces Completed
     It took a little over an hour to bead all of the required material.  Although the power tool junkies may scoff at that and think the work could have been done with a router, maybe quicker, I'd have to disagree.  First of all, finding some of these profiles in available router bits is probably not possible.  These are pretty detailed.  By the time you set up fences, install/remove the different bits, run the risk of burning the wood, and then add clean up time to the picture I'm not sure you could do any better.  Besides, I worked off some calories so I could eat more this Thanksgiving!  One last plus for the beading tool is that you can cut your own profile to either match an existing one or make a custom design just for your own work.  I like to put a small detail along the apron of tables and this would be an example of where this can come into play.

     The last thing I wanted to do is to compare this Smoked Poplar to Black Walnut it's been engineered to replicate.  The piece of Walnut is on the left and you can see that the detail the cutter left is crisper.  It also cuts cleaner and forms a shaving rather than the dust formed when the Smoked Poplar is beaded.  There is a positive to this though, when the Poplar is oiled there is a nice contrast between the scraped bead, the rougher background surface, and the surrounding planed surface of the rest of the molding.
     All in all, a very rewarding and productive experiment.  All that remains is to cut and join the frame, finish it and mount the artwork.  I'll post that picture when it's complete.


Friday, November 25, 2011

Custom Picture Frame Molding with a Lie-Nielsen #66 Beading Tool


PART ONE:  PICTURE FRAME FROM 4/4 MATERIAL


     After using and teaching others how to make and use their own scratch stock for many years I recently received a Bronze beading tool from Lie-Nielsen tool works.  If you've never heard of them I'd encourage you click on the link and check out the quality of their Made in the USA tools.  I'm a huge fan of them and own a few planes, a spokeshave, set of chisels, and now their beading tool.  As things often go, a series of events led me to this commission for a custom frame that will be approximately 24" x 36".  The gift of the beading tool is the first in that series of events.
     The next event happened at our last meeting of the Sin City Woodworkers.  A local supplier had dropped off some samples of thermo-treated Poplar.  It was referred to as "Smoked Poplar" and is a product designed to replicate Walnut at about a third of the cost.  It's light weight, should be very stable, the color goes all the way through, but it is somewhat brittle.  That's probably because of the thermo process the wood goes through.  Matter of fact, when you cut or bead it there is a charcoal odor -- like you left the steaks on the bbq too long!
     The last of the events was being called to give an estimate on a picture frame.  The clients were pretty open as to the design of the profile but knew they wanted something dark.  I contacted the lumber company and was able to get a piece to experiment with.  I designed a profile, made the corner sample, and after showing it to the client, got the job.  Here is the sample that earned me the commission:

Corner Sample: Smoked Poplar
You can see how rich and dark this material looks and from a distance you probably would mistake it for Walnut.  The finish on it is natural Watco oil.  There are differences between the two species of course.  As I mentioned brittleness is one of them and it's much softer but for this application that won't present any problem at all.


     Creating your own picture frame moldings from scratch is an interesting endeavor.  There are many details to it but let me give you the basic procedure so you can try it on your own, feel free to contact me if you want more detail.  After deciding on the material and width you need to consider whether the frame is for a stretched canvas, a board, or a watercolor.  If it's a canvas, you need to either use wood thicker than the 3/4" stock readily available or use this trick I'll talk you through here.

Lay out of  Rabbet

Back 15 degree bevel
               

      Start by cutting the back of the piece at 15 degrees, this will force the molding out away from the wall.  This is best done on the tablesaw.  Next you set a bevel at 15 degrees and draw in the rabbet.  Keep in mind that the bevel you cut on the back sits against the wall, that's why the rabbet is also cut at the 15 degrees.  Set the height of your blade by extending the distance to the side of the molding, then make your first cut with the piece laying flat on the tablesaw.

Second cut for Rabbet
Completed molding before beading
   
     The second cut is a little trickier and the way I do it is probably not OSHA approved!  It's difficult to determine the exact height of this cut so what I do is to estimate it the best I can, push the piece through until it's just past the blade, then lift it straight up by pushing on the back of the piece.  Then I'll slowly raise the blade a little at a time until the two angled cuts meet.  Once they are,  you should set a feather board up to maintain pressure against the fence and cut the remaining pieces.  You'll end up with a piece of material that looks like the one on the right.

     Now we're ready to start the fun part -- beading the frame!  The pictures above were taken when I created the corner sample.  The only change I made when doing the actual frame was to cut the bead at the sight edge before I cut the rabbet.  I wanted to make sure it would be strong enough as the bead was formed.

Tuesday, November 22, 2011

TV Tray Redux -- First Look

First Look !!
     Most of you, if you remember them at all, would picture a TV tray as brass coated, spindly legged, faux laminated wooden top, on a cart with plastic wheels and handle.  I recall saving Blue Chip stamps and getting the required number of books for a set of them shortly after getting married in '72!  Ugly as they were, they had their place and purpose.
     Over the past six months or so I've been working on these and designing them through mock-ups and drawings.  This has been between commissions so it's had plenty of time to work in my mind!  Let's face it, people still eat their meals while watching TV so there is a need.  One  popular way is to have nesting tables.  The shortcoming with them is that they get smaller so if you're stuck with the littlest of the set, there's not enough room for plate, drink, and utensils.  They do solve the traditional TV tray problem in that they are more attractive and can be left out in a room.
     The current expression is to "think outside of the box" and although I'm not real crazy about any saying that's over-used, that's what I've done here.  The goal for these was to function as TV trays but more importantly, when they're not in use I wanted them to be attractive and make a statement of their own.  In our house there is a blank wall near the entryway, these will be placed against the wall -- somewhat like low console table.  Items can be displayed on it but as you know, I'm all about the wood and, in my opinion, using the Walnut/Zebrawood combination is enough.  However; almost anything you want to display could  be put on the set.  My next thought was who says a table must have four legs?  In this instance three are sufficient and when they are placed along a wall you're not overwhelmed by a sea of legs.  It also lends itself to the shape of the top, which I think is a type of parallelogram.  I played around with the angles so that a regular plate and glass would fit on the top.  To give it more stability the legs have through tenons, cut at 10 degrees that go completely through the top.  These will be wedged with maple, adding to total look.  The other aspect of the legs I wanted to achieve was a lightness.  They taper in the length and also bevel across the face.  The way the light will play off of these angles should be a nice effect.
     Still have lots of work to do before these will be complete but real pleased with how they're coming out.  Here's another angle of them -- gotta love the wood!

Love the Wood, Can you see the leg profile?

Sunday, November 20, 2011

Diane's Saying I Always Hear!

     A number of years ago, Diane and I would head out to the desert to paint, run, read, and get away from it all.  I'd do a couple hour run while she set up her easel and found her subject.  When I came back I'd read and just watch her work.  Well, she tends to talk to herself (don't we all!) and I asked her one time what she said.  Her reply has stuck with me: "I work until I get to a problem, figure that one out, and work until I get to the next problem".  It made so much sense to me that I've been approaching my work that way ever since.

Nice Legs!!

     For the trio of tables I'm working on there have been many design and construction problems that needed solving.  Angles, joinery, bevels, etc. all compound the complexity.  I've just completed the legs.  I knew I wanted a lightness to them so a taper and a beveled face seemed appropriate.  The first step was to bevel the face of each leg.  This was easily done on the tablesaw however; the tenon limited being able to work to the center of each leg.  This was solved by using a hand plane.
     After beveling, each side of the leg needed to be tapered.  Using the tapering sled for this was not possible because of the one face being beveled, it wouldn't lay flat on the tapering sled so I needed to come up with a solution for that.  After a bit of head scratching here's how this was accomplished.
Taper Jig & Leg
After Cut

     In the photo on the left you can see a jig I made for the leg to ride in.  The side of the jig of the jig is guided against the fence on the bandsaw and they're pushed through as a unit.  You can see the wedge that was removed in this operation.

Wedge Taped On
Jig & Leg Reversed


To cut the other side the wedge that was removed is temporarily taped back to the leg.  Then, by reversing the jig and the leg as a unit but keeping the fence in the same position I was able to cut the other side of the taper.


     All that remained is to refine the cut edges and the beveled face.  After honing my smooth plane I completed that step.  There's just something relaxing and rewarding about hand planing a surface.  Trying to capture that on film is pretty difficult but I tried it anyway:

Planed Profile
     The beauty of it is how the light reflects off of the surface and how the grain wraps itself over the beveled surface.  After the surfaces were completed, each edge was chamfered ever so slightly with 8 strokes of a block plane.  Can't wait to see how these turn out after the hand rubbed oil finish.  Next step will be to fit the inset, Zebrawood top into the frames.

Friday, November 18, 2011

Designing Your Own Picture Frame Molding

     As a woodworker I learned something about myself a long time ago ..... I'm more interested in the process of what it is I'm trying to create than the final product.  Don't misunderstand this though, there's nothing more rewarding than presenting something I created to a client and hearing them tell me how they enjoy it but the process of getting to that final piece is what excites me.  Many artists/woodworkers/creative people of any bent hear their friends tell them: "hey, if you made a couple hundred of those you'd be rich, they'd sell like hotcakes!"  but for many of us that's not where it's at.  Okay, so where's all of this going?

Lie-Nielsen #66 Bronze Beading Tool
     I was given this beautiful tool, a Lie-Nielsen bronze beading tool which is his companies version of the old Stanley #66.  First off, this company makes their tools in Maine and I'm a great fan of theirs.  I own chisels and planes made by them and the quality and performance of these tools is beyond compare.  What a beading tool does is to scrape profiles into a piece of wood with a cutter.  It's an old time technique used to make furniture details and moldings.  This tool came with a set of pre-made cutters but you can also make your own.  In the hand tools class I taught, I introduced my students to this technique with my shop made scratch stock and the process is really not all that difficult.  However; after using this tool the advantages over a shop made one is pretty apparent but comes at a price!  I'm very apprecitive to have received this tool and just had to try it out!
     Two other things have occurred to give me the chance to experiment with this tool.  First off, I've been asked by a client for a bid to do a picture frame.  The request is for a dark molding of a fairly simple profile.  At the Sin City Woodworker's meeting this past Wednesday Jamie showed some samples of what she called "Smoked Poplar", technically it's called thermo treated Poplar.  It's available here locally and is touted as a substitute for Walnut.  It costs about $3.30 a board foot compared to that to Black Walnut which can be 2 to 3 times that price.  I was able to get a chunk of it free to try out from Peterman Lumber so thought this is the time to experiment with the beading tool and create a custom profile.

     If you've never even thought about making your own moldings it's really an interesting process.  For starters, unless you're framing a panel or a poster you need to have a molding that is thicker than the typical 3/4" stretched canvas.  An obvious choice would be to use wood for the frame that is thicker than that but that can get expensive and heavy.  A trick you can use is to cut the bottom, outside corner at an angle to make the frame angle out from the wall.  For this example I used an angle of about 15 degrees:

Initial 15 degree cut on what will be the outside bottom of the molding
     This was done on the table saw.

Laying out the Rabbet
     Keep in mind that the frame will contact the wall on the beveled edge only.  This means the rabbet needs to be cut out at the same angle of the bevel so the canvas will sit squarely in the frame.  Using a small, sliding bevel I drew in the area that needs to be removed, it's shaded in for clarity.

Removing the rabbet waste, second cut
 
   The first cut is done with the molding laying flat on the table saw.  The second cut will take a bit of trial and error to establish the correct depth.  Although definitely not OSHA approved, the best way to do this is to eye-ball the depth you think is correct, slide the fence into position, and cut a couple of inches into the board until the blade is covered.  Now, very carefully lift the board straight up by pushing down on the back edge.  You can now see how far the cut went.  For this molding, I turned the elevation wheel up about 4 times, maybe a half a turn at a time, until the two cuts meet.  Once that's done you cut the remaining pieces.  Here's what that process provided for me:

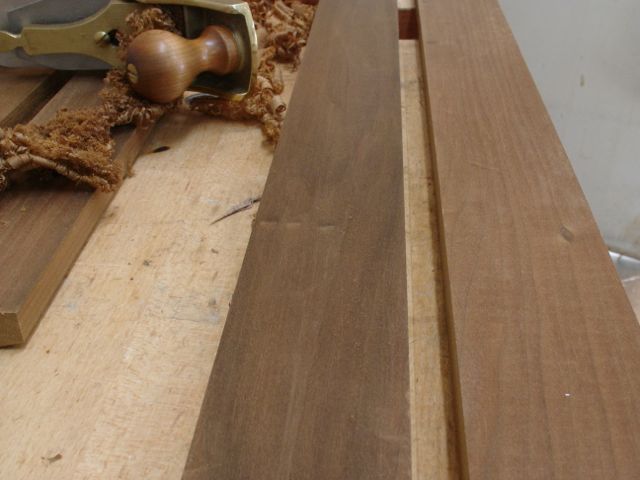
Final, table-sawn profile
In this instance I need to clean up the inside edge.

     Now we've hit the fun, experimentation stage of this project!  Sure, you can design your profile to use either a router or a shaper but they won't allow you to make custom profiles easily like a scratch stock held in the beading tool will.  If this was a production run I could certainly have a custom  cutter made for me and use the power but that's not what we're after here.  Heck, for that matter I could just draw it out and send it to China for them to make like so much of the other crap -- oops, I mean products that we find in our stores today!
     The beading tool came with several preformed cutters.  All I did with them was to remove the machine marks from the outside surface.  This was quickly accomplished with a diamond flattening plate I use for my water stones and then finished with an 8000 grit stone.  The problems I've heard regarding using the beading tool is that it may chatter.  Any chatter will be caused by an unsupported edge.  The technique that worked was to advance the cutter slightly below the bottom of the tool, set the fence to locate it on the profile, and then cut each piece until full depth was reached.  Next, the cutter was re-adjusted to go deeper and the cutting process was repeated on each piece.

Beading Tool in Action

     I found that a gentle pressure is all that's required to make the tool work.  I intentionally went over a small knot to see how it would react and it was okay.  The process is pretty fast too, it took less than 30 minutes of scraping time, using three different cutters, to complete the profile I was after. A side effect which may add to the over-all appearance of this mold is that the beading tool seems to burnish the flat areas of the profile.  I oiled a scrap piece of this poplar and I'm anxious to do it to the corner sample I made.  That'll have to wait until tomorrow but here is a picture of it, freshly glued together:

Ready to be oiled

     Well, this has been a great experiment.  One of the things that came up at the meeting was whether or not the color goes all the way through the wood --- it does.  Peterman told me it would be a little more brittle but because of the heat process it's lighter in weight and more stable.  I think of it as wood that's been in a super kiln.  When I first started to cut it I thought it had a slight chocolate odor but it's probably the charred odor, not objectionable though.  Tomorrow I'll oil this corner sample, show it to my perspective client, and post a photo of how it looks finished.

Thursday, November 17, 2011

It's Finished !!

   Happy to say the finishing touches were put on Diane's studio today and it's just how she wanted and designed it to be.  We picked up the doors from the Glass Art Studio here in Las Vegas, decided to let them install the glass as I was sure they can run a much finer bead of silicon than I can.  Besides, they charged just slightly more than a tube of it would have cost us.  We also got a different bulb temperature of lighting but will probably need to add some more light to the entire studio space.  Diane has some task lighting but for the work she's doing the studio needs to be completely well lit.
     Here's a few pictures of the finished project, first off, this is the left side of the space:

Left Side
     The lighting doesn't show off the glass and the crystal knobs.  See the wooden horse on the top shelf?  I brought that with me from Holland when we came to the states in 1956!  It's been glued a multitude of times and the tails long gone but it's one of two childhood toys I have.  The other is a teddy bear I recall getting for Sinter Klaus in 1955.  Okay, back to the project.  You can now see the two drawers in the case that are in line with the table top.  Di will keep one of her machines on this side of the table and store any needed items in the drawer below.

Right Side
     Here is the right side of the studio.  Everything is pretty much the same and you can see the patterned glass and the crystal knobs illuminated from the light coming in through the window.  Diane's inspiration for the table was found in a magazine or web search as was the cabinetry.  She then worked the design to suit her requirements and the space we had and she's very happy with it.  I'm happy too that the table is plenty sturdy for the machines, especially the serger.  When that thing gets going it moves!!  It used to be on an L-shaped desk upstairs and when it was in use we needed to put an extra support under the corner of it.