


PART TWO: BEADING THE FRAME
 |
| Lie-Nielsen #66 Bronze Beading Tool |
Wow, isn't' that a thing of beauty? Even the guy who gave it to me and is a power tool fanatic admitted to the beauty of this tool -- said he'd buy it just to put it on display! The tool is based on the Stanley #66 which I believe was manufactured from the 1880's to the 1940's. The quality of this Lie-Nielsen tool is outstanding and the only preparation work needed was to polish the faces at each cutting edge. Before electric routers came along this was the tool to use to make moldings and profiles. Another tool was Stanley's #45 plane which cut profiles rather than scraped them like the beading tool does. I've worked with the #45 and believe me, set up and use of the beading tool is much easier. Matter of fact, I e-bayed the #45, it just didn't seem worth the effort to me.
 |
| Left Side Planed -- Right Side from the Planer |
Before beginning the beading process, the show face of each board was planed with a smoothing plane. It's an important step that is often left out by some but if you look at the picture on the left I think the result is obvious. To do this, I use another Lie-Nielsn tool, a Bronze smooth plane. Electric planers, no matter how good they are will tend to leave chatter marks all across the board. You can see them pretty clearly and they're magnified once the board has a finish on it and the light reflects off of the surface. In my work, this is a pretty important step.
As I mentioned in part one, I cut the first bead for the sight edge before cutting the rabbet out. That was done with the cutter on the far right in the picture above. The question will be asked: "How long did that take you to do?" and the answer was less than 25 minutes. This frame required two pieces 4' long and another two at 3'. You need to have a bit extra since it's difficult to start and stop the beading tool right at the end of a board.
 |
| First Profile: Sight Bead |
To use the beading tool the first step is to set the depth. This is done by holding your piece of wood on the sole of the tool, sliding the cutter to the required depth, and tightening it in place. The fence is then located on whatever side works best for you and your ready to go. The first few passes are critical. The tool is pulled towards you and it's important to tilt the trailing edge up so the cutter basically just scribes the wood at first. It doesn't take much to maintain pressure against the board with the fence. After the cutter has scribed its profile into the board you can take deeper and deeper cuts. Sounds corny but you just have to listen to the wood -- the sound the cutter makes will let you know if you're trying to remove too much material at one time.
 |
| All Pieces Completed |
It took a little over an hour to bead all of the required material. Although the power tool junkies may scoff at that and think the work could have been done with a router, maybe quicker, I'd have to disagree. First of all, finding some of these profiles in available router bits is probably not possible. These are pretty detailed. By the time you set up fences, install/remove the different bits, run the risk of burning the wood, and then add clean up time to the picture I'm not sure you could do any better. Besides, I worked off some calories so I could eat more this Thanksgiving! One last plus for the beading tool is that you can cut your own profile to either match an existing one or make a custom design just for your own work. I like to put a small detail along the apron of tables and this would be an example of where this can come into play.

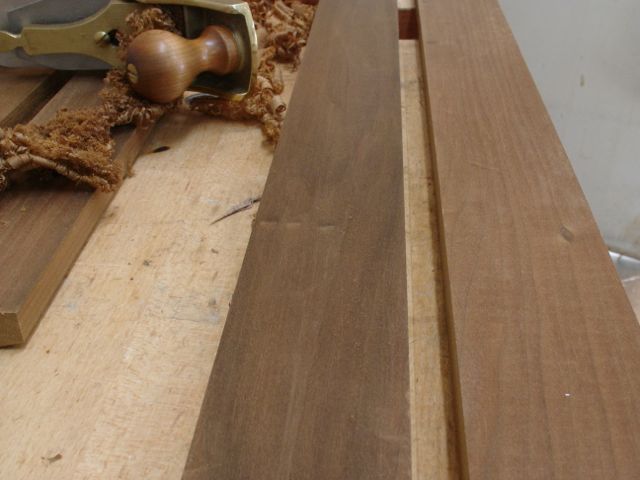
The last thing I wanted to do is to compare this Smoked Poplar to Black Walnut it's been engineered to replicate. The piece of Walnut is on the left and you can see that the detail the cutter left is crisper. It also cuts cleaner and forms a shaving rather than the dust formed when the Smoked Poplar is beaded. There is a positive to this though, when the Poplar is oiled there is a nice contrast between the scraped bead, the rougher background surface, and the surrounding planed surface of the rest of the molding.
All in all, a very rewarding and productive experiment. All that remains is to cut and join the frame, finish it and mount the artwork. I'll post that picture when it's complete.
No comments:
Post a Comment