Showing posts with label Star Jasmine Table. Show all posts

Monday, May 13, 2013

Summer is Here -- 99.3 Degrees in the Shop @ 5:00pm


     Oh boy, I think it's pretty early in the year for hitting 100 degrees in the shop but Mother Nature probably doesn't care what I think.  Now comes that crucial time where any glue ups will need to be done first thing in the morning or else inside on the kitchen island.  I'll work out there until my sweat causes the woods grain to raise or I fear rusting my tools!  Time to get my habit of drinking at least 70-80 ounces of water to make it through the day that's for sure.  The important thing I needed to get done today was to replace the cane in the Star Jasmine table that was accepted into the Design in Wood competition, the table needs to be delivered on Thursday, 5/23.
     The upside of doing one of a kind work and not pigeon holing myself into the same work processes is that it keeps me motivated.  The downside is that I need to re-train or familiarize myself with a process every time I do it.  Caning is no exception!  I've done a number of jobs using pre-woven cane and some requiring hand weaving but not enough to feel 100% proficient.  Diane and I both find that when we blog our work we will go back to it to jog our memories on a process.  With that in mind, here's a pictorial essay on how to cane with pre-woven cane.  I get my supplies from Frank's Cane & Rush Supply and found him to always be helpful either by phone or email so he's recommended by me.

     Here's the completed project:

Shelf Re-Caned (whew!!)
     I have to admit to some apprehension starting this since the table has already been accepted, just adds a little more stress to not slipping with a chisel and gouging the work.  The main difference is that this Radio Weave is actual reed whereas the other was paper.  Don't think I'll be using the paper product again although it's held up fine in a wine cabinet.  The process begins with soaking cane and the spline for at least two hours in room temperature water.

Pre-Mitering Reed


     Before I put the spline in to soak, I generally cut the miters but leave it slightly over-sized.  For that, a bench hook and Japanese razor saw it perfect.  Final fitting is done with a utility knife but I like having that first miter cut somewhat accurately using the bench hook as guide.


Beginning Step


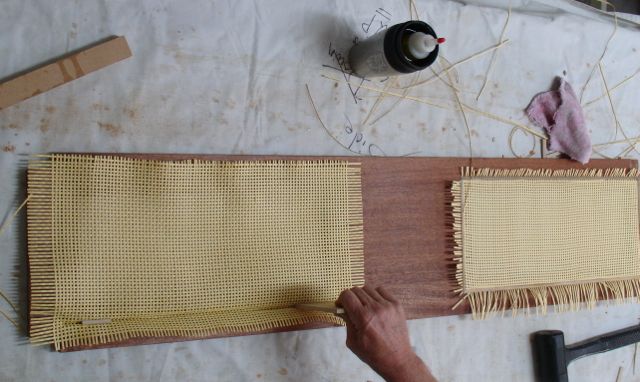
     After the cane has been in the water for at least two hours it's laid onto the frame.  The process begins by pressing it into the groove using a wedge and working it in a little bit at a time. At this point, it's good to use your other hand to pull the overhanging piece up a little, this allows you to press it further into the groove.


     As you work your way around you need to anchor things into the groove.  You can use wedges for this but in my experience cutting short pieces of cane and lightly tapping them in place works better.  I'm using a wide wedge made of MDF which is nice for the width but the MDF begins to deteriorate in a fairly short time, better to make it out of wood.  I saw one video on YouTube where a large, metal one was used for this step.  My plan is to make one from wood and add a thicker section on top, maybe a dowel.  Really hard on the palm of your hand as you continually work the cane into the groove!


Trimming the End
     Although this looks rather unsafe it's okay if your chisel is sharp and you keep things under control.  Having those fingers on the outside isn't the safest but I keep them "out of the line of fire" of the chisel.  What's happening here is that now that the cane is pressed into the groove it's time to trim the pieces on the outside.  It begins by pulling out the strands that are parallel to the weave.  Most tutorials I've seen on this show using a utility knife which to me is more dangerous and much harder to control.  The goal is to trim the ends just below the top of the groove.  The slicing motion with a utility knife is hard to control and there's a definite risk of slipping out of the groove and slicing the wood.  It also has the tendency to pull and distort the weave.  You can rest the chisel on the inside edge of the groove, angle it downward, and trim them off without the risk of slipping out to cut the frame.  The chisel does have to be very sharp for this though.

Final Trimming


     Just about done trimming the ends of the cane.  Palm of my hand getting kind of sore by now!  The piece of spline is in temporarily for now on the right, long side.


Putting Glue in the Groove


     Finally time to glue the second piece into place.  Michael, from Frank's Cane recommends ordinary PVA glue like Elmer's Glue-All.  According to him the drying time for it and the cane is the same.  Previously I used Liquid Hide Glue which he told me dries slower than the PVA so the cane maybe dry but the glue isn't fully cured and that could result in the cane pulling loose.  Made me wonder if that's what happened with the previous cane and was the cause of the waffling.


See the Mallet?


     The longest sides are glued in first.  The tricky area is the miters at the corners.  If you undercut them it's easier to get a good fit.  As I mentioned, I precut them before soaking to give me an accurate angle then trim them with a utility knife to fit.  I use a rubber, dead blow mallet which is blurred in the picture but you get the idea.  Don't beat on the reed spline too hard because you can deform it.
     All that remains is to let it dry thoroughly for a couple of days inside the house and then re-apply the top coats.  I plan to do another coat on the top of the table and it'll be ready to take to the Design in Wood competition next Thursday.

     By the way, I just gave the panels a little tap and they sound as if they're as tight as the proverbial drum!


Saturday, May 11, 2013

What -- Making Candy in the Shop?


Candy Thermometer but no Candy
     First of all the exciting news is that my entry of the Sapele Hall Table was excepted into the Design in Wood competition sponsored by the San Diego Fine Woodworkers Association.  Here's a view of the table, actually one of the pictures I submitted:

Sapele Elliptical Hall Table with Drawers
     There was one slight problem and that is that the caning on the bottom shelf began to waffle!  My suspicion is that the cane was so dried out from being in my 100+ degree  shop in the summer that it was unable to re-hydrate and stretch tight.  It was fine for a few weeks but as it became accustomed to the indoor conditions the waffling began.  I had already ordered replacement from Frank's Cane before the table was accepted -- couldn't stand seeing the waffle, seems as if my eye went right to it!
     Of course that meant I needed to disassembly the shelf, bring it out to the shop, and remove the existing caning.  Even without the pressure of the upcoming competition I wasn't looking forward to this needed task knowing that one slip of the chisel and we'd be back to square one.
     I had used Old Brown Glue for the cane so wanted to double check with Patrick on the website to get his advice on the best way to rehydrate the glue.  That brings us to the top picture and the candy thermometer.  For some restoration work I'd used a water and vinegar solution but his suggestion was water and a steam iron to about 150 degrees.  Didn't want to use a steam iron and risk raising the grain so did the compromise thing and heated the water instead.  The small bottle was used like a syringe to suck up some heated water and then squirt it where needed.

Removal in Progress
     My first thought was to remove the reed that holds the cane in by stripping sections out as I went.  I figured that the more layers of reed I removed, the easier it would be for the water to penetrate and dissolve the glue.  That was a good start but I discovered it worked better if I elevated the shelf so the water would run downhill at the bottom of the groove.

It's Working!!
     This allowed me to pry it out and pull up at the same time.  The tool I'm using is one of a set of those high quality carving tools offered by Harbor Freight for less than $10.00 for a complete, professional set!  There was a sign to tell you more water was required, a cracking sound that sounded just like I imagined the wood would make if it was splitting.  Kind of alarming but it turned out to be the glue cracking because it was too dry.  More water = no more splitting sound.
     Here you can see a before and after cane removal.  The plan is to let it dry completely until Monday, then I'll make a thin scraper that will just fit inside of the groove to remove any residue and re-cane.

One Down, One to Go


Tuesday, March 12, 2013

Sapele Hall Table is Done!


Sapele Hall Table
     I'm really happy to share the photos of this project.  Just like the feelings you have after completing an ultra race you trained for or having a child (postpartum blues); it's always a time of mixed emotions.  This table is just under 54" long and 30" tall.  The top is a little over 16" wide at the center of it and tapers towards each end.  Here's another view of it from a side angle.  


Side Angle
     What I feel gives this table a unique character is the detail on the apron.  This was made with a beading tool from Lie-Nielsen  that a friend gave me for helping him on a move across the country.  For years I'd been making my own scratch stock and he surprised me with this wonderful tool.  I suppose you could call it a router of the olden days but I really enjoy using it.  The triple bead detail is mimicked on the drawer pulls as well.


     The shelf on the bottom features a Radio Weave style of woven cane.  This comes from Frank's Cane & Rush  and is actually made of paper!  I had played around with different design concepts for the shelf design but prefer the lightness of the cane inserts.
     Incorporated into the overall design are drawers at either end of the table.  These would have been considered a glove drawer when folks actually wore them on an every day basis!

Drawer Detail

    Here in the desert southwest, gloves are a rare occurrence but this makes an ideal place to put your keys, cell phone, pagers, etc. when you come home from work.  The drawers are made of Maple and ride in traditional wooden runners with a solid Pine bottom.  Notice the Ebony pegs for the breadboard ends.  I had just enough of the Ebony to pin the tenons and stretcher supporting the shelf.
     The original name and concept for this project was the Star Jasmine Table.  The plan was to carve that flower into the center section of the shelf but it just didn't look right.  That would have been the only carved element and seem out of place.  My carving skills are "evolving" so I didn't want to chance ruining the project with a poorly carved design element.  Regarding that though, I am currently taking a carving class from Dennis Patchett a local, topnotch carver here in Las Vegas.
     Since the carving was eliminated, I now refer to this table as the Elliptical Hall Table.  Here's a shot of the top to illustrate why I chose that name:

Nope, Not a Surfboard!
     There's about an inch difference in the width from the center to the ends, just enough to add some visual interest to the design.  So, what are the plans for this project?  Personally I would like to market and sell it so I can buy more materials and create another project.  Diane, on the other hand, wants to make a permanent place for it in our house.  At $1950.00 I'm hoping it finds a home elsewhere and funds my wood addiction.  In either case, it was a good project and like every one of them; a great learning experience.

Friday, March 8, 2013

Teaser Peek and Old School Woodworking


Spoiler Alert
Just had to post this one picture of the Star Jasmine table that is now safely placed in the house.  Wanted to share how the beaded accent on the apron and then again on the drawer pull looks.  To my eye, this just adds a quiet style element.  The plan was to photograph it today.  The backdrop would be the foam piece draped with burlap.  Guess what though? very overcast and we just had a good rain shower so I'll wait until tomorrow when lighting conditions should be better.


     There was one little detail that needed my attention before the photo shoot.  The caned shelf is held in place by two wooden clips at each end that secure it to the stretcher.  Once I put the table in the house I noticed that you could see those ends when you're sitting down -- that's not acceptable!  I labeled them so they'd go back in the same location and could have simply used the tablesaw or chop saw to cut off the 1/2" or so but thought better of it.  Such a quiet, peaceful rainy day as today shouldn't be disrupted by the whine of power machinery so decided to go old school instead.

Shooting Board & Bench Hook
     The first step was to cut them shorter with on the bench hook with a crosscut saw:


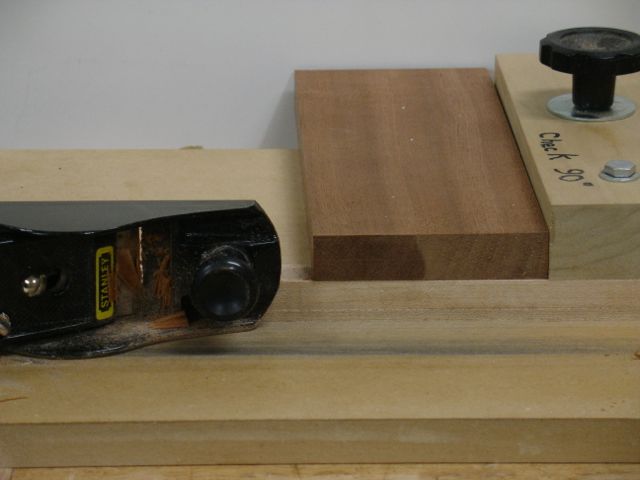
                        Followed by cleaning it up with the shooting board and block plane:


       These are little steps that make woodwork so enjoyable.  Even with a sled on the tablesaw this wouldn't have been a very safe task.  I tried to take a photo of the difference in the end grain after planing but it didn't come out very clear.  If you've ever planed the end grain of a piece of wood with a good, sharp blade you know how nice it looks.  Applied a bit of oil to that cut end, re-attached the clips, and it's just a waiting game for the sun to come out again.
      Hmmm, wonder what my next project will be?  I'm currently taking a carving class on Monday nights so I'll bet it's safe to assume it will have something to do with carving.

Thursday, February 28, 2013

Trolling on Ebay & A Top Waiting For A Bottom!

Top & Shelf Ready
     Things are moving along, albeit slowly, on completing the Star Jasmine table.  This is my own design and falls under the category of either a hall table or a sofa table.  Part of the design that I feel makes it unique are the drawers at either end plus the elliptical shape of the top.  It's completely finished now along with the shelf.  Here they are, leaning against the bannister waiting for the rest to be completed.  I really like how the grain of the Sapele runs through the center of it; actually it's made of three pieces of Sapele with breadboard ends pinned with Ebony.  The shelf section will sit on the stretchers mortised into the legs.  The delay now is due to the finish process on the drawer fronts.  You can't rush a 24 hour drying period and the temperature in the shop slows it down even more.
     Okay, so trolling on Ebay, what's that all about?  As part of my simplifying process I tend to sell anything I haven't used for a few years on Ebay and that was the case recently with a Marples mortise chisel.  I rarely use it, the hollow chisel mortiser takes care of the grunt work for that operation!  In spite of that, I really do prefer quiet hand work to noisy tool operation whenever possible.
     That's the case with fitting the drawer bottoms for this table.  Sure, a router and a rabbet bit would have accomplished this task quicker but I wanted to use my Stanley #78 Rabbet plane.  Only problem is that I've never had a fence to do that operation properly --- enter this:   Ebay sale from Briar Collectables.
     The fence is what allows you to cut an accurate rabbet, before I found it I would clamp a straight edge to the board to guide the plane.  That was a cumbersome, crappy solution at best.  Here's the old tool, outfitted with the fence:

Stanley #78 with Fence and Completed Bottom
     The fence consists of the rod and bracket on the right side of the plane.  This is one of the drawers for the table with it's completed bottom.  As far as the plane itself goes, Stanley manufactured these from around 1885-1973.  The lever you see next to the handle dates it to post 1925 and the sweetheart logo on the blade confirms that my plane is probably from the late 20's to early 30's.  You can change the position of the blade to the front and have a bullnose plane.  In any case, I like this old tool.
     The first cuts are always made across the grain.  I found that by pulling it backwards at an angle, the nicker would score the wood first:

Scoring with Nicker
     I'm using a piece of clear pine for the bottoms and although it's growth rings make it a dubious candidate for it will see if it will hold up since it's wide enough without having to laminate pieces together.  Pine, being soft is actually harder to chisel cleanly than a hardwood.

End Grain First

     After scoring the top it was just a matter of repeated passes to bring it to the required size.  I find that by wrapping my hand around the fence and bottom of the board it's pretty easy to control.  After both sides were completely rabbeted it was time to finish off with the front of the piece which is edge grain.  Notice that now it's making shavings rather than end grain chunks!
Edge Grain to Finish
     The one thing I need to do to make the plane look a little more it's age is to get rid of that zinc plated thumb screw!  Need an old brass, knurled knob with enough patina to match the rest of the tool.  There will probably be one more post on this table and that's when it's complete.  Currently taking a carving class from Dennis Patchett at WoodItIs school/studio here in Las Vegas so my focus will be there for a while.


Saturday, February 23, 2013

Designing the Pull


     The nice thing about designing your own hardware is that it will be unique to your piece.  Not something that you may find anywhere else.  The design process can be carefully planned out or kind of a spur of the moment, here's what looks good to me now, kind of process.  The one element I knew I wanted for the drawer pulls was that it incorporated some of the beading that is on the long apron of the table.  Here's what I came up with, at this point the drawer is unfinished and the pull is on with some double back tape.

Drawer Pull, Notice the Difference in Finished vs. Unfinished Sapele?
     When I initially beaded the apron I also beaded a few pieces of 8/4 Sapele with the plan of eventually turning them into the pulls.  Since the entire apron has the triple bead I knew that design wise it should also be on the narrow ends.  The process started with a very rough sketch:

Preliminary Sketch
     Since there are only two of these and they're on opposite ends of the table I didn't feel the need to make a template or pattern.  The question mark on the drawing is because I didn't know how deep to make the pull.  Two things I considered is that first of all there was ample space to get a finger or two under it and also that it stayed in scale to the rest of the table.  Step one was to use a forstner bit to hollow out the recess:

Roughed Out Finger Area
     I know, you're probably thinking why make three?  Well you know that old adage, if you make an extra you won't have any problems, make just enough and one will probably break!  Anyway, after drilling the holes the sides were chiseled to even up the overlapping cuts made by the forstner bit.  Next step was to cut the angle on the top.  I wanted it to match the angle under the table top so used the bandsaw with the table tilted as shown to make that cut.

Cutting Angle
     A block plane made the sawn surfaces smooth and they were then  ripped to what seemed like a proper depth.  Finally they were cut to length and formed.  Planes, spokeshave, and sandpaper was the next thing to make them feel like something you'd want to grab on to.  Here they are, almost ready for finish.

Ready to Go to Work
     Several little items were done today as well.  The shelf got it's last coat of finish, the drawer stops are made, and the remaining things are the clips I need to make that will secure the shelf to the legs and the top to the apron.  Just had to mock it up and put it in the house, besides it's cold out there and the finish will cure better inside.

Friday, February 22, 2013

Nothing Like a Well-Hung Drawer!


Almost One Down
     The drawers for the Star Jasmine table are hung using traditional, shop made runners.  These would consist of the side pieces, the bottom runner, and the top kicker designed to keep the drawer from tilting downward when it's pulled out.  I made everything but the runners out of soft Maple including the drawer itself.  The runners are made of Sapele since they're close to the bottom of the apron and I didn't want to have a light colored piece of wood there.  As you can see in the picture, it was easy to place the table on top of the table saw to bring it up to an easier height to work at.

As planned, the drawer runner rests on top of the cross piece.  It was planed to give me an even reveal along the top edge of the drawer.  The drawer guides are screwed to the apron sides through 4, over-sized and counter bored holes.

Positioning the Guide
     The first step was to clamp both guides to the apron and adjust it so the drawer front was flush and square to the opening.  Once I was satisfied with that a hole was pre-drilled for a round head wood screw.  One side needed to be shimmed out at the rear so a shim was sized to fit, you can see that in the top picture.  To make sure it wouldn't ever fall out, it too was drilled so the screws pass through it.

Securely in Place
    In the above picture you can see how the runner sits on top of the crosspiece.  The drawer front extends to just below the crosspiece.  When I do something like this my habit is to put in one screw at a time, tighten it, and then check the drawer alignment.  Since the holes are oversized a slight tap of a small hammer can be used to tweak it as needed.
     One side needed to be shimmed out a little bit and the opposite side needed to be taken the other way.  This was quickly done with a jointer plane.

Adjusting the Drawer Guide
Just had to take a close up of this shaving, the Sapele drawer runner is glued to the Maple and the shavings stayed together!

Nice Shaving!
  Last step was to glue and tack the kickers to the top of the guides.  My next challenge is to design drawer pulls that will be functional but fade into the piece.  Having drawers on the ends of a sofa table isn't that common; guess that's why I chose to incorporate it into my design!  Here's a picture of the completed runners:


Guides, Runners, & Kickers

     Wanted to share this final photo of trimming the ends of the radio weave.  After allowing the glue to dry completely I prefer to use a sharp, utility chisel.  That's my preference over a razor blade because the razor can slip and slice the wood or spline around it.

Trimming the Cane
At this time I've given it one more of the top coats -- we're getting there!


Sunday, February 17, 2013

Radio Weave Cane, a Brief How-To


     Well, once again a project I'm working on has a manufactured, woven cane element.  I really like to use this for doors and shelves.  I know if I did it often enough I could get closer to that all elusive perfection but will stand by the saying that goes something like this: "the beauty of an item crafted by hand are its inconsistencies and variations."  Here's what I ended up with at the end of the day.

Trimming on Schedule for Tomorrow
     I love the look of this weave.  I buy this and other chair caning supplies from Franks Cane and Rush who's located in Huntington Beach, CA.  His website gives lots of information and he'll personally answer questions either by phone or email.  This particular weave is actually made out of paper!  Just as so many projects we take on, one slip up here can negate many hours of work.
     If you've been following the progress of this table you may recall that the shelf had to be oiled and finished first and then the groove for the spline is cut.  This is so there is raw wood for the glue to adhere the spline to.  The spline groove is about 3/4" from the opening so using a pattern, router with a guide collar, plus the 3/16" bit was the way to go.  The question was how to hold the pattern in place?  Here's my solution:

Spline Pattern, Bottom View
     To guide the router I used a 1/4" piece of MDF.  Then I cut a piece of 3/4" MDF and screwed it together being careful to line it up square and maintain equal spacing all around.  To hold it securely a scrap piece of wood was screwed to the bottom and the tension holds everything in place.  All that remained was to be very careful as I guided the router around to maintain contact with the pattern.  This was especially tricky going around the corners but doable as you can see here:

Right Side Done, Left One to Go!
     Boy, routers sure throw out a lot of dust and mess but that was by far the easiest way to accomplish this procedure.  After squaring up the corners with a chisel the spline needed to be cut to fit.  That threw out another challenge.  The spline is pretty small and tapered.  That makes it kind of tricky to hold square as you cut the mitered ends.  Again, necessity being the mother of invention I came up with this little jig that helped immensely.  It's nothing more than the scrap of wood I used to set the router to its 5/16" depth.  After cutting a 45 on each side to guide the cut it was simple to use.

Impromptu Spline Miter Jig
      By putting it against a bench stop it was quick to cut with a Japanese razor saw.  Marking the inner and outer corners in the frame was easier than trying to measure and draw mitered lines on the rounded tops of the spline.

Marking Corners
     Finally ready to start the caning process.  This being a paper based cane, all that was needed is about 5 minutes of soaking.  The directions say to use wedges to secure the cane in the grooves as you install it but I've added another little trick.  By taking a piece of MDF and planing a rounded taper on one side of it I'm able to push a wider section of cane into the groove at a time.  I'll use a small piece of the actual spline to hold it in position as needed after forcing the wet cane material part way into the groove.  When I used a small wedge I found it too easy to distort the weave.

MDF Installer Tool
     The MDF piece was a scrap about 5" long, you can see it in my hand.  At the left of the cane you may notice a small piece of spline used to secure the cane.  By the way, you should always use a water soluble glue for this process and I prefer using Old Brown Glue which is  a liquid hide product.  That's what you see in my coffee mug!  Liquid hide needs to be heated to around 120-140 degrees so filling the mug with hot tap water does the trick and the insulation keeps the temperature at the right level.
     Next up is filling the groove with the glue and pounding in the spline:

Spline Installation
     Since I'm pretty much self taught I can only tell you what works for me.  Once I've figured out where the spline will go I remove any excess cane beyond that.  You can see it's done on the side and top.  The longest sides are done first followed by the short ones.  Seems like it's inevitable but sometimes you'll need to trim the spline in the corners.  Don't know if that's because the moisture changes the length but if you undercut the miter it'll go together neater.  As I said at the beginning of this blog, If I did this a lot I'd definitely get closer to that elusive perfection.

Thursday, February 14, 2013

Tutorial: Half-Blind Dovetails


     The goal of doing any joinery on a project is to find the best way to assemble the pieces so that they are both strong and functional.  In all of  the years spent woodworking, dovetail joints seem to be the "holy grail" for many woodworkers.  Well let's face it, they are proven from as far back as Egyptian times and their form is such that even if the glue fails, the wood piece still holds together.  That's been true whether it's an Egyptian king's coffin or an American cabinetmaker chest of drawers from the 1800's.  What we're after here is something that will look like this:

One Drawer Side, Sapele & Maple
     The darker wood (Sapele) is the drawer front while the side is the Maple.  The way the joint functions is that by its design, the side won't separate from the front due to the tails shape.  Think about how a drawer is used, you're constantly pulling it open which stresses that side connection. Pretty much impossible to pull apart unless the wood fails which may be caused by the angle being too steep.
     Jamie, of WooditIs here in Las Vegas has said that if you ask 10 woodworkers the same question you'll likely get 10, or maybe 12; different answers!  Keep that in mind as I create a pictorial of how I go about creating this joint.  When I teach I always encourage my students to investigate all of the different ways there are to accomplish a technique, experiment with them all, and then develop what works for you.
     I'll start off by saying that I'm a tails first kind of guy.  There's a huge controversy among woodworkers as to what you cut first. Google it online and you'll see what I mean and then re-read the paragraph above!
     The first step is to make sure your ends are square.  You can leave this up to your tablesaw or chop saw but I like to go one step further and true them up with a shooting board and a block plane as shown here.

   
     Not to get off track too much but I found that one of my drawer openings was about 88 degrees rather than 90.  I made my shooting board so that  I can adjust it to compensate for that.  It was set with a sliding bevel to match the angle of the opening.  Now, even though the drawer front won't measure square, the revel around it will be consistent.  Here you can see the cut as I "un-square" the front.

Dark Area is being Cut

     Okay, back to the drawers and the half blind tails.  I mentioned this as an experimental way to use the Stanley #140 trick in a previous blog.  It's pretty quick and easy on the table saw but be safe.  Use a back up piece to help support the wood as you create a slight tenon for the tail to lay on.

Pseudo Stanley #140 Trick
     Like I said, I do tails first and I like to lay out and cut both of the drawer sides at the same time.

Lay-Out Tails

         Clamp both of the pieces securely with a parallel clamp for this operation.

Cutting Tails
     Next up is to cut the outside shoulders with your dovetail saw (crosscut if you have one).  My preference is to notch it first with a chisel.

Notch Shoulder
     This gives the saw a flat area to guide against, I've found that for me it's an easier way to get a straight shoulder cut.  Usually a little bit of paring is required.  For these drawers there are two tails so the area for the center pin needed to be removed.

Tails Done
     This is followed by transferring the tails to the drawer front.  It's a pretty straight forward process but if you can find a way to clamp things together it'll improve your accuracy.

Transferring Tail Board to Drawer Front
     Here's where my old eyes can give me troubles!  I rig up a light, open the door, and do whatever else is needed to see the lines.  For wood like Sapele pencil or chalk should be used to outline your scribed lines.  First step is to cut the outer boundaries of the tail, keep in mind that you want to cut on the inside/waste side of the line.

Initial Cuts in Drawer Front
     This will be followed by careful chiseling to remove the waste.  Again, being able to securely hold the piece while you work on it is critical and will make a huge difference in how your joint will turn out.  I love my little bench on bench for this type of work.  It brings the work up to a comfortable level and saves me lots of back stiffness!

Removing the Waste
     I get the bulk of the wood removed in this position, drawer front flat on the bench.  Notice those pencil lines to help see what I'm working to.  Once most of it is done in this postion I'll put the board upright in the vise.

Working to the Line
     Then it become a matter of trial and error to get the joint together.  I start at one edge, usually the top  and slowly work it in until things fit as they should.  This is an area where patience is required.  Saying that though, I've had students just make their cuts and the tail drops right into place! This picture is somewhat blurry but I tend to cut a small portion at the top to the scribed line, then try, then trim, then try, then………. you get the idea.


Paring to the Scribed Line
     I've worked with these joints for quite a while and must admit they do get easier.  Like everything else in life, some days are better than others so don't be discouraged if the fitting gets tough and don't get too cocky if they drop right into place!
     Unless you're striving to make a living and pay the bills, try to do this work and just enjoy the process.  You'll be surprised at the enjoyment you'll get from this, to me it's all about the process and those quiet hours spent creating your work.  Hope this gives you some more insight into making these joints.  As always, I welcome any comments or questions you may have.