The goal of doing any joinery on a project is to find the best way to assemble the pieces so that they are both strong and functional. In all of the years spent woodworking, dovetail joints seem to be the "holy grail" for many woodworkers. Well let's face it, they are proven from as far back as Egyptian times and their form is such that even if the glue fails, the wood piece still holds together. That's been true whether it's an Egyptian king's coffin or an American cabinetmaker chest of drawers from the 1800's. What we're after here is something that will look like this:
 |
| One Drawer Side, Sapele & Maple |
The darker wood (Sapele) is the drawer front while the side is the Maple. The way the joint functions is that by its design, the side won't separate from the front due to the tails shape. Think about how a drawer is used, you're constantly pulling it open which stresses that side connection. Pretty much impossible to pull apart unless the wood fails which may be caused by the angle being too steep.
Jamie, of
WooditIs here in Las Vegas has said that if you ask 10 woodworkers the same question you'll likely get 10, or maybe 12; different answers! Keep that in mind as I create a pictorial of how I go about creating this joint. When I teach I always encourage my students to investigate all of the different ways there are to accomplish a technique, experiment with them all, and then develop what works for you.
I'll start off by saying that I'm a tails first kind of guy. There's a huge controversy among woodworkers as to what you cut first. Google it online and you'll see what I mean and then re-read the paragraph above!
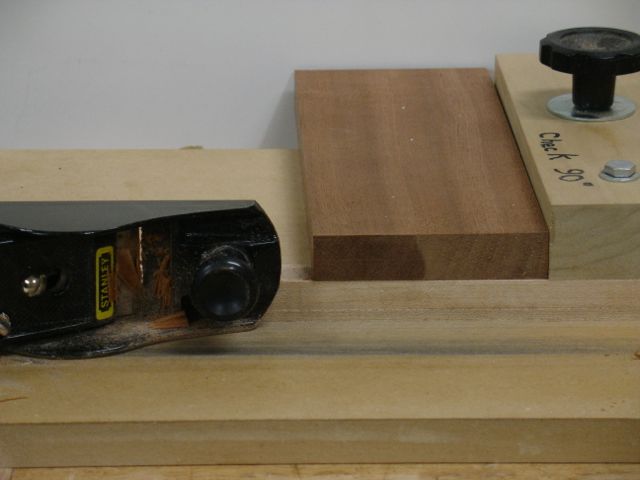
The first step is to make sure your ends are square. You can leave this up to your tablesaw or chop saw but I like to go one step further and true them up with a shooting board and a block plane as shown here.
Not to get off track too much but I found that one of my drawer openings was about 88 degrees rather than 90. I made my shooting board so that I can adjust it to compensate for that. It was set with a sliding bevel to match the angle of the opening. Now, even though the drawer front won't measure square, the revel around it will be consistent. Here you can see the cut as I "un-square" the front.
 |
Dark Area is being Cut
|
Okay, back to the drawers and the half blind tails. I mentioned this as an experimental way to use the Stanley #140 trick in a previous blog. It's pretty quick and easy on the table saw but be safe. Use a back up piece to help support the wood as you create a slight tenon for the tail to lay on.
 |
| Pseudo Stanley #140 Trick |
Like I said, I do tails first and I like to lay out and cut both of the drawer sides at the same time.
 |
| Lay-Out Tails |
Clamp both of the pieces securely with a parallel clamp for this operation.
 |
| Cutting Tails |
Next up is to cut the outside shoulders with your dovetail saw (crosscut if you have one). My preference is to notch it first with a chisel.
 |
| Notch Shoulder |
This gives the saw a flat area to guide against, I've found that for me it's an easier way to get a straight shoulder cut. Usually a little bit of paring is required. For these drawers there are two tails so the area for the center pin needed to be removed.
 |
| Tails Done |
This is followed by transferring the tails to the drawer front. It's a pretty straight forward process but if you can find a way to clamp things together it'll improve your accuracy.
 |
| Transferring Tail Board to Drawer Front |
Here's where my old eyes can give me troubles! I rig up a light, open the door, and do whatever else is needed to see the lines. For wood like Sapele pencil or chalk should be used to outline your scribed lines. First step is to cut the outer boundaries of the tail, keep in mind that you want to cut on the inside/waste side of the line.
 |
| Initial Cuts in Drawer Front |
This will be followed by careful chiseling to remove the waste. Again, being able to securely hold the piece while you work on it is critical and will make a huge difference in how your joint will turn out. I love my little bench on bench for this type of work. It brings the work up to a comfortable level and saves me lots of back stiffness!
 |
| Removing the Waste |
I get the bulk of the wood removed in this position, drawer front flat on the bench. Notice those pencil lines to help see what I'm working to. Once most of it is done in this postion I'll put the board upright in the vise.
 |
| Working to the Line |
Then it become a matter of trial and error to get the joint together. I start at one edge, usually the top and slowly work it in until things fit as they should. This is an area where patience is required. Saying that though, I've had students just make their cuts and the tail drops right into place! This picture is somewhat blurry but I tend to cut a small portion at the top to the scribed line, then try, then trim, then try, then………. you get the idea.
 |
| Paring to the Scribed Line |
I've worked with these joints for quite a while and must admit they do get easier. Like everything else in life, some days are better than others so don't be discouraged if the fitting gets tough and don't get too cocky if they drop right into place!
Unless you're striving to make a living and pay the bills, try to do this work and just enjoy the process. You'll be surprised at the enjoyment you'll get from this, to me it's all about the process and those quiet hours spent creating your work. Hope this gives you some more insight into making these joints. As always, I welcome any comments or questions you may have.


No comments:
Post a Comment