Saturday, May 28, 2011

Always More to Learn

Most of you have probably heard the statement that goes something like this -- the more I learn the more I realize what I don't know.  I've heard that stated in a number of different ways but the gist of it is that no matter what you think you know, there's always more to learn.  I suppose that's what drives people, like me, that aren't satisfied with the "status quo" and always want to improve their skill set.  That's definitely how it is with me and my work.  The frame I've been working on that has the art nouveau theme is finally complete, I think!  As someone who gets wrapped up in the details and appearance of my work a difficult concept for me is to gild a frame with 22 kt. gold leaf, see it all beautiful and shiny, and then deliberately make it look old and aged!  That's the nature of the beast, I've taken workshops in gilding and toning and the concept is to replicate normal aging you'd find on a frame.  It runs the gamut from using an ice pick to create worm holes to using chains and rocks to show wear and tear.  Here is the final (unless I change my mind) frame for a painting Diane recently completed titled Mother's Day:

Mother's Day by Diane Eugster
The way I achieved the patina on this frame, which is somewhat hard to tell in a photograph, was to use rottenstone to first take the shine (rub back) off of the gold.  Intentionally, I tried to leave the carved pattern brighter since I like that feeling of a ribbon of gold going completely around the frame.  This was sealed with shellac and allowed to dry.  Next, a thinned mix of Asphaltum and Naphtha was brushed onto one leg at a time, then wiped back to leave a brownish tone on the frame.  In some areas it was too heavy but wiping those with a Q-tip and wax lightened them up.  After several days, I used wax to remove some of the Asphaltum and add protection to the entire frame.

Here's a closer shot of a corner.  So far I'm satisfied with how things turned out.  We'll leave the painting out and knowing me, I'll critique my work every time I walk past it!

Sunday, May 22, 2011

Made in China vs. John Made

     After using the same frame for my reading glasses for the last 7-8 years I came across a really cool, yet eccentric, pair at a "high end" (don't like that term) optical shop called Obika. They are engraved on the temple as  Handmade in Germany and the company name seems to be Schminckel.  Obika is in a new shopping district here in Las Vegas called Tavoli Village.  As a teacher I always preferred reading glasses that don't have a frame on the top so kids would never disappear from my sight, especially at the prison I taught in my last 11 years.  These are hard to come by so when I spied these I had to have them.  I was surprised when I picked them up that they came with a crappy, made in China box so I just couldn't let that slip by.

Side by Side Comparison
    Since I had some  8/4 Zebrawood remaining from the tops for the triangular tables I decided to use it for the case.  Love the grain patterns and striking coloration of that material.  The finish is super blonde shellac and wax.
Case Interior
    I was real pleased to see how the grain came out as I routed the recess for the glasses.  The first step was to make a template out of masonite that approximated the outside profile of the glasses.  If I were to make these for sale I would choose to make a more generic outline.  This template was attached to the blank with 23 gauge pins and then routed out using a plunge router with a guide bushing attached and a core box bit.
After routing, a small scraper was used to smooth it out.  Rather than glue felt into the recess Diane made a small bag out of the cleaning cloth that came with the glasses.  The grain is really stunning, almost the same effect you'd get if you cut Baltic Birch plywood.  Small Soss hinges were used along with a magnetic to keep the case closed.  I mentioned the possibility of selling these and I plan to show it to the store where I got them and see if they're interested.  Here's a picture of yours truly modeling the specs, I'm lovin' it !!

Monday, May 16, 2011

Joinery Options

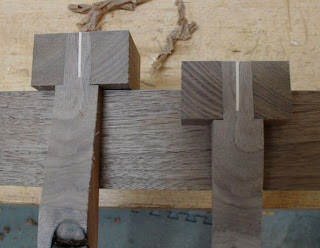
Now that the decision has been made to use a 5/8" through tenon for the table legs I thought it would be wise to make a sample or two.  I choose that size since that's the largest hollow chisel bit I have and with the 1" square legs that'll leave a 3/16" shoulder all around.  I figured that by making it a splined tenon it would wedge tightly into the mortise plus make a nice design element -- I like the honesty of visible joinery.  Here's a practice tenon with a Maple spline.  The hole drilled at the base of the spline slot is to prevent the piece from splitting when the spline is hammered in.  I had a concern regarding the spline direction, it should go against the grain but with a square leg that's somewhat of a "crap shoot"!  I also wanted to put the splines at an angle on the rear legs and with the grain on the front leg, definitely thought it best to do a trial or two.

Tenon & Spline
Things went together well but I wanted to make sure the sides of the tenon were snug against the walls of the mortise.  Decided to do the test by cutting a sample apart on the bandsaw and see how it looked internally, that was kind of fun, felt like I was doing a research article like the woodworking magazines do!

Cut apart Joint

As you can see, the tenon is snug in the mortise and the spline is completely bedded in it's slot -- just like it's supposed to be.

I spent some of the day re-sawing the piece of Zebrawood, that is some  challenging wood to plane by hand.  I think the jointer plane needs to be re-sharpened since Zebrawood has what I'd term hard, sinewy grain.  To simplify it somewhat I cut it into the size needed for the three table tops and managed to make one panel this evening,.  The rest may come tomorrow after I get the stitches out of my knee and get ready for rehab.

Saturday, May 14, 2011

It's Been Awhile!

It's been some time since I've posted to my blog but I have a good excuse -- knee surgery on the 29th. of April.  I'm much improved but didn't go up the stairs to my bedroom or the gilding area so the frame is all gilded and ready for toning.  Since that requires longer periods of time I'm putting that project on hold until my knee tells me it can stand on its' own for a number of hours.
In the meantime, I've started a new project and am currently working on some prototypes for it.  When we went to Pasadena I noticed a lumber yard called Arroyo Hardwoods.  Decided to check it out and ended up with a nice piece of 8/4 Zebrawood just begging to be re-sawn and book matched!  We have the need for some small tables to use as side tables for company or ourselves -- think TV trays.  I rarely take the easy way in my designs and this will be no exception.  I've seen lots of rectangular or square tables so decided to try a triangular or a truncated rectangle.  You knew that would lead to prototypes so here's what's going on.  The first thought was to make them stackable but that didn't work out too well so I went for the rectangular theme.  They will be made of Walnut with the Zebrawood as an inset.  Since I want them to appear quite light I decided to not use an apron but rather mortise the legs into the sides with an overlap type of joint, here's that prototype:

Traditional Leg with Inlay
The top was made first out of Poplar.  The first leg design included an inlay which I initially thought could be attractive.  Now that I see it I disagree, the top is sleek and contemporary while the leg looks somewhat traditional.  It just didn't have the flow I was looking for.


Triangular Shaped Leg


The intent of the next leg design was to micmic the triangular shape of the top, this too was attached with a lap joint.  What I do when I work on designs is to make the mock-up and just place it in the room for a while to see how it would work.  The decision is that it wouldn't!, looks too bulky and heavy.  I want these tables to have a very light appearance.  


Where I am now is to place the legs under the table to maintain a clean edge all the way around the top.  One concern I've had was with the stability of using three legs.  From the mock-ups I've constructed so far it doesn't seem to be an issue.  Since they will be used to place a drink or snack on they won't be knocked around much.  Here is the final prototype:
Final Prototype
The legs are mortised into the top.  The largest mortising chisel I have is 5/8" so I made the legs 1" square to allow for a 3/16" shoulder all around.  The mortise is completely through the top and will be secured with glue and a wedge.  Things look a little awkward in this photo because there are gaping holes where the initial legs were attached.  The cardboard top is a poor substitute for the Zebrawood I plan on using and you really have to stretch your imagination to have the Poplar become Walnut.  Next step will be to see how the Walnut works for this design.