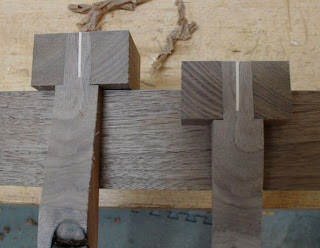
Now that the decision has been made to use a 5/8" through tenon for the table legs I thought it would be wise to make a sample or two. I choose that size since that's the largest hollow chisel bit I have and with the 1" square legs that'll leave a 3/16" shoulder all around. I figured that by making it a splined tenon it would wedge tightly into the mortise plus make a nice design element -- I like the honesty of visible joinery. Here's a practice tenon with a Maple spline. The hole drilled at the base of the spline slot is to prevent the piece from splitting when the spline is hammered in. I had a concern regarding the spline direction, it should go against the grain but with a square leg that's somewhat of a "crap shoot"! I also wanted to put the splines at an angle on the rear legs and with the grain on the front leg, definitely thought it best to do a trial or two.
 |
| Tenon & Spline |
 |
| Cut apart Joint |
As you can see, the tenon is snug in the mortise and the spline is completely bedded in it's slot -- just like it's supposed to be.
I spent some of the day re-sawing the piece of Zebrawood, that is some challenging wood to plane by hand. I think the jointer plane needs to be re-sharpened since Zebrawood has what I'd term hard, sinewy grain. To simplify it somewhat I cut it into the size needed for the three table tops and managed to make one panel this evening,. The rest may come tomorrow after I get the stitches out of my knee and get ready for rehab.


No comments:
Post a Comment