Sunday, September 30, 2012

Tutorial: The Best Zero Clearance Plate Ever ?


Is This the One?
   

      I really don't want to fall into that "The Best -----" genre of story titles but couldn't resist.  You know what I mean at the check out counters i.e. Best Way to Lose Weight; Best 10K Time Training Program; Best $5.00 Wine on the Market; Best Dovetails Ever; and so it goes.  I always suspect those titles because really, how many Best Ways can there be to do the same thing?
     I can't take full credit for this method of making a zero clearance plate because it's something I saw years ago in a magazine and filed it away into the recesses of my mind hoping it would surface at just the right time.  Well, after using the dial indicator to set up my tablesaw that time has arrived.  Now that it's over I'm really glad I went through this process.  Making the adjustments to the saw changed the location of the blade in reference to the throat  plate so it was no longer a zero clearance set up.
     Like many of you, I've gone through the stage of using the factory plate on the saw, then making my own from plywood, and finally buying a specialized one made of phenolic and complete with adjusters and everything!  I'm Dutch and these things aren't inexpensive so I still was left with the factory plate for my rip blade and shop made plates for various sized dados.  The concept behind this plate was to use the same specialized plate for everything but make inserts customized to any blade configuration needed.  Here's where I started this process.
     The first step was to create a channel on top of the plate to accept the inserts.  I'm using 1/4" MDF so cut a bunch of strips about 1 3/4" wide.  These strips should be 8"-10" longer than the throat plate, that's not a critical measurement though; just use what you have.  To cut the channel I used a 1/2" straight bit in the router and made successive passes to achieve the needed depth.  At the same time, make a sample piece or two with the identical cuts in a piece of scrap material, I used MDF for that.  You'll need that to fine tune the width of the channel.

Router Table Set Up
     Here's my set up, it's a shop made router table set into the extension table on my tablesaw.  This way I can use the rip fence for my router table too.  Boy, this phenolic stuff is hard and smelly; actually chipped my carbide dovetail bit!  The piece sitting upright is one of the extra pieces made to set up the dovetail bit and make trial cuts before actually cutting into the throat plate. The other thing in the picture is my push stick -- use one so you don't cut a nice channel in your thumb as you finish the cuts.


     I gradually increased the depth of the channel until the MDF fit.  It's ever so slightly proud but that will be easy enough to fine tune with a piece of sandpaper.

Checking Depth

Once the channel is complete I changed over to a 14 degree dovetail bit.  Here's where that piece with the trial channel cut into it comes in play.  Use it to fine tune the depth needed.

Setting Depth

     Once that's dialed in you'll cut both sides of the channel to create a dovetailed slot for the insert to slide into.  The next step requires small adjustments with the fence to get a good fit.  Your strips should be longer than needed so you'll have plenty of pieces to experiment with.  The first step is to cut a 14 degree angle on one side of each strip.  Now comes the fine tuning.

Are We There Yet?

     The beveled edge on the strip will want to slide underneath your fence so it's best to clamp a piece of plywood to your fence, push it down tightly to the table.  I'm using a clamp close to the cutter to keep the strip down so the 14 degree bevel is consistent the entire length of the strip.  Now it's a matter of gradually cutting the piece down until it slides into the channel with just a bit of resistance.
     Each strip will need a hole drilled into it so you can remove the plate from the tablesaw.  Mine happened to be 3/4" so slide the strip into the channel, leave it proud and drill the hole completely through all of them.
Finger Holes

     By this time I was pretty tired of all the machine noise and dust so went traditional for the last couple of steps.  Insert the strip and line up the finger hole.  Clamp that into your vise and use a coping saw to make it fit.

Final Shaping

     Sure, you could use a guided bearing in your router but this works too.  I also cut a pass down the area in the back where the splitter goes then used a chisel to pop that piece out.

Not Pretty but Works!
It's a Beautiful Thing!

     Now I have about 8 of these strips ready to go for any blade I need to put on the tablesaw.  As they get sloppy I can just toss it and install a fresh one.  Make sure that when you're making your initial cut into the strip that you put your fence over it to hold it down.  For a dado blade I'd recommend that you clamp a piece of MDF over the entire insert when making that initial cut.


     Let me know if you decide to try this for your own saw, I'd be curious to hear your opinions!


Tuesday, September 25, 2012

Belt Sander Sharpening


Belt Sander Sharpener --- My Version
      Jamie once said "ask 10 woodworkers how to sharpen a tool and you'll get 12 answers"; boy, isn't that the truth!  When it comes to sharpening there's no shortage of methods we employ to achieve that keen edge that will slice right through the toughest of wood fibers, cleanly and effortlessly.  Kind of like Monty Python seeking the holy grail isn't it?
     For all of my flat blades I prefer using Japanese water stones and guides only, I'm not a fan of hollow grinding on a wheel.  Yes it's more time consuming but it suits me and my method of woodworking.  The only time I ever use power grinding on a chisel would have been for my carpentry chisels that gets into a fight with the occasional nail and loses!
     Carving chisels and gouges present a different set of problems.  When they're factory fresh, so to speak, the bevel is uniform and occasional honing  or stropping keeps them cutting well.  As time goes on though the edge will tend to roll over making it harder to slice through the wood.  Many times it's desirable to lengthen the bevel or change it slightly to suit your own angle of attack.  I've been working on that and for me, getting a uniform bevel by hand has proven difficult.  So, back to the web and books to do some research.
     In Leonard Lee's book on sharpening he talks about how the belt sander is an excellent but over-looked method you can use to sharpen tools.  I used this as a starting point and the more I checked it out, the more attractive it became to me.  Lee Valley sells a 1" x 42" belt sander without a motor but there are any number of places that sell a 1" x 30" belt sander starting at $30.00 or so from Harbor Freight to the $400.00 or more range.  I opted for one from Enco which looks similar to almost every other 1x30 sander on the market.  Before I get into the details of this sander, another thing that makes this concept attractive is Lee Valley's offerings of sharpening belts.  Here's a LINK to them, they're reasonably priced and since power sharpening is not an everyday process they will be less costly than buying quality grinding wheels.
     According to safe practices, when you're sharpening it's better to have the rotation of the belt going away from you.  The tool rest that comes with the sander can't be tilted to a steep enough angle anyway, even if the belt was rotating the correct way.  That's why I made this plywood enclosure and bolted the belt sander to the back of it.  This way the belt is rotating away from the blade and by coming up with this tool rest I can also achieve the required angles. I wanted to leave enough room on the side to make belt changing easy.  Making the tool rest had me doing my share of head scratching!  I had the piece of perforated piece of angle iron from some long ago project so decided it would be the base.  Knowing that the closer I could get it to the belt the safer it would be is why I notched it out as shown.  You can see it better in this picture:

Parts other than the Housing

     The other parts are a 3/8" all thread with fender washers and a wing nut.  Next to the tool rest is a guide that will help keep the chisel square to the belt.  It can be bolted through one of the elongated holes so that makes it adjustable.  The MDF pieces that are labeled with the angles on them is what I came up with to support the tool rest.  Trying to create a pivot point wasn't possible because the distance between the rest and the belt would increase/decrease.
     If I "deconstruct" the process of setting it up it may be easier to understand.  First of all, the rod is run through the holes:

Step One:  Insert Rod

          As the rod is threaded through, you also thread in the desired angled rest:

Step Two:  25 Degree Rest Installed

     Push the threaded rod all the way through both of the rests and sides of the box:

Step Three:  Insert Rod Completely Through Unit

          Lay the metal tool rest on top of the angled blocks:

Step Four:  Tool Rest in Place

     Now you can tighten the wing nut securely.  Since there is some flex at the ends of the plywood box it's easy to get a good, tight hold.  If needed you can also fine tune the angle of the rest to the sanding belt.

Final Tightening & Adjusting of Tool Rest

     So, how does this all work?  Well, so far I've been really pleased but can't give it a full test until I get the sharpening belts from Lee Valley.  Using an 80 grit belt I just had to see what would happen.  Even though I won't use this on flat edges the chisel on the right is a garage sale item that I use to scrape glue off of projects once it's set up.  You can see it has a nice scratch pattern.  The two carving chisels are part of a quality, 11 piece set from Harbor Freight which I think set me back about eight bucks!
    

Check it Out!
     You can see the middle chisel got burned a bit on the lower left edge, the other stuff is rust.  That occurred because the handle got hung up on the tool rest since these chisels are very short.  No problem with the one on the left, I was able to get a uniform bevel all the way around.  This was one pass only, a second pass will eliminate the low spot in the middle.  I'm positive that when I get the blue zirconium belts from Lee Valley they will work fine.  Then just a honing and removal of the burr on the inside of the edge and it should be good to go.
     The question though is: will it cut?  Check this out and tell me what you think:

It Works!!
     Keep in mind that this is one of China's finest tools, I'm pretty sure the final grind on it is done on the street from the back of a moving truck!


Saturday, September 22, 2012

Murphy's Law out to Get Me! Pull-Out Shelves


     After re-modeling the kitchen we're really happy with it but I decided that to bring it to the next level we really needed to add some pull-out shelves, especially under the stove top.  Maybe it's the knee surgeries catching up with me but I'm tired of kneeling down there to find the right lid for the pan I need.

Loaded and Ready

     I've never been accused of taking the easy way to complete a project and these were no exception.  Rather than use a common 3/4 extension, bottom mount slide I decided that 100 lb., full extension slides would be the best.  The sides of the pull-outs are made of European Steamed Birch with a MDF bottom fully supported in a dado.  The shelf is laminated with Formica left over from Diane's studio remodel.
     As I was planning out the work that Murphy and his law just kept trying to trip me up!  First off, I knew that I wanted the bottom to be housed in a full dado for strength.  Rather than make stopped dados that wouldn't show in the front and rear I used this joint:

Locking Joint to Hide Side Endgrain

     Since the tongue on the front piece is locked into the side there is little chance of separation.  No matter how carefully you set up your machines when you're making a matched joint like this there is always a bit of final fitting that's needed.  Ten to twelve passes with a hand plane brought it to the required size.

Front & Back Piece Fitted

     Now that the framework was complete the bottom pieces were fitted and laminated.  I really dislike the mess of laminate work as you trim it to fit so decided to try this method to contain some of the mess.

A Cleaner Way to Trim Formica

     Rather than using a hand held router I thought I'd try putting the router into the table.  I had made this fence that fits onto the rip fence.  It's hollow and you can see the shop vac hose attached to the end at the right, bottom corner of the picture.  Happy to say this worked just great.
     To attach the runners to the cabinet I made a U-shaped channel that was attached behind the center stile.  Then separate ones were made for the sides.  My plan was to first attach the piece in the center, fit the pull-out to it and the corresponding side piece and then screw it all down.  Except for the Murphy's Law incidents it did work.  First up was to attach the slides to the correct parts.  Before I got too far on that I realized it would be pretty tight working up against the side of the cabinet so allowed just enough room for the drill chuck to clear.  I find that if you're doing more than one of a process it's worth the effort to make a quick jig so that every piece is located in exactly the same place.  One was made for the support side of the slides and another for locating the slide on the pull-out.


Attaching Slides to Pull Out

     I thought I was pretty clever making sure to mark the front of the pieces but somehow or another, Murphy's Law found me putting in one upside down and backswords!  Fixed that and started to install them.

Center U-Shaped Piece Installed

     That went as planned.  You can imagine what a hassle it can be working inside of a 24" cabinet with limited head room above and leg room outside of it.  Well, Murphy had to rear his ugly little head one more time!  The side pieces are 22" long and the slides are 20" long.  In the side piece I drilled three holes to attach them to the cabinet bottom.  What are the chances of one of those holes being in the exact location for a screw hole I used to attach the drawer slide?  Yeah, that's what I'd say too "slim to none".  Wrong!!, as I pre-drilled the front hole I noticed a little bit of resistance but was able to get past it.  Then, as the screw went in it stopped about two thirds of the way into the hole -- yep, the screw used to attach the slide was right in that hole.  This meant taking them back to the shop, pre-drilling another hole, taking out the offending screw and then putting it in its' new location. Not a real big deal but after the other little episodes I'm really glad it was in the first hole I used.  Anyway, here it is and you can see it's a good installation.  It's finished with a couple of coats of wipe on poly and wax. My wife thanks me and my knees and back will be forever grateful!

Nice, Even If I Do Say So Myself!

Saturday, September 15, 2012

My Official Show Announcement!


     Well, after working on and towards this moment it's time to share the official announcement for my box show.  If you click on this LINK , you'll be taken to the website of the Urban Ranch General Store.  From there you'll be able to get the full details.  The Urban Ranch General Store is the design studio of Durette Candito.  She, along with Suzanne Silk, will have her work displayed at the show as well.  Durette used to have her Interior Design studio on Main Street but those of you who are local will recall how a blast at the Nevada Power facility across from her devastated her studio along with the Attic and an Opportunity Village building.  Her new location features all of her fantastic hardware and finds from around the world.  She is a well known interior designer as well and I've been privileged to do some work for her in the past.

     For this show my intent was to design and build a collection of boxes that were artistic as well as useful.  There will be 29 boxes to choose from and, as is part of my design ethic, I wanted the wood to be the star.  Some of the boxes feature intricate joinery like this one made of Walnut and Canarywood.

Canary Tails

     Also included are some boxes that incorporate a carved and gilded top along with exotic wood.


The Gilded Cat

     Wood has always been a fascination to me.  The textures, colors, and grain patterns seem to be endless.  My earliest recollections of being attracted to it was in doctors offices where they had wood veneered doors.  To this day I see animals, mysterious figures, and all kinds of designs in the wood.


Splined Leopard
    I hope that many of you can find the time to see the show.  It's this Thursday from 5:00 to 8:00 and the address can be found on the link I gave at the beginning of this post.  I'm pretty excited, I'd get excited too every time Diane had a painting juried into a show and we'd go to the opening.  Now I have to add some nervousness to it because it's my first ever show!

Hope to see you there -- John


Thursday, September 13, 2012

How's this for a first ever Dovetail ??


     Check this out -- this is the very first dovetail ever cut by a student I just started with this morning.  The fit is good, the shoulders are square, and both pieces line up.


           Here's another view of it:


     There's only one slight bauble and that's on the right side of the tail.  That happened about 10 seconds before I mentioned you should pare from both sides of the tail and not off the edge when squaring up your initial cuts!
     We started work on dovetails around 8:45 and after explaining the theory behind it and some design considerations for sizing we started off doing practice cuts in some scrap.  It's enough of a challenge to follow a line and cut it square; for tails you also have to angle it inward as you cut.  Lots of little things to remember and try to control just for a cut about 3/4" long!  Add that to the fact he'd never even used hand tools and I think you too will be impressed.  Including the talking and practicing before we started the joint itself this represents roughly three hours work.
     He came prepared with what I'd consider premium quality tools --- Lie-Nielsons!  He had found someone selling their collection for less than they are new and these tools looked as if they hadn't been used much at all, quite the bargain.  Now one thing I always stress to my students is that a quality tool won't make a mediocre worker better but it will improve the quality of your work if you have the skills to back it up.  Let me put it this way, I played violin in the 4th. grade at the insistence of my Mom.  Give me a million dollar plus Stradivarius and it'll still sound like a cat that got its tail caught in the door!
     At this time he doesn't have a workbench to work on or enough space to put one anyway.  I showed him the bench on bench that I always use and that will more than likely be the first project we'll tackle.  It's small enough to place anywhere and move as needed.  When doing hand work you really need a reliable way to hold the wood, there's enough things going on that you don't want to worry about the wood moving on you.

Wednesday, September 12, 2012

Already a Refinement!


     You have probably heard about all the rain here in Las Vegas yesterday, actually made the national news!  Well, at this end of town things were under control but the dramatic spike in our humidity did its thing to wood -- mainly, expanded it the wood across the grain.  Usually that's not much of an issue here in the desert.


Still Looks the Same!
     The one part of the design I wasn't too sure about was the little Oak button that goes between the threaded lock and the beam.  It's purpose was provide a barrier of the brass rod to the Canarywood of the beam.  It was what I thought to be "the weakest link".  The humidity caused that to swell and resist tightening up.  I know that ivory was used for that in the past but there's a ban on that.  I thought of a button but ruled it out as too weak.  Then it hit me, I love using that ultra high molecular weight polyethylene when making sleds for the tablesaw.  Here's what I tried, first I cut a small piece on the chop saw to the approximate size of the Oak button I'd made.  This was then stuck to the UHMW with double back tape and by nibbling off the corners with a chisel it eventually became a rounded button.

From Square to ......

Round
     Put it in and the last minor adjustment was to file down a little bit of the brass so the beam is square to the holder part of the gauge.  Now it's even better than before and I really can't wait to use it tomorrow with my student that's learning the art of hand cut dovetails.


Tuesday, September 11, 2012

Making a Marking Gauge with a Hamilton Tools Blade


     I have to admit that I am really pleased with myself and how this project turned out.  Here's what it looks like, it's made of Canarywood and Chakte Kok:


Marking Gauge, My Design
     I was inspired after looking at the beautiful marking gauges made by Jeff Hamilton, here's a LINK to his website.  You'll see his are beautiful and of a different design than the traditional ones we're accustomed to seeing.  He offers a replacement blade which I used for my design.  I mentioned to him that I was eager to make my own and if he minds if I possibly incorporate some of his design in mine.  I like his reply; basically he said he gets quite a few orders for his gauges after someone orders the blade and discovers how much work is involved.  I can attest to that, this is not a quick project.
     The gauge I replaced was a typical Marples, in my case I've had this one for probably 25-30 years.

The Old and the New

     There really wasn't anything majorly wrong with it, age had made it sloppy but my main complaint with it was how it felt when you grip it to scribe a line.  That large, knurled knob is right under your finger as you wrap your hand around it.  Another drawback is that the fence doesn't have much surface area and can skew as you draw it against the wood.  You'll notice on my version that the knob is at the bottom of the gauge, now the hand can wrap securely around the entire piece as you scribe your line.  You can see what I mean in these pictures.  By the way, the blade from Hamilton Tools is perfect, forget making one out of a piece of bandsaw blade or whatever -- this slices wonderfully both with and across the grain.


     See how easily my hand wraps completely and securely around this gauge?


      Let me go through the procedure I went through to create this tool.  I used the Marples gauge as a guide and it was about 1 1/8" thick.  I had some Canarywood left over from a dining table and chairs project that was thick enough.  The first step was to cut the required size and plane the edge square.  I decided the best way to get the hole for the beam was to cut the two pieces, make the hole, and then assemble them together.


     To create the hole for the beam I used a dovetail saw, chisels, and a small router plane.

Preparation for the Beam

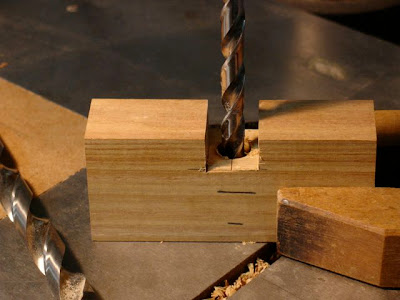
     That was just the start!  I knew I wanted a threaded knob to secure the beam in place.  Another option would have been a wedge but I like the idea of being able to tighten it without trying to hold it in place while pushing the opposite direction with the wedge.  A 1/4" x 20 insert is used for that, however; that meant a series of holes needed to be drilled.  First off was a 1/8" hole drilled completely through the block, this is like a pilot hole so all of the holes to remain aligned.

Pilot Hole
     Rather than have the screw threads pushing directly into the beam and chewing it up a 1/2" diameter hole was next.  This is where a piece of Oak dowel about 1/4" thick goes, it will be between the end of the threaded knob and the beam.

1/2" Hole for Oak Button

     Next up was an 11/32" hole which is the right size for the threaded insert.

Hole for Threaded Insert

     A little bit of bees wax helps take the stresses off of me and the wood -- don't want to hear that cracking sound after all the work so far!

Insert in Place

     Gorilla glue has been my choice for laminating panels together for a long time.  I really like how easy it is to clean up the foam when it's cured and it never seems to show when the piece is oiled.  A cut off from the beam was wrapped with wax paper and used to help align the two pieces.


Piece Re-Assembled

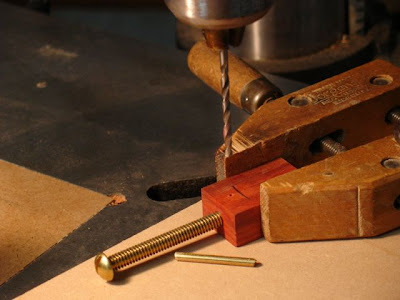
     While that was drying it was time to start on the knob.  The threaded 1/4" brass rod was epoxied into a piece of Chakte Kok.  I pinned it with an 1/8" brass rod before the epoxy set up to securely keep the knob in place.  Kind of free-formed it to where it felt good to my fingers.

Knob Beginnings


      My first setback was that when I placed the first beam made of Cherry into the hole the hole was too big!  Caused in part by some slight mis-alignment issues but really a blessing in disguise since I wasn't satisfied with the method I used to attach the Hamilton blade to the beam.  Here you can see the initial shaping of the knob as well as the Cherry beam.  I like the final version made out of Chakte Kok much better.


     Let me explain the problem with attaching the blade to the beam.  The hole is sized for a #6/32 machine screw.  The first way I did this was to cut a groove in the end of the beam for the blade to nest in.  The hole was drilled through for the blade screw and finally a 3/8" hole was cut partway into the beam.  Let me illustrate that:

Securing the Blade: Attempt One

     The nut was coated with a black sharpie so that it transferred to the plug.  Next I cut out that part of the plug and glued it into the hole and over the nut.  This worked but only once!  After that the nut slipped and the blade wouldn't tighten securely.  Okay, back to the drawing board.  On the Hamilton gauge there is a piece of brass pinned to the end of the beam but since I didn't have any brass looked around the shop to see what I could do without copying his design -- I had some aluminum!

Securing the Blade:  This Worked

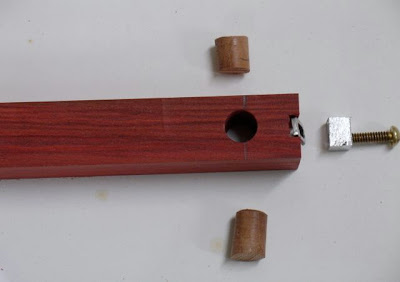
     Here's my solution, after drilling and tapping the aluminum it was cut to a size that fits into a 3/8" hole drilled completely through the beam.  Next, two Cherry plugs were cut to approximate size, the aluminum piece was inserted, the brass machine screw held it in position, and the plugs were glued in from both sides capturing the piece of aluminum between them.
     Final steps were to cut a recess for the .064 piece of brass which is screwed and epoxied to the Canarywood.  The recess was cut oversize with the tablesaw and then final sized with a rabbet block plane.  The brass extends into the hole ever so slightly which should help reduce the wear inside the hole itself.  I used a jig saw for the initial shaping of the brass followed by files and polishing.  A couple of coats of shellac and wax finishes it off and I must say -- I'm a happy camper!  Can't wait to actually put this to use.  I have a student later this week learning how to do dovetails so this will be put to the test.

Parts for the Marking Gauge


Thursday, September 6, 2012

Table Saw Tune Up


     I mentioned in my last post that it seems to be time to check the alignment of the blade to the table and the fence to the blade.  I purchased an inexpensive dial indicator from Harbor Freight and made  a holder for it to ride in the miter gauge slot.  This is uncharted territory for me, I really hadn't used these type of measuring tools since my hot rod days and machine shop part of my industrial arts education -- suffice to say; that's a long ways back!

Step One:  Table Aligned with Blade

     I was a bit apprehensive on this step knowing that it could be a real pain in the !@#%#$^!#.  Even though the runner for the holding jig fit quite snugly I could get a variation in the reading of +/- .006 by applying pressure to one side or just leaving it alone and sliding it in the miter gauge slot.  To compensate for that I applied pressure towards the same side to keep the reading accurate.  You can't see it in the picture but I placed a black dot on the blade with a sharpie, set the dial indicator right on it at the front of the blade, applied pressure to the holder and zeroed out the dial.  It was interesting to note that if I left the blade stationary and slid the indicator along it there was a variation in the measurement as I moved from the front to the back of the blade. The important measurement though was to zero out the indicator on the mark made at the front of the blade and then rotate that mark to the rear.  There was only .001 difference in those readings so thankfully, I don't need to align the table.  That tells me a lot about the quality of this Jet Cabinet Saw, I've had it for many years and do move it around by grabbing on to the table so I honestly anticipated having to re-align it.
     The next step was to align the fence with the blade and also re-adjust it to be square to the table top. This is a bit easier, just takes some fiddling around with the set screws that lock against the rail.  I found it interesting that after adjusting it so the reading was exactly the same at the front and rear of the fence there was a measurable variation of +/- .010 while sliding the indicator the length of the slot.  No doubt that's caused by uneven wear on the side of the fence but no problem whatsoever.

Step Two:  Square Fence to Table and Align to Blade

     The final step to this process was to adjust the splitter so that it was in line with the blade.  That's the one part I'm not overly happy with, it is too easy to knock it out of kilter with a board or something.  It'll do for now but if I ever get that dull moment I'll mess around with that!