


 |
| Step Stool for Connor |
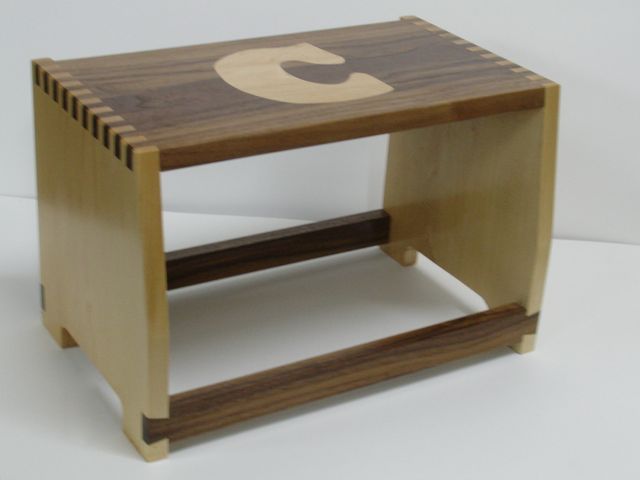
Now that Christmas has passed I can post my blog about making Connor's step stool. I must admit that it's much nicer than the one I made for his Mom when she was his age but you know, my skills have improved over that time. I used machine cut finger joints to join the top to the sides and hand cut dovetails on the stretchers for the bottom. This project was suggested by my neighbors Mom when she asked me what I was making for Connor's Christmas present. Hard to believe, but her daughter (my neighbor) was in my first class when she was in seventh grade!
 I stayed with the theme of Walnut and Maple for this step which can also be used as a stool. With it, Connor can reach the counters to brush his teeth and be a big help for Mom! To make it special I found an image on Yahoo of the letter C. I thought this was pretty cool because it's the Cookie Monster from Sesame Street and Jennifer and I watched that together all of the time.
The first step to making this was to create a template which was done on the scroll saw. By using a guide bushing set on a router I first created the recess of the letter in the top of the step stool. As you can see, the template was clamped to the top and then routed out.
 |
| Template clamped on, ready for Routing |
Once the outline was complete, a small router plane was used to remove the rest of the material inside the outline of the C:
 |
| Router Plane used to Complete Recess |
I had already made the C part out of a piece of Maple so it was glued into the recess and planed smooth:

Once I got the step stool to this point I realized I should have relieved the bottom a bit just in case it sat on an uneven surface. Now that all was assembled there is no way to cut it on the bandsaw so the only option was to use a coping saw. Heck, I've taught hundreds of students how to use one so it was a logical choice:
 |
| Coping Saw Work |
This is by far the easiest way to have two identical surfaces and contours on a project. If this cut was only made on one surface a file, spokeshave, and sandpaper would have been just fine but if you want to insure that both profiles are identical a template is the way to go. You can see I have quite a bit of material to remove but with the template clamped onto the sides, located by the bottom of the step stool and the center line both sides will be identical.
 |
| Template and Guided Router Bit |
Now comes the hard part, waiting until Christmas for Connor to open this present. Then I'll be able to post it on the blog.
Hope all of you that follow my blog had a Merry Christmas!!
Nice job, Bro. Lucky little boy! btw, I don't believe Christmas is past yet...you must have been sleepy when you wrote this blog :-)
ReplyDeleteWide awake but we opened presents early because of schedules. They'll be in CA on the actual Christmas day. Glad you liked the stool, another good project.
ReplyDelete