I have to admit that I am really pleased with myself and how this project turned out. Here's what it looks like, it's made of Canarywood and Chakte Kok:
 |
| Marking Gauge, My Design |
The gauge I replaced was a typical Marples, in my case I've had this one for probably 25-30 years.
 |
| The Old and the New |
There really wasn't anything majorly wrong with it, age had made it sloppy but my main complaint with it was how it felt when you grip it to scribe a line. That large, knurled knob is right under your finger as you wrap your hand around it. Another drawback is that the fence doesn't have much surface area and can skew as you draw it against the wood. You'll notice on my version that the knob is at the bottom of the gauge, now the hand can wrap securely around the entire piece as you scribe your line. You can see what I mean in these pictures. By the way, the blade from Hamilton Tools is perfect, forget making one out of a piece of bandsaw blade or whatever -- this slices wonderfully both with and across the grain.
See how easily my hand wraps completely and securely around this gauge?

Let me go through the procedure I went through to create this tool. I used the Marples gauge as a guide and it was about 1 1/8" thick. I had some Canarywood left over from a dining table and chairs project that was thick enough. The first step was to cut the required size and plane the edge square. I decided the best way to get the hole for the beam was to cut the two pieces, make the hole, and then assemble them together.
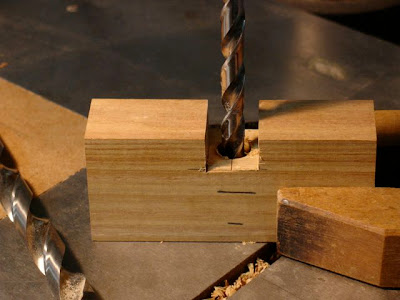
To create the hole for the beam I used a dovetail saw, chisels, and a small router plane.
 |
| Preparation for the Beam |
 |
| Pilot Hole |
 |
| 1/2" Hole for Oak Button |
Next up was an 11/32" hole which is the right size for the threaded insert.
 |
| Hole for Threaded Insert |
A little bit of bees wax helps take the stresses off of me and the wood -- don't want to hear that cracking sound after all the work so far!
 |
| Insert in Place |
Gorilla glue has been my choice for laminating panels together for a long time. I really like how easy it is to clean up the foam when it's cured and it never seems to show when the piece is oiled. A cut off from the beam was wrapped with wax paper and used to help align the two pieces.
 |
| Piece Re-Assembled |
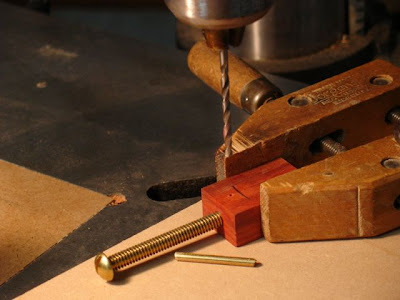
While that was drying it was time to start on the knob. The threaded 1/4" brass rod was epoxied into a piece of Chakte Kok. I pinned it with an 1/8" brass rod before the epoxy set up to securely keep the knob in place. Kind of free-formed it to where it felt good to my fingers.
 |
| Knob Beginnings |

My first setback was that when I placed the first beam made of Cherry into the hole the hole was too big! Caused in part by some slight mis-alignment issues but really a blessing in disguise since I wasn't satisfied with the method I used to attach the Hamilton blade to the beam. Here you can see the initial shaping of the knob as well as the Cherry beam. I like the final version made out of Chakte Kok much better.
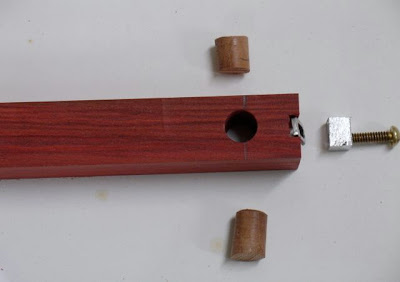
Let me explain the problem with attaching the blade to the beam. The hole is sized for a #6/32 machine screw. The first way I did this was to cut a groove in the end of the beam for the blade to nest in. The hole was drilled through for the blade screw and finally a 3/8" hole was cut partway into the beam. Let me illustrate that:
 |
| Securing the Blade: Attempt One |
The nut was coated with a black sharpie so that it transferred to the plug. Next I cut out that part of the plug and glued it into the hole and over the nut. This worked but only once! After that the nut slipped and the blade wouldn't tighten securely. Okay, back to the drawing board. On the Hamilton gauge there is a piece of brass pinned to the end of the beam but since I didn't have any brass looked around the shop to see what I could do without copying his design -- I had some aluminum!
 |
| Securing the Blade: This Worked |
Final steps were to cut a recess for the .064 piece of brass which is screwed and epoxied to the Canarywood. The recess was cut oversize with the tablesaw and then final sized with a rabbet block plane. The brass extends into the hole ever so slightly which should help reduce the wear inside the hole itself. I used a jig saw for the initial shaping of the brass followed by files and polishing. A couple of coats of shellac and wax finishes it off and I must say -- I'm a happy camper! Can't wait to actually put this to use. I have a student later this week learning how to do dovetails so this will be put to the test.
 |
| Parts for the Marking Gauge |


Its really appreciative work, i am inspired to read this post.Such a nice way to explain the process.Thanks for sharing your experience with us.
ReplyDeletewww.frederickfollows.co.uk
Thanks John, especially appreciated since you're in the business of making tools and punches. I want to make another one of these and add a radius to the bottom of the beam so it's easier to angle as I make the marks. Another day, another project but seldom a dull moment!
ReplyDelete