Showing posts with label Faux Barrister Bookcase. Show all posts

Wednesday, September 14, 2011

Ready For Delivery

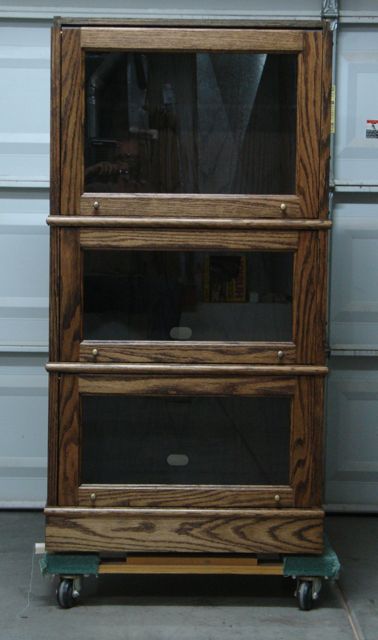
     I'm happy to say that the Faux Barrister Bookcase is ready for delivery however; the weather is just not going to cooperate!  After bemoaning how hot is was last month and the delays in gluing up, now it's raining and I really don't think it's wise to give it the water test.  I spoke with my clients last night and they're excited to get their piece but patient too.  Here's a couple of pictures that I took in the shop last night, unfortunately I couldn't assemble the piece by myself so for now we'll just have to use our imagination as to how it'll look as one piece.  I'll definitely take my camera and try to get some photos in their house.
     There's quite a difference in the overall appearance of the unit with the doors, knobs, and glass installed.  The oval shape you see is the access for electronic cables, there is access inside of each unit to allow flexibility. It's pretty obvious now but once the unit is placed into the media niche and things are put into it it won't be seen.
Upper Unit

     I'm sure thankful for the furniture dollies that Harbor Freight sells so cheaply, they make a world of difference in being able to move pieces around the shop to where I want them.

Straight on View

3/4 View


One of the main items destined for this unit is a turntable.  It'll be housed in the largest area. The placement of it pretty much determined the spacing and sizes of the remaining shelves.  We wanted it to be at a comfortable level for easy access to the turntable.


From this 3/4 view you can see how the molding creates the illusion that these are separate units, just like traditional Barrister Bookcases would be.  You can imagine how this look will continue once the upper unit is placed on top.  The custom molding that wraps around it like a skirt will conceal the material of the top of the base unit and give the appearance of one, continuous bookcase.


     We were talking about doing custom furniture work in my class yesterday and we all agreed that the final steps of a project seem to take the longest.  It sounds quick and simple to say; "all that's left is putting on the doors, back, and hardware" when in reality these things are quite time consuming and have a fair share of head scratching!  For example, let's look at the brass pins used for the doors to pivot and move on:

Cutting Pins
The process was to first use wooden dowels to check for side play of the door.  Since I used jigs and stops to drill the pin holes theoretically everything should have been the same.  They were pretty darn close, that's where being careful through out the building process pays off.  What was involved was to first create a bevel on the both ends of the pin (1/4" brass rod), cut it to the required size using the jig shown in the picture, and then using some super glue and a hammer to gently coax the pin into the sides of the door.


Roller Set-Up

The door needs a means of support at the front of the case as the pin travels in the groove.  Traditionally all that is required is a dowel but I decided to add a small roller thinking that it would make the action a bit easier, especially on the larger doors.  Placement was critical and needed to be consistent on all doors.  With this jig that was accomplished, seems like I contorted myself into some weird positions to get this done.  It wasn't bad on the larger doors but the smaller they got the less room I had for my hands, drill, and head!


Set-Up for Catches
The final step to the door process was to locate the catches in the exact, same location so the reveal on all the doors would be consistent.  Rather than trying to measure this for each door I devised a method to hold the doors at the same location while locating them.  Again, fairly easy on the bigger doors but the small ones were tougher to get in to.  I like using these brass, double-ball catches that can be adjusted for tension and allow for some slight movement due to weather conditions.


     All in all, I'm happy with how this project turned out.  Building custom furniture is always a process of learning and doing research to accomplish what your client wants and the vision you come up with to meet that.  I'd be bored to death if someone wanted me to build ten of these for them, might as well go into production then!  Anxious to get this piece delivered and go on to the next project.  It's going to be a bit different as I set up an Etsy store to sell and market the custom eyeglass cases I've made.  Seems like just the thing for a unique, one of a kind, Christmas present for somebody!

Sunday, September 11, 2011

Coming to the HomeStretch and Using MinWax Wipe On Poly

     Work continues on the bookcases, almost done with the finishing process.  I'm trying a new product from MinWax (new to me) which is a wipe on, polyurethane.  For my solid wood furniture I typically use a natural oil finish that is top coated with a multiple, hand applied finish.  For solid wood, the sheen and feel of the wood is beyond compare.  When using cabinet grade sheet goods, even the best quality ones that you can find, the veneer simply isn't thick enough to achieve the same sheen.
     The concern for woodworkers everywhere, when it comes to the finish, is how to apply it and not have it become contaminated with dust during the drying process.  Dust is a big enough issue here in the desert but now add the typical woodshop environment and you compound the issue considerably.  The wipe on poly eliminates that concern completely.  It's simply wiped on with a clean, cotton rag and dries so quickly the dust doesn't have any time to settle.  A plus I discovered with it is that it will remove any stain that has dried on the surface or oozed out of the pores.  If you've ever stained Oak, that tends to be a problem.  Oak is so porous that it'll allow the stain to settle below the surface and then ooze out and harden sometime over night when you're not there to wipe it off!  In the past, you would have to remove this with some solvent before applying your top finish.  In any case, the Wipe On Poly works well.  A very light sanding between coats is all that's required.
     At this point, everything has three coats except for the base unit which only has two.  The glass wasn't ready for pickup on Friday (think they went home early) but it'll take some time to install the doors and get them adjusted.

Base Unit


Upper Unit
Being able to move the unit around on furniture dollies is a big plus.  Since the backs won't be attached until the doors are in and adjusted it was easier to get to the entire unit and see what's going on in there.


This has three coats of the Wipe On Poly, I like the way the crown molding and the skirt came out.  Even though these are new units I think they have an aged appearance and will look like my client has had them for years, maybe passed on from generations past!

The door frames are ready to have the guide pins, knobs, and glass installed.  The pieces laying in front of them are the door stops that will limit the travel of each door as it slides back into the case.


Door Frames

Monday, September 5, 2011

Cases are Almost Complete!

Cases Together
     Things are coming together and here is the proof of that.  This is the entire unit with the doors loosely set into place so that I could see how the grain pattern would look on the completed piece.  The only thing missing now is the cap that goes onto the front edge, as it is you can still see the plywood edge.  In the background are the panels for the back of each case, they're stained and ready for the finish coat of satin polyurethane. What's been completed so far represents about forty hours of work.  It's kind of like running a long race, at first you just feel like you're slogging along but then you realize you've covered 30-40 miles.  The final stretch always takes a bit longer than you think it should but victory is close and sweet!
     Designing this project had some interesting challenges.  The first was how to design a cabinet that had the appearance of separate Barrister Bookcases but it needed to have different sized shelving areas to accommodate the turntable.  That'll be housed in the center area.  At 80+ inches tall, it would have been too difficult to build and move as a one piece unit so I came up with a way to hide where the two pieces come together.  It separates right above the turntable area.

Using Wax Paper to Prevent the Glue from Joining

Close up of Case Joint Molding
The molding at the case junction is similar in profile to the crown molding.  It is attached to the upper unit which simply slides into position.  To attach it, I put wax paper between the two cases so the glue wouldn't ooze out and attach them -- that could have been a major problem!  These were glued and clamped, and reinforced with a few biscuits for strength.


     In this close up view you can see that there is a slight relief cut on the bottom of molding to help it clear the lower unit.  This is looking at the back of the cases.  The groove visible on the bottom case is what the door pin will slide in.


Guide Block Attached to Door Front

     The challenge of making custom pieces is that no two of them are alike.  To be sure, there are certain operations in woodworking that are the same no matter what the final project will be but usually, each project has it's own set of challenges that need to be solved.  One of those challenges for this project was how to accurately lay out and drill the holes required in the doors.  It was critical that each one was in the proper location or else the doors wouldn't function the way they should.
     To solve that problem I made a guide block that was clamped in line with the top of the door.  Since it's always difficult to measure to the center from both faces the best way to align this block was to the front face of the door on each side.

Drill bit with Stop Collar

     This meant there had to be two holes so that when you flip it to the opposite edge it would line up.  Maybe sounds a bit confusing but not so bad, you just have to keep it in mind as you drill the holes.  By making the guide block on the drill press I was guaranteed a straight hole.  In practice the guide block is first clamped to the door, then the drill bit is inserted into the hole and it's drilled until the stop collar contacts the guide block.


     Now comes the finishing operations.  It's critical that the brass pins used to support and guide each door are a certain size.  My plan is to use wooden dowels first to check the operation and then cut the brass pin the exact, same size.  Because of the nature of wood, there is bound to be some variation in these things but hopefully not too bad.  The brass pins will be attached with either epoxy or crazy glue, I need to do a mock up first.  I'm thinking that the crazy glue would be better because it's thinner than the epoxy so there shouldn't be a problem with it oozing out and showing up on the finish.  Theoretically, they shouldn't go anywhere once they're inserted into their holes.
     Now comes the finishing procedures, this will require quite a bit of sanding since it's made of cabinet grade plywood rather than solid wood.  For solid wood I generally smooth the surface with hand planes -- can't plane plywood!  I'll order the glass tomorrow but I also start teaching the hand tool class at WoodItIs school here in Las Vegas -- really looking forward to that.  I'm hoping that work and weather will cooperate and I'll be able to deliver the completed project in a week.  My clients schedule has him off on Mondays so that's the best day to shoot for completion.  I'll keep you posted.

Friday, September 2, 2011

Visible Signs of Progress

     After my whining about the weather and not being able to do any large scale glue ups due to the heat, I've finally been able to accomplish them.  Must admit, it always feels good to see the progress once you put things together.  Most projects, and this was no exception, have lots of preliminary ground work before a project actually takes shape.  One of the things that took a good deal of time was cutting and shaping all of the profiled moldings.  The other thing that has taken time was cutting the carcass sides to size as well as  the dados required for the shelves.  Pretty much like making your own jig saw puzzle to get a well constructed project.
   

Dry Fit and Pre-Drilling of Upper Unit
The first piece assembled was the upper unit, it was small enough and basically only had six long joints.  The process was to locate the screw holes on the inside of each dado then clamp the pieces together.  Next I could drill and countersink the holes from the outside of the case.  It was no problem gluing and attaching the shelves to one side, one at a time.  My concern was attaching the other side and having 3 shelves to glue/screw into the opposite side at one time.  With careful planing and keeping cool and calm this went well.  No matter how many glue ups or assemblies I do, it's always a time of stress.  All of your work up to that point can be wasted if things go wrong.


Jig Used to Support Side Molding

     After the glue set (over-night) it was time to miter and attach the moldings which finish off the case.  The front pieces are reinforced with several biscuits, the side piece conceals the screws used to assemble the case.  I made a simple T-square to hold the molding in place on the sides.  Always difficult to hold and nail a piece that's covered in glue but this went without a hitch.
     Creating the crown molding was another custom part of this project.  The existing media niche that the unit will fit into limits how big of a crown we can have.  Although a crown is not normally found on a barrister bookcase it works all for this design.  Simple, yet "crowning" and it mimics the side molding.  Molding of a similar design will be used where the two cases sit on top of one and other.  This will hide the seam.

Crown Molding
Cutting all of the miters can be tricky and since I want them to be as accurate as possible I always clamp them down on the miter saw, sure it takes a little more time this way but there's no chance of the wood creeping forward as the blade cuts it at an angle:
Close up of Miter Cutting with Clamp
     Two days ago the weather cooperated and I was able to assemble the base unit.  I laid it flat on the torsion box assembly table and used the same process used on the upper unit.  Only big difference here is that instead of there being 3 shelves, this unit has one more and is about twice the size!  After joining one shelf to a side I clamped it squarely onto the table and added the next ones.  Little tricky putting all 4 shelves into the opposite side with glue and all but things went well.  The large clamp running across at a diagonal is there to insure everything dries as squarely as possible.  There is a 1/2" plywood back that will fit into the rabbets on each side of the case to maintain the integrity of the entire unit.
Base Unit

Door Frame for Turntable Area


     Last of all, this afternoon I was able to glue the five doors together.  Did these one at a time on the kitchen island; know what?  I could get used to working in air conditioned comfort!

Sunday, August 28, 2011

Refining the Profile, Use of a Story Stick, and Waiting for Cooler Temps

     Have I mentioned how hot it's been lately?  Seems like my shop time is dwindling down but I'm still moving forward.  One of the things that's most enjoyable about doing custom, one of a kind work, is that you create pretty much every part of the project.  I guess that's what it means when something is referred to as "Custom".  Many times you can find things that'll work but more often than not, it's up to the individual craftsman to make what is needed to complete your vision.  Case in point is the molding that will make it look as if the bookcases are separate units, here's a close up of that profile:


See the Difference?
The black thing in the back is what's called a tadpole sander.  These are rubber profiles that can be used to  refine or sand a shape that's been cut.  Look closely at the pieces of molding in the back --- see those faint lines running perpendicular to the grain?  Those are marks left by the shaper cutter and are commonly referred to as chatter marks.  By comparison, check the piece in front -- they're gone right?  In most mass produced furniture and moldings you'll still see these marks.  They're virtually unavoidable because of any slight variation in the cutter or run out in the bearings but very time consuming to remove.  Here's a close-up of the profile for this bookcase:

    Although the tadpole sander isn't a perfect match it flattens out when you put some pressure on it.  At this point the molding has been completely sanded with 120 grit paper.  Once the piece is assembled it'll be completely sanded with 150 - 220 grit paper prior to finishing.  As much as I prefer a natural oil finish, this piece will be stained to match the other units the client has already.


In between the times I spent whining about the heat I also managed to sand all of the pieces that will make up the bookcase.  In my construction technique I prefer to use joinery to "lock" pieces together.  When using sheet goods like on this project a good choice is tongue and groove joint.  I find it hard to believe that much of the knock down furniture available from the so called big box merchants use particle board and relies on a butt joint and screw to give it strength!

Story Stick
In the  photo above you can see how these units will go together.  What we have is the top of one of the side pieces with the groove for the shelf to fit into.  The piece that says "back" is the story stick.  I needed to locate 4 holes to secure each shelf, top,or bottom to the case sides.  Rather than measure and mark the location numerous time,  you mark them once on the story stick and use it to locate all of the required holes.  These are drilled from the inside of the case.  After temporarily clamping the unit together I'm able to drill and countersink for the screws from the outside.  The way I've designed this unit is that the molding I talked about earlier will cover the screws.  Should work like a charm!
Here's the first look at the top unit, clamped together, pre-drilled, and waiting for a cooler temperature so it can be assembled.

First Look


Thursday, August 25, 2011

Shaper Work

     For some reason, probably well deserved, the wood shaper is not a tool you'll find in too many small size shops.  Even as a teacher, I only had one at a high school I taught at until they decided to eliminate the program and turn the shop into a weight training room for the football team!  I know one of  the reasons shapers are scarce -- they'll completely mangle a finger or hand or whatever else it may come into contact with.  Sounds gruesome but a tablesaw, on the other hand, will slice a part of you off and it can probably be re-attached!
     I have an old Rockwell model, probably produced in the 50's that I traded for some work many years ago. It's a one horsepower, 1/2" spindle but I've used it to make numerous doors and also for pattern shaping on chairs, legs, etc.  Here's a picture of it with the parts for the barrister doors stacked behind it:

Coped Pieces for Doors
Years ago I bought a set of matched cutters from Freeborn and they're worth their weight in gold.  Actually I have two sets of these cutters, one is a more provincial style and the other more streamlined.  That's what I chose for this job as well.  Shaping these pieces reminded me as to why I prefer working with woods other than red Oak -- it's very splintery, almost felt as if I needed a flak jacket with pieces going every which way!

Close Up


     I feel comfortable enough using my shaper.  The yellow wheels are excellent in preventing kickback and also holding the piece firmly onto the table.  You can see that a lot of material is being removed at one time so a steady feed pressure is called for.  In a production shop there would be a power feeder to control the stock and rate of feed. Maintaining a steady rate of feed is important in determining the final finish on the wood when using a shaper.
     Since the temperature is not going down any time soon I really can't start assembling the case.  In the morning I'll cut the pieces to final width and start the process of sanding all of the pieces of molding.  I left the case sides and shelves an inch or so wider than needed so that I could rip clean edges after running  the dado head for the grooves.  Making good progress, now if only it'll cool down some so the assembly process can begin.

Tuesday, August 23, 2011

Lessons from the Mock Up

     I made quite a bit of progress in the shop today and wanted to go back out tonight but the thermometer scared me off!  Really glad there's not a tight deadline on this project and it helps that my client is a "car guy" so knows only too well what it's like working in our desert heat.  Last night I almost had the mock up complete and if there's one thing I've learned it's that the tolerances/clearances in a barrister bookcase leave very little room for error.  There is a type of complicated mechanism that looks somewhat like a scissor jack and is supposed to control the travel in the door by keeping it parallel.  I haven't read too much positive about that system other than it's very tricky to make, install, and keep running smoothly.  I suppose that a barrister type arrangement is suitable for what it's designed for; occasional access.  Drawers are designed for frequent opening and closing so their design is totally different.
     Anyway, here's a few pictures of what's been done to date:
Door Close Up
Here you can see the groove that the pin will ride, this is the heart of how this works.  What's critical is that there is a minimum of play between the end of the pin and the wall of the groove.  I'm using brass rod for the pin.  Once the cabinet is assembled, I'll need to design a molding that will cover that groove and also prevent the door from coming out.  The door will be installed through the back of the cabinet before the knobs are attached.  Once all of the doors are installed the back is screwed on.  Should it ever be necessary to remove a door, the back can be unscrewed, knobs removed, and then it will be removable.  Not something you ever want to do but you need to leave yourself an exit plan!


Over-all View of Mock Up, Plans, & Parts


Here's another view of the mock-up with the plans behind it.  As you can see, this will be a fairly tall unit.  You'll notice the middle section of the case is considerably larger than the others.  This is where the turntable will be housed.  The lines drawn on the door were to give me a visual for determining the width of the stiles.  Turns out that 1 3/4" looked about right!


 The last major bit of work completed today was to cut all of the pieces required for the doors.  They've all been brought to a uniform thickness with the planer but I always surface each one with a hand plane (#4 Smoother).  In my opinion, a machined surface just doesn't compare to what you can achieve with a good, sharp hand plane. The coping cutter is set up on the shaper so that's where we'll start tomorrow.  A good practice is to make extra pieces which I did. Oak can split pretty badly when you use a shaper or router on it, it seems to never fail that if I make a few extra pieces at this time I won't need them.  If I take a chance and fail to make extra stock I have a problem and have to start from scratch -- isn't that Murphy's Law?

Sunday, August 21, 2011

Latest Commission: Barrister Bookcases

     I recently met with a client that asked me to make a Barrister's style bookcase to fill a media niche in their home.  Happy to say that after we discussed the project and their requirements for it they accepted my bid and now it's off to work.  I'm going to refer to these as a faux Barrister bookcase because there are some major differences in the design.
     Traditionally, barrister is a term used to describe lawyers.  Before the advent of the internet lawyers had collections of books to research their cases.  As you may imagine, the longer they practiced the more extensive this collection of books became.  The Barrister bookcase was developed as a way to add cases as they were needed.  One unit stacks on top of the next.  Another feature is the glass panel in front that slides up and into the top of the case to allow access, this also minimizes dust.  My client has several of these cases already so this one will add to them.  The main difference is that I'll build it as two, stackable units that will be 80" high.  One of the primary uses for the case will be to house a turntable so the center unit will be considerably taller than the rest --- there comes the challenge!
     Using a cabinet grade, Red Oak plywood will simplify the construction of the case but it also requires using mechanical fasteners (i.e. screws) rather than glued, traditional joinery.  The doors will be a traditional coped frame.  To conceal the screws and to replicate the cases being separate units meant I needed to design some type of molding.  I spent much of the morning yesterday doing just that.  After planing the material down to 5/8" thick, I formed the profile using a router.


  Each piece required four passes, increasing the depth of cut each time.  The mantra for this is to keep a slow, steady feed to achieve the best cut possible.  There will still be a lot of sanding with the tadpole sanders to smooth the profile to meet my standards!  You can't see it in this photo but I'm sure glad the router fence I made has a port on it to attach the shop vacuum.


Here's a close up of the molding, what I needed to do was raise the bit and make it wider than needed to maintain a flat, square edge.  Once the desired profile was cut, the molding was ripped to about 1" wide.
     The remainder of the afternoon was spent cutting the casework pieces and dado's in them for the joinery.  One of those days where you get so involved in what you're doing that you don't notice the temperature hitting 102 degrees!  My first clue is usually that I see these wet spots on the wood caused by my sweating all over it.  Quit work around 4pm and completed the order for the hardware.  Anxious to see how the work progresses today after church.  Sure am glad that I probably won't be doing any assembly next week as the predictions are for our temps to hit 110+, can't work fast enough to keep the glue from skinning over before clamping the work together!