


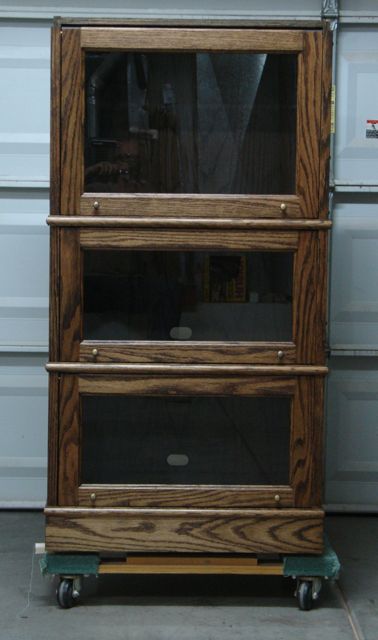
There's quite a difference in the overall appearance of the unit with the doors, knobs, and glass installed. The oval shape you see is the access for electronic cables, there is access inside of each unit to allow flexibility. It's pretty obvious now but once the unit is placed into the media niche and things are put into it it won't be seen.
 |
| Upper Unit |
 |
| Straight on View |
 |
| 3/4 View |
One of the main items destined for this unit is a turntable. It'll be housed in the largest area. The placement of it pretty much determined the spacing and sizes of the remaining shelves. We wanted it to be at a comfortable level for easy access to the turntable.
From this 3/4 view you can see how the molding creates the illusion that these are separate units, just like traditional Barrister Bookcases would be. You can imagine how this look will continue once the upper unit is placed on top. The custom molding that wraps around it like a skirt will conceal the material of the top of the base unit and give the appearance of one, continuous bookcase.
We were talking about doing custom furniture work in my class yesterday and we all agreed that the final steps of a project seem to take the longest. It sounds quick and simple to say; "all that's left is putting on the doors, back, and hardware" when in reality these things are quite time consuming and have a fair share of head scratching! For example, let's look at the brass pins used for the doors to pivot and move on:
 |
| Cutting Pins |
The process was to first use wooden dowels to check for side play of the door. Since I used jigs and stops to drill the pin holes theoretically everything should have been the same. They were pretty darn close, that's where being careful through out the building process pays off. What was involved was to first create a bevel on the both ends of the pin (1/4" brass rod), cut it to the required size using the jig shown in the picture, and then using some super glue and a hammer to gently coax the pin into the sides of the door.
 |
| Roller Set-Up |
The door needs a means of support at the front of the case as the pin travels in the groove. Traditionally all that is required is a dowel but I decided to add a small roller thinking that it would make the action a bit easier, especially on the larger doors. Placement was critical and needed to be consistent on all doors. With this jig that was accomplished, seems like I contorted myself into some weird positions to get this done. It wasn't bad on the larger doors but the smaller they got the less room I had for my hands, drill, and head!
 |
| Set-Up for Catches |
The final step to the door process was to locate the catches in the exact, same location so the reveal on all the doors would be consistent. Rather than trying to measure this for each door I devised a method to hold the doors at the same location while locating them. Again, fairly easy on the bigger doors but the small ones were tougher to get in to. I like using these brass, double-ball catches that can be adjusted for tension and allow for some slight movement due to weather conditions.
All in all, I'm happy with how this project turned out. Building custom furniture is always a process of learning and doing research to accomplish what your client wants and the vision you come up with to meet that. I'd be bored to death if someone wanted me to build ten of these for them, might as well go into production then! Anxious to get this piece delivered and go on to the next project. It's going to be a bit different as I set up an Etsy store to sell and market the custom eyeglass cases I've made. Seems like just the thing for a unique, one of a kind, Christmas present for somebody!
No comments:
Post a Comment