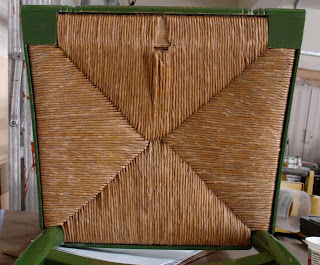
Well, here's the other chair in its' finished state just waiting for a ride home. This was a good challenge, I've woven a seat before using a natural grass material but this is done using paper fibre rush. It's very uniform in size but more rigid than a natural material so weaving the final bridge section of the seat was difficult -- I have achy fingers and hands to prove it! After two thin coats of shellac it was ready to re-attach the moldings to the sides, front, and back. I wasn't able to keep the nails from popping through but that will just add to the aged, antique quality of the chair although I will see if I can find a touch up for it.
After I delivered the two chairs I picked up an antique table that needs a bottom shelf, which will be caned and also a wooden waste basket that needs to be redone. The basket has an oval of the manufactured cane that I will re-caned to match the table and the other chairs. My client didn't realize that the table was also missing a drawer, that side was against the wall. That may be another part of the project, either a false front or a complete drawer assembly will be required.
Even though my main interest is doing new work I'm glad I've taken these projects on. I can't help but think it's a God thing, He's providing me with work even in these economic times and I'm learning new skills and keeping busy.
Monday, January 31, 2011
Saturday, January 29, 2011
A Tale of Two Chairs
Here we go with the tale of two chairs, my apologizes to Charles Dickens! The two chairs I'm re-doing are quite different even though they're from the same manufacturer, Hitchcock. I completed the one on the left yesterday and it's done with pre-woven, manufactured cane. After soaking the cane for a couple of hours it was wedged into a groove which runs completely around the seat. A tapered spline is then glued and forced into the groove to keep it in place. Now that the caning is dry the seat is as tight as the proverbial drum and ready for another half century of sitters.
I've just started on the chair on the right and am breaking for lunch. It has a woven seat and will be done with a Fibre Paper Rush. I've only used sea grass in the past and this fibre is a manmade material that is woven in a spiral pattern. You need to be careful not to unwind the spiral as you weave the rush around the seat. The only part done so far is the front corners which needed to be filled in before going to the back. As is typical in chairs, the front is a bit wider than the back so the first step is to square it up. This chair has painted, wooden slats that will cover the front, back, and sides. I was fortunate to be able to loosen the glue and wedge them off without popping the nails. Keeping my fingers crossed that I'll be able to re-install them into the same holes without popping them back through the front and ruining the existing paint.
If anyone has a chair they need to re-cane or a new caning job I whole heartedly recommend Mike Frank who is the owner of Franks Caning. He has been in Southern California for years, has great service with quick shipping. The best part is that you can call him and he answers the phone! No recordings or anything, another big plus is that he's more than happy to give you advice and help on your projects. That's the kind of company I like to do business with.
Thursday, January 27, 2011
The Initial Carve
Here's the progress on the carving for the lid on the chisel chest. As a beginner and mostly self-taught wood carver I'm never sure if what I'm doing is the correct way or not! This is a book-matched panel, you can probably tell that by the whitish streak running down the center. I used a technique from a carver friend of mine and routed a cove to have a positive area to end the carving. At this point it's mostly ground out but I still need to smooth the background, the photo helps make the areas that need attention show more. This is a tricky piece of Cherry to carve, sometimes it seems as if it's easier to use the chisels, especially a large skew, by going across the grain rather than trying to figure out which way the grain is going. You can tell by the grain pattern that this piece has some interlocked grain so probably not the best piece to practice on -- it's all a learning experience.
I've been splitting my time between this and cleaning out the spline and cane from one of the chairs. Constantly putting the water/vinegar solution in the groove, letting it soak, and then scrape out more of the glue residue. Went to Harbor Freight last weekend and picked up a complete, professional grade, Chinese quality set of 11 carving chisels for only $5.99 + tax!!! I think they drug them behind a car to create the cutting edges on the pavement, they are rough. But, for what I needed they work great. I modified a couple of them so I could pry out the caning in the seat and also as a scraper to fit into the tapered groove and scrap out all of the glue. The cane came this afternoon so may decide to tackle it tomorrow after reading up on the skills I need. One thing I hadn't thought of is how bright and new this one chair will look compared to the others, maybe I can mix up some shellac with tints to replicate some age.
That's what's been going on in the shop. I didn't get the bid for the TV console table, there were some design issues with it but the time wasn't wasted and I learned from doing the drawing and research. Something else will come along -- no worries!
Sunday, January 23, 2011
Not the best Multi-Tasker but ... Why Not?
This has been an interesting weekend for my woodworking. First of all, as you saw in my last post, the What Not Cabinet has been returned to it's owner. I saw it this afternoon after she had rubbed in a few coats of lemon oil and I must admit, it's really looking good! The reason I was there was to return three of the five chairs they had brought to me. It was decided to just repair the two that needed it the most and leave the others alone. Here's what I'm looking at:
These two chairs are fine examples of the Hitchcock Chairs manufactured in Connecticut. This is a long time furniture manufacturer and are very collectable, do a Google search and you can learn a bit of their history. At this point I've removed most of the spline from the pre-woven chair which took a couple of hours while soaking it with a solution of vinegar and water. I'll order the cane, rush, and spline tomorrow. That's job one.
Then on Saturday afternoon I met with a potential client who needs a TV console table with some interesting custom features. What was helpful is that she has a definite idea of what she wants from a catalog picture, now the challenge will be to be competitive with a solid walnut piece vs. China mass produced laminate. I'm up for the challenge, she knows what she wants and quality is on her list. I'm confident I can deliver!
The last item for the weekend was to make the dividers for the chisel chest. I'm also working on the carved panel for the top lid. Here's what it looks like:
The very top section doesn't have any finish on it yet because I need to complete the carving and glue it together. I'm liking what I see and will be happy to have this complete and store my chisels safely. Having them in drawers will keep them from falling out of the leather rolls when I take them out of the cabinet.
Why do they always have to hit the concrete on the cutting edge?
![]() |
| Hitchcock Chair, Pre-woven Cane |
![]() |
| Woven Rush Seat |
These two chairs are fine examples of the Hitchcock Chairs manufactured in Connecticut. This is a long time furniture manufacturer and are very collectable, do a Google search and you can learn a bit of their history. At this point I've removed most of the spline from the pre-woven chair which took a couple of hours while soaking it with a solution of vinegar and water. I'll order the cane, rush, and spline tomorrow. That's job one.
Then on Saturday afternoon I met with a potential client who needs a TV console table with some interesting custom features. What was helpful is that she has a definite idea of what she wants from a catalog picture, now the challenge will be to be competitive with a solid walnut piece vs. China mass produced laminate. I'm up for the challenge, she knows what she wants and quality is on her list. I'm confident I can deliver!
The last item for the weekend was to make the dividers for the chisel chest. I'm also working on the carved panel for the top lid. Here's what it looks like:
The very top section doesn't have any finish on it yet because I need to complete the carving and glue it together. I'm liking what I see and will be happy to have this complete and store my chisels safely. Having them in drawers will keep them from falling out of the leather rolls when I take them out of the cabinet.
Why do they always have to hit the concrete on the cutting edge?
Tuesday, January 18, 2011
Deterioration Arrested?
Well, here is the completed project and I believe we have arrested the deterioration. It turned out to be a very interesting yet educational project. I have a much better understanding of the properties of wood and how it reacts to moisture and temperature change. This cabinet started life at least 100 years ago in the Northeast part of our country. For us desert rats, this is where humidity changes with the seasons and moisture is problematic for furniture. Sure, we get some humidity swings with the monsoons but as a general rule, we're pretty even "tempered". As a furniture maker I understand the way wood moves and try to design accordingly but now I wonder how my work would hold up if it went to New York or Maine.
As an example, the back of the center unit is made of a couple of boards laminated together. It was simply nailed on but has shrunk to such a degree that it no longer covers the opening! It was attached with brads that were clinched over but the wood had pulled through leaving slots. At the top and bottom I was able to use a small brass screw and washer to hold it to the case. Another problem was previous repairs that were done through the years. On the sides a screw was driven to hold a bracket in place. One side the bracket was cracked but still there and on the other the piece was gone. I made a replacement piece and did what I could to make it match. Thankfully it's underneath and in the shadows but let's just say it won't pass The Antique Roadshows group of experts!
In a few other places repairs had been attempted with a nail and judging by the missing pieces whoever wielded the hammer missed the nail a time or two. Using the 23 gauge pin nailer made it much easier to attempt to hold pieces together. I'm a firm believer now in using hide glue. Previous repairs done with a yellow or white carpenters glue were very obvious. Around one of the round mirrors the frame was in about 5 pieces and caked with the residue of the glue. Trying to scrape it off to prepare it for gluing resulted in pieces of the old, brittle wood coming off with the glue. The hide glue would re-dissolve when I used a solution of vinegar and water just warmed in the microwave.
All I can say at this point is that I'm glad I decided to take on this project and although far from perfect, I think I've met the clients goal of having the piece structure intact without ruining the patina built up over all this time. That was another lesson, I was really able to see where the spots were that didn't get a complete cleaning or dusting. Re-assmbling the parts without making it look like a new repair was a challenge. It took just under 9 hours to complete the work.
Monday, January 17, 2011
All Clamped Up and No Where to Go
Another good day of progress on the restoration project. Started off buying the pin nailer and it's well worth it. There are some places on the cabinet where someone had made a repair by using a finish nail or brad and inevitably that's also a place where the wood cracked. With a 23 gauge pin it's almost invisible, I have some furniture markers and a swipe across the hole should conceal it completely. Re-assembling this gallery was quite the trick!
It's made up of 5 pieces and they all had to be installed at the same time. Two side pieces, two posts, and then the front -- all doweled together. Over the years they have cupped, warped, and otherwise changed shape since it was originally put together which added to the complexity. I ended up supporting the side pieces with a couple of clamps then glue the posts to the front, hold that and attach it to the side pieces, brush glue on the cabinet portion and then try to hold all of them together and find the dowel holes -- whew! It worked okay, then it was a matter of clamping with just enough pressure to hold it in place but not so much that the wood will crack. Tomorrow afternoon we'll see how it holds. Next is to reattach the curved and carved molding that goes under the shelf. There's a return piece missing so I'll more than likely try to replicate something to fill the space. Good education putting this together and seeing how it was done in the 1900's.
By the way, in the background you can see the tool chest I've been working on as well. I put the first of 4, hand rubbed top coats on it this morning. A friend of mine, Vince, came over to learn about this finish so that made the morning enjoyable.
Sunday, January 16, 2011
Back Together
Progress went well today on re-assembling the cabinet, couldn't have done it without Diane's help though. The cabinet measures 40" wide and my arms just aren't quite long enough to hold the clamps in place. I'm sure that this piece was originally put together with hide glue because when I cleaned the joints and dowels with warm water and vinegar I could feel it redissolve and become sticky again. My thoughts are that it can only help make a better bond. It was tricky trying to line up a dozen or more dowels in such a long piece but all went well. Here's what it looks like now:
It seems to me that one reason the unit failed is because there isn't any member of it going the full width, everything is left to dowels to join it together. Essentially it is three separate pieces joined with the dowels so any unevenness in the floor would cause joint failure. I didn't want to add any mechanical fasteners to the already brittle wood so decided to cut some glue blocks to reinforce the bottom. I sanded first to clean the area and then made some 45 degree pieces out of alder and glued them in place. At worst, future settling and movement may cause them to fall off but at least it won't cause any damage to the piece. In my experience I've never seen a glue block like this fail.
In the foreground you can see some of the bric-brac that I need to replace for the gallery at the top. See the bracket hanging loose at the left edge, that's another part that needs to be reattached. First thing tomorrow I'll be headed to Woodworkers Emporium to buy a pin nailer. They have the new Porter Cable model that can shot a 1 3/8" pin. Sure hope they're open since it's MLK Day.
Subscribe to:
Posts (Atom)


