


In my desire to build my carving skills I enrolled in an on-line class taught by Mary May. I had seen an episode of the Woodwrights Shop that featured her and enjoyed her style and delivery. She has been written up in a number of woodworking magazines and has several YouTube videos as well. When I first heard about these on-line instructional methods I must admit I was a bit skeptical. That's probably based on my own experience as a classroom teacher for 31 years! In any case, I enrolled in the program a few months ago and at $10.00 per month I'm finding it well worth while. Here's a LINK to her web site if you want to check it out.
One of the on-line courses was one on carving a Camellia. Her lessons are broken up into different phases and include a downloadable pattern and tool list. Like many people, I prefer to have an end use for my practice work (used to hate practicing my trombone alone in a little practice room) and thought of a way to have my practices carvings be useful. I decided that any carving that is "suitable for human consumption" could be used as a lid on boxes in my Etsy store. Depending on the wood used I could leave it alone, stain it, or gild it. In the case of the Camellia I chose to gild it since it was carved on Basswood. Here it is in the beginning stages.
 |
| Rattle-Can Clay and Quick Size |
Next up is to use either a fine (400+ grit) sandpaper or steel wool to burnish the cured primer. You will actually burnish it so the gold leaf will be quite shiny. Now, before I forget; when we talk about oil gilding it's almost always done with what's referred to as composition metal or Dutch Gold -- not precious 18-23kt. which is accomplished by a process known as water gilding. After the piece is burnished, blow or tack cloth off all traces of dust and apply a very thin, even coat of quick size. Depending on the brand, quick sizes usually have a working time of 1-3 hours.
To know when your size is ready for gilding, use what I refer to as the knuckle test. You rub your knuckle over the surface and it should kind of squeak as you drag it across. Remember dragging your thumb over a desk when you were a kid? That annoying sound it made is what you're after.
 |
| The Knuckle Test |
 |
| First Sheet |
 |
| Remaining Sheets |
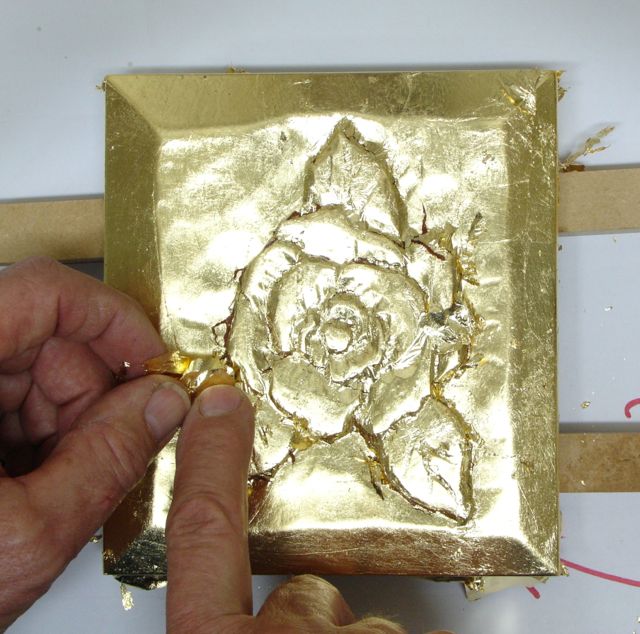 |
| Patching the Faults/Cracks |
Let this all dry over-night. For this one I plan to use a technique that, hopefully will interest you. A gilded surface is rarely left bright and shiny. You'll need to wait for my next blog to see what I plan to do with this one. I know this was brief but feel free to contact me with any questions or details you'l like to know more about.
No comments:
Post a Comment