Wednesday, November 14, 2012

It's Official: Winter has Arrived in Las Vegas


Winter Over-alls & Heater!!
     Those of you in the colder parts of the country are probably thinking "what a woos!" but hey, when it goes below 40 degrees at night and the shop is just a tad above that when I start work in the morning it's time to change my ways!  See that propane heater in the corner?  Just right to take the chill off and then add my heavy weight Carhart's and I'm good to go!  Diane caught me marking off a piece of Curly Maple I just bought for a custom ordered box but I had some work I was half way into on the Star Jasmine table so had to multi-task for a while today.
     The last thing I completed on the table was to laminate the top pieces and add the piece along the edges to thicken the over-all appearance.  Since it's 16 1/2" wide it was too wide to fit into the tablesaw sled so I had to improvise.  It's always a hassle to cut wide pieces on the table saw and I might have been better off with a handsaw and router guided by a straight edge but here's what I did.  A piece of wood was screwed to the miter gauge and then I clamped the top to it.

Squaring and Cutting Top to Length
     I started the saw and then raised the blade to begin the cut.  It worked alright, I just couldn't see making a larger panel cutter for two cuts but everything turned out almost square.  I plan to make the over-all shape of the top a very slight ellipse.  I want the ends to be about an inch narrower than the center of the top.  Since the length of the top is about 52" it will be barely noticeable but still add some interest to it.  I almost began laying out the curves when I realized the tongue for the bread board ends needs to be cut square to the edges.  Much easier to do that now then when it's square then after the ellipse has been formed.


Routing the Tongue
     This turned out to be a chicken and egg situation, in other words, what came first?  The tongue will be 3/8" thick and 1 1/4" wide.  By clamping a straight edge across the top and then making a series of cuts with a router it was cut on both ends.  Here's the dilemma, the top hasn't been surfaced yet and the breadboard end isn't made either.  I decided to leave the tongue a good 1/16" thicker than needed so I can work it with a rabbet plane to achieve the best possible fit.  It really is in keeping with my philosophy of letting the machines do the bulk of the work and then using hand tools for the final fitting.  Once the top is surfaced the mortise can be cut into the breadboard piece and fitted to the  top.


     In case you're wondering, by afternoon the temperature in the shop is a comfortably in the lower 60's.  Only need the heat for a short time in the morning!


Friday, November 9, 2012

Bread Board End Part 2

   
     First of all, it was pointed out that I really gave some inaccurate information on the first bread board end post regarding the peg and the holes.  I wasn't clear enough in stating that the experimental part was to see how the top would look having a breadboard end of 1 1/4" thickness while the main table top is only 3/4" in thickness.  The plan is to laminate a piece to the underside of the top at the edges only to make it appear to be thicker.  Here's the final result of the experiment.  I like it but will probably use more of a taper and Ebony for the pegs.


Experimental Top
     If you read the comment on the previous post it was pointed out how this really isn't a bread board end nor will it function as one.  A true bread board end would have a dowel at the center and also one at both ends.  The center hole would not be elongated since this is where the bread board is anchored.  The holes at the ends would be elongated to allow the table top to expand/contract within the bread board depending on the seasons.  Hope that clarifies things.  The purpose of this was to see how the bottom taper would work and that came out alright.
     The first step was to lay it out.  This was a matter of extending the lines and drawing a 45 degree line at the corners.

Lay Out, Notice How the Edge is Built Up
      As always, the first cuts are across the grain, this was done with a block plane.

Beginning of Taper

     The way to gauge your progress is to watch what happens at the corners.  You should see your angled cut go from the inside to the outer corner.  I've tried to illustrate that here with the chalk.

Tapers Aligning at Corners
     It seems to me that this will work on the full size table.  I'm thinking that Ebony will be a better choice for the peg, more contrast and decorative value in my opinion.  The response to my previous blog suggested draw boring the center peg to counter eventual shrinking of the breadboard end across the width and that's a point well taken.
     Again, sorry about the confusion on the previous post regarding the bread board design.  Once the table project gets under way I'll clarify that again.

Wednesday, November 7, 2012

Bread Board End Experiment


Things Get Messy & Cluttered
     Seems like most woodworkers I know tell me they'd like to have a bit more shop space and I agree whole heartedly.  Although that would probably mean I'd have a bigger mess to clean up but at times it sure would be nice to have more horizontal surface to put stuff on!  That's my bench after a couple hours of working out the ends for the table I'm planning to build.  It will be a sofa table and made of Sapele.  I'm wanting to incorporate some carving into it so have also been experimenting with that as well.  It's not quite ready for human consumption but I'll share it when it is.  The design is based on the Star Jasmine flower.  We have one in the back yard and it puts out a very small, spiraled flower that is serving as my inspiration for the design.  Almost ready to show the carving idea so be patient!
     The table will be about 16" wide and just short of 6' in length.  My plan is to have the sides ever so slightly curved for some visual interest.  It'll be a very elongated oval.  The Sapele I have is 4/4 so to add some weight to it I will laminate a 5/16" thick piece to the edges so I can have a top of about 1 1/4" thick.  Here's the experimental piece; glued, clamped, and ready to go.

Clamped Up

     The next step is to plane a taper on the sides to add that visual interest I want.  Arbitrarily I decided to come down from the top an inch and also in an inch from the side.  Now that you see this let me explain the reason for  making an experimental piece first.  The purpose of a bread board end is to conceal the end grain of the wood and also helps keep the table top flat.  I don't want to laminate a length of end grain wood all the way across the 16" width of the table, only the edges like in this picture.  I need to see how this will all work so the experimental piece is a good way to go about that.

Bottom Taper Laid Out (Also the Tenon)

     After laying them out the next step was to plane them to the line and level the entire length of the piece.  Easy enough on an 8" section, the 6' or so table will be a little more challenging!

Taper Planed and Checked
          A piece of 1 1/4" thick will be used for the breadboard end.  Lay out is done with the marking gauge after the groove was cut with a hollow chisel mortiser.  Sure, could have done it entirely by hand but since I have the machine I'll always let it do the "grunt work".

Lay Out Complete 
     Usually, the groove would be pretty much centered in the breadboard end but not in this instance.  The pieces laminated to the edge of the top will give the illusion of a thicker top so I'll need to mimic that at the ends.  The tongue for a breadboard should be about 1/3 the thickness of the top, that's about 3/8" for a 1 1/4" top.  I used the combination of a tablesaw to rough out the tenon then a rabbet block plane to bring it to size.

Breadboard Tongue Complete

     Keep in mind that this is a very short, experimental piece.  In practice the tongue would not be full width the entire length.  Usually only the center 2" or so and the same space at the ends will be 3/4".  The remainder could be half of that.  The purpose of this joint is to allow the boards that make up the table top free movement with humidity changes.  It is pinned or screwed and only glued at the center.  This way the boards can expand and contract without splitting apart.
     I made a 5/16" dowel out of a piece of Maple and located it in the center of the board.  Here I'm setting up the drill press so the dowel will go into the bottom of the breadboard end but not completely through.

Adjusting Depth for Dowel

     I think it's wise to clamp the breadboard end so that it is tight up against the shoulder of the table top when you drill it.  Pretty easy on this experimental piece but when you do an actual table top it calls for some creative clamping.  An alternative is to use a hand held drill.

Drilling Dowel Hole

     Before assembly, the dowel hole needs to be elongated in the tongue to allow for that movement I mentioned earlier.  A round file works best for that.

Elongating the Hole

     To assemble this joint you only apply a small amount of glue to the center of the tongue.  With an actual table top you would also have a dowel at both ends.  Glue is applied to the dowel but not too much.  It is important though to have glue in the bottom hole so the dowel is secure.  It's not unheard of to put a coat of wax on the tongue itself just to be sure no glue holds it to the top and prevents that movement.  Honestly though, here in the desert seasonal changes are not a huge concern -- things are pretty dry all of the time.  It's still important to plan for it in your design process.  The dining table I made of Canarywood has seasonal movement.  I can tell because the ends of the table and breadboard are only flush about half of the year, the other half the boards shrink across the width and they are no longer flush.
     At this point, things are clamped together and we're waiting till morning to see how they look.  Again, clamp the pieces together to get the breadboard end tight to the table top.  I'm anxious to see how the planing will go as I  match the edge profile to the breadboard end.  I also want to finish this piece to see if the Maple dowel will compliment the Sapele.  I'll probably peg the tenons on the apron to continue that design element.  Let you know tomorrow how things work out!

Assembled

Wednesday, October 31, 2012

What Really Matters IMHO

   
 Those of you that follow my blog will recall the series of them that dealt with this custom project:

Pandemic Game Box

    It was a total internet communication process to design and create this for my client who wanted it for an anniversary present.  Being able to be creative and design things for others brings me lots of joy and satisfaction.  It's the process that excites me and then when I get a response like this:


I got the box today! I absolutely love it. It's better than I even imagined. The board and petri dishes fit perfectly! We are going to Mammoth Caves in Kentucky for our 1st anniversary, I don't think I'm going to be able to wait till the actual day to give it to him. I want to take the game to Kentucky in the new box.

Thank you.
Danielle


Well, that's just the icing on the cake!!


Monday, October 29, 2012

Re-Handling a Marples Chisel


Top or Bottom -- What's Your Choice?

     Several blogs back I mentioned that I've sold some of my Marples carving chisels for the simple reason I just don't care for the blue, plastic handles.  Not only does it cheapen them (IMHO) but they just don't feel good when you work with them.  The 2 chisels that didn't sell were a double bevel, angled skew and also an #8 gouge.  Decided to keep them and once I figured out how to remove the handles it was on to the next phase.

Carving Chisels
     From the outer appearance I assumed these were socket type chisels and handles but as you can see, that's not the case.  The chisels have a large, tapered tang that has a squared section for the first 1/2" or so from the handle. To remove the handles I placed the chisel between a couple of scraps of wood in a vise.  A pair of vise grips firmly locked on the plastic handle combined with some twisting and pulling got the off.  The first one I did a hacksaw was used to cut off some of the plastic but don't feel that's necessary.
     Looking through my pile of leftover exotic scraps I found this piece of Canarywood.  The first step was to locate the center and then drill two holes.  The first one was sized to fit and squared area of the tang while the second was slightly smaller to accommodate the tapered section.


Ready to be Re-Assembled
 

     I have a piece of leather so decided to use that between the chisel and the handle to cushion the shock.  Even that looks better than the white pieces of plastic Marples used.  There is a hole drilled in the leather first and then it was roughly cut out.  This chisel will be used as a utility chisel at the bench or on a job so having that piece of leather there will act as a bolster between the handle and the steel of the chisel.


Epoxied in Place
   

         Now to put it all together.  For sure I couldn't place either end on a bench and beat the handle on with a mallet so here's what I did.  A couple of scrap pieces of wood were places on either side of the blade which was then clamped in a vise.  The epoxy was put in the hole, things were lined up and then a couple of tabs with a mallet set the handle in place.


          Here's how that looks once the epoxy is set.

Ready for Shaping

       This particular chisel is a 3/8" wide bench chisel.  This was the experimental on so I didn't pay as much attention to the shape of the handle as I should have.  For the carving ones I'll definitely make a pattern and be a bit more exact.  The nice thing about building any of your own tools is that you can form them to fit your hand exactly.
     The first step was to locate the centers of the chisel and lay them on the wood.  This was done with a black sharpie which doesn't give a very precise line but I wanted it to show up for this blog.

Preliminary Layout 

     What the plan was it to cut one side then use the cut off piece to transfer the shape to the opposite side.

Transferring Curve
     Just as with any other bandsaw work where you're essentially sculpting the wood, the scrap pieces are taped on temporarily so you have a stable surface when cutting the other side.

Cut-Offs Reattached
     To shape the handle I employed several different tools the main one being spokeshaves.  That leather bolster proved to be valuable for more than just bolstering!  The part of the handle closest to the blade was too small to get the spokeshave in.  Besides, I didn't want to run the spokeshave blade into the metal of the chisel.  Here's where that leather helped:

Trimming by the Metal
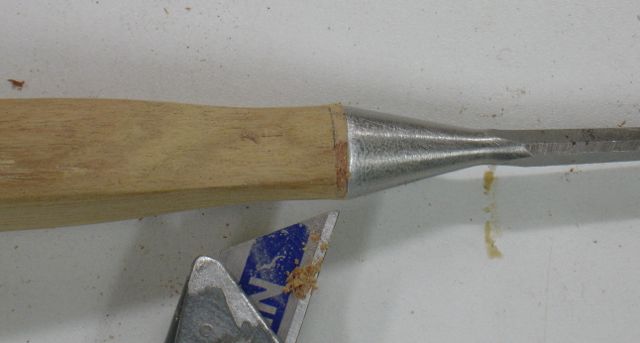
     I used a carving knife and carefully pared away the wood being carful to stop at the leather.  This left a slight bit of leather that still needed to be removed and a utility knife took care of that.  Didn't mind dulling its replaceable blade against the chisel.

Final Trimming of the Bolster

     Sanding and working the wood until it felt good in my hands is all that's left.  I'll put a couple coats of the 3 part top coat mix I use and it'll be a great little chisel.  Next up, well there's a list in my head so I'll just keep checking things off as they go.

Saturday, October 27, 2012

A Dutchman for a Dutch Man!

   
     My uncle, who's Dutch like me, will be celebrating his ninetieth birthday next month and there is a luncheon planned in his honor.  Anyone who can survive ninety years deserves to be honored!  Well, this presented somewhat of a problem because after all, what do you possibly get for someone when they've spent nine decades here on this earth?  After all, I've only done six+ of them and my favorite gifts seem to be gift certificates to tool places.  A passion of his has always been music, he's been involved with it for all the time that I can remember so that seemed to be the perfect starting point.
     I recently bought some Sapele and plan to  eventually make a sofa table from it.  It seems similar to African Mahogany with a very pronounced ribbon grain.  Since I'd like to incorporate some carving in the table I thought this would be the perfect opportunity to see how this wood works.  Here's the motif chosen for the pencil box I'm making for my uncle.  By the way, I'm swearing any of my relatives to secrecy on this project -- please don't tell him about it.


     What could be more appropriate for a life long musician than the treble clef.  Here it's in the early stages of carving but in spite of the interlocked grain I feel like it's coming along okay.  The box itself  will have a sliding top and dovetailed corners.  Always up for a challenge and this wood proved to be just that.  The back of the box was pretty straight forward and my goal was to make as small of tails as possible.  Not only is the grain interlocked but it also has the tendency of wanting to split as you pare off the ends.  So far, so good.
     When I got to the front of the box I started with a half pin but the remainder of the box had remain intact to house the groove the lid would eventually slide into.  Well, you can see there is a bit of a gap above the middle pin.

Whoops!

     Good time to follow my heritage and create that Dutchman to fill the gap.  The story I've always heard is that this term came about because the Dutch are frugal and thrifty people, that sounds so much better than cheap!  Rather than tossing the entire board which would be wasteful, a sliver is glued in to take up the slack.  It's best to do this from a cut off of the board so that the match is as close as possible. You could use a hand saw to cut this sliver but I used the tablesaw instead.

Beginning of the Dutchman

     Use a push stick and don't cut all of the way through cut off piece.  If you're lucky you'll only need to do this once.  Prior to fitting it into the gap I use a bit of sandpaper to taper the end.  Always pay attention to the grain direction, it needs to match the joint.

Dutchman Glued In

     For these boxes my preference is to use Liquid Hide Glue, it has a pretty long open time and cleans up well.  Once the glue was dried, a zero-set saw was used to cut it flush.

Dutchman Trimmed Flush

     This was followed by careful planing with my block plane.  I've put a slight camber on this blade but even with the low cutting angle of the block plane the Sapele wants to splinter if you plane off the edge.  Very important to not only plane from the outside in but also pick up the plane without dragging it back over the edge.  The plane did a great job cleaning up the dovetails.

Upper Left Pin Remains
      Here you can see the results of careful planing.  The wood takes on a different appearance, obviously the pin on the upper left remains to be planed flush.  With the interlocking grain of this wood, even a smooth plane set for a super fine cut creates a bit of tear out.  Before doing the final work I'll need to experiment to see what the best way to finish the surface will be, it may call for a cabinet or card scraper with a very small burr.
     By the way, this is the first project I was able to use the new marking gauge that I made.  Beautiful, thin line that was easy to work to.  The sides for this box were resawn from a piece of 4/4 Sapele, here's how that line looked.  I always scribe the line from both sides and then bandsaw between them.

Scribed Prior to Re-Sawing

Tuesday, October 23, 2012

Pandemic Box headed to Michigan

   
     Well, it's time to wrap up another project and as is the case with most of them it brings mixed emotions!  This one was particularly interesting because it was something I'd never heard of and all of the communication was done via the internet.  I'm really pleased with how it turned out and hope it meets all of the requirements my client has.  She's been watching the process of the construction via my blog so she knows how things are looking.
     Here's a view of the box completed with the hardware attached.
Completed Project

     When you open the box, there is a compartment underneath where the game board will be stored, notice the pieces on the inside of the lid?  Those will close against the game board and keep the lower section intact.

Inner Panel, Game board Area

     You remove this inner panel with the finger hole in the middle to access the storage area for all of the cards.  The section in the middle is for 6 petri dishes that are used to hold the game pieces.

Box Interior

     The final stages of a project is where sometimes things can go wrong so there's always a bit of stress.  This is most common when installing the hinges.  I use a router and template to get them almost sized but the final fitting is done by scribing and chiseling to the exact size.  I recently had a student and we discussed why a marking knife is a much better choice than a pencil for this step.

Scribing Hinge Mortise
     When you have a scribed line it's better because you can set the edge of your chisel in that line.  Your chance of success is much better with a scribed line then with a pencil line.  Well, it's time to change the blade on the tablesaw and cut some foam pieces to protect the box on it's way to its new home in Michigan.